Thursday, December 31, 2009

Christmas Countdown Crafts

Posted by Lori:
I realize Christmas is over, but I wanted to go ahead and post these two ideas for Christmas countdowns, so that those who might be interested would have them for next year. By the time I thought to take pictures of them, it was too late for this year, anyway.

This first countdown was made by Mom. She made Kimberly and I both one.  It's the first thing my children did when they wake up each morning from December 1 until the 25th - move the little gingerbread man from the bottom, up, counting down the days until Christmas.

This countdown is made out of felt.  Mom sewed some of it and used hot glue for some of it.  There is a small gingerbread man attached to the long ribbon, which is used for the countdown.

This countdown was made by my mother-in-law when my oldest three children were little.  It's a storage box.  You may can find them at hardware stores, but I'm not sure.  I found some online by searching for "25 drawer storage containers".

Each box contains a strip of construction paper cut in a long "U" shape to fit arount the drawer.  And then, of course, the numbers are painted on the outside of each drawer.  My mother-in-law put little Christmas-themed items in each box...one for each child.  Some of the items were small wrapped candies, mini ornaments, mini decorations.  We used this countdown for many years.  I saved some of the mini items from her original things, but added new candy each year.

Maybe this will inspire you to create a Christmas countdown for next year!
Pin It Now!

Wednesday, December 30, 2009

Cinnamon Rolls

Posted by Lori:
I don't make cinnamon rolls often throughout the year, but every Christmas Eve I do. I shared with you an easy recipe using Rhoades' brand cinnamon rolls before, but this recipe uses the actual rolls. Of course, you could use your favorite bread recipe instead, but this is a quick and easy way to make them. This recipe is a variation of my father-in-law's recipe, who I've mentioned is a great cinnamon-roll maker! NOTE: Be sure to read at the end my son's variation to this recipe.

Cinnamon Rolls
1 package 36 count Rhoades Rolls (or other frozen bread dough)

Thaw rolls on greased pan. (I used my Doughmaker's 13 x 18.5 inch pan, but you could use two 9 x 13 cake pans.) Allow to thaw and rise a little. To speed up this process, place pan in warm oven - a little below the "warm" setting or about 120-140 degrees. On floured surface, combine rolls into ball. Roll out into approximately 34 x 16 inch triangle.

Cinnamon-Sugar Filling:
1 cup butter
1 1/2 cup packed brown sugar
1 teaspoon cinnamon (you may prefer more cinnamon)

In small, microwave-safe bowl, melt butter. Stir in brown sugar and cinnamon. Pour out onto dough and spread evenly across entire rectangle. Roll up tightly from long side. Slice into approximately one inch pieces.

Glaze:
1 stick butter or margarine
1/2 cup shortening
2/3 cup sugar
1/3 cup water

In small saucepan, bring ingredients to a boil. Cool. Pour in bottom of greased 13 x 18.5 inch pan (or the two cake pans as above). Place cut rolls on top of glaze. Allow to rise 2 hours or until doubled (can use speedy method in low-warm oven). Bake rolls in preheated 350 degree oven for 25 minutes or until browned. If desired, turn cinnamon rolls out onto another pan(s) or onto large piece of aluminum foil. This is to allow the glazed part to be on top. Cool slightly before icing.

Icing:
2 cups powdered sugar
1/4 cup milk
1 Tablespoon vanilla

Mix together in small bowl. Spread over hot cinnamon rolls.

My son, Zachary, made these rolls a few days ago. He liked my version okay, but wanted them a little stronger in taste....more like my father-in-law's. He doubled the cinnamon-sugar filling (used almost all of it) and also doubled the glaze. They were great, too! Half of our family liked his better - half liked mine better. If you like a stronger cinnamon taste and a gooey-er cinnamon roll, then use his version. If not, use mine. Either way, you'll be pleased with the results!
Pin It Now!

Tuesday, December 29, 2009

Earthquake Cake

Posted by Lori:
This cake won't ever win the "Prettiest Cake" contest, but looks are sure deceiving! We've made this cake for 20 years. I remember that my husband first made it when he was a cafeteria manager at Tipton Home (a children's home). The children and staff always liked it when he made it. He had to not only double it at that time, but make it times SIX in a huge pan!

Nowadays when we make it, it's just in a typical 9 x 13 inch cake pan, but it's still enjoyed by many.

Earthquake Cake
1 cup chopped pecans
1 cup coconut
1 German Chocolate cake mix (plus eggs and oil or water per package directions)
1 stick butter or margarine
8 ounce package cream cheese, softened
1 teaspoon vanilla
3 1/2 cups powdered sugar

Spray or grease the bottom of a 9 x 13 inch cake pan. Sprinkle pecans and coconut all across the bottom of the greased pan. Mix cake as directed on box and spread over pecans and coconut. Beat butter or margarine and cream cheese, vanilla, and powdered sugar and spoon (dollop) over the top of the cake. Bake at 350 degrees for 50 minutes or until done.
Pin It Now!

Sunday, December 27, 2009

Apple Turnovers


Posted by Donna:

I'm anxious to share this recipe with you. One of the men from our congregation has been bringing this special dessert to our fellowship meals for years. Everyone loves it. I decided last week to make it as one of my desserts for our Christmas family get-together yesterday. I must say it was a big hit.

2 sticks butter (do not substitute margarine)

2 medium apples ( I used Granny Smith)

1-1/3 cup white sugar

1 tsp. cinnamon

2 pkg. (8 count) crescent rolls

1 (8 oz.) can of Mountain Dew

Peel and core each apple and divide into 8 pieces. Roll each piece into a crescent roll and place in a large baking dish.

Melt the butter on top of the stove; then add the sugar and cinnamon mixture. Bring to a rolling boil and spoon it over the rolls. Be sure and don't pour it on top of the rolls. I used a ladle to spoon mine on top of the turnovers.

Pour the Mountain Dew around the turnovers---not on top of them. If you pour it on top of the turnovers, the sugar/cinnamon/butter mixture will come off of them. Bake in a preheated 375 degree oven for 35-40 minutes.

My sons-in-law and grandson absolutely loved these. I do, too-----and you will, too when you make them.

Enjoy!!!!!

Pin It Now!

Friday, December 25, 2009

Brown Sugar Brownies

Posted by Lori:
This is a simple recipe using your favorite brownie mix. My friend, Jackie, uses a fudge brownie mix and doesn't really measure her ingredients, but my sister-in-law, Michelle, knew exactly the right measurements and sent them to me. Though I've not made these myself, I've eaten them and they are great!

Brown Sugar Brownies
Brownie Mix
1/4 cup margarine
1 cup brown sugar

Mix brownies per package directions. Melt margarine and mix with brown sugar. Spread over brownie batter and bake per package directions.
Pin It Now!

Merry Christmas!

We wish you a very Merry Christmas!
From the
Pin It Now!

Tuesday, December 22, 2009

Cracker Candy

Posted by Lori:

Note: I made this recipe today and it was great, but mine didn't set up - although it still tastes great. It could be my stove (ancient!) and not cooking hot enough. One tip I found online said to cook the mixture to soft boil stage...other things said 3 minutes of boiling. (I'll do 3 minutes next time and test to soft ball stage.)

Yesterday while shopping in Oklahoma City, my daughter and I went into one of my favorite stores - Williams Sonoma. For some reason, as soon as we walked in there, I thought of a recipe I had made when my husband and I first married. It was a praline type of saltine cracker. I really liked them and have had them a few times since, but haven't made them except for that one time.

Last night when we got home I got a Facebook message from a friend with a recipe she wanted me to try. It was for a praline-type cracker, but also had chocolate - YUM! I'm going to make these this week.

Cracker Candy
Saltine crackers (enough to lay flat in a 9 x 13)
1 cup butter
1 cup brown sugar
1 regular size bag of chocolate chips

Line baking dish with foil and spray with non stíck cooking spray. Place saltines flat in bottom of pan making sure they don't overlap. Break some in half to fill edges if needed. Place butter and brown sugar in saucepan and bring to a boil. Boil mixture for 2 mintues. Pour on top of saltine crackers and spread if necessary making sure all crackers are covered. Bake at 350 for 5 minutes. Remove from oven and sprinkle entire bag of choclate chips on top. Let them sit and melt for a little while. Once mostly melted spread chocolate so that it covers the top. Let cool until entirely cool or place in freezer to speed the process. Once cooled, break into pieces and enjoy:-)

Thanks for the recipe, Renee!
Pin It Now!

Monday, December 21, 2009

Candied Yams

Posted by Donna:

This is a favorite sidedish that I'm sure we all love to make at Christmas and Thanksgiving. I also know we all have our standard recipe that we use; but, I decided to post this anyway just in case there are some first-timers making the family Christmas dinner. This can be adjusted to the number being served. I'm posting what I usually do that will serve at least 12-13 people.

Peel 8-10 sweet potatoes. Put the whole potatoes in a large sauce pan and cook until tender---not mushy. Drain the water off the potatoes and let them cool. Once they have cooled down, slice the potatoes in half. Because the potatoes are usually large, I cut the halves into as well.

The next step I either do one of two different ways.

Put the potato wedges in a glass baking dish. Sprinkle the wedges with brown sugar and then add dollops of butter on top. Bake the sweet potatoes about 20-25 minutes at 350 degrees. Take the potatoes out and add mini-marshmallows on top and return to oven. Let the marshmallows brown on top.

The other way is to melt the butter on top of the stove; then add the brown sugar to the butter. Cook until well blended. Pour this on top of the sweet potatoes. Bake the same as above and also add the marshmallows. To me, this is the fastest way. They taste the same--it's just a matter of time.

I know I didn't put down the amount of butter/margarine to use. I never measure the amounts. I'm sure I use at least 3/4 cup melted butter. Add enough brown sugar so the sauce will be slightly thick. Again, this is a personal preference as to how much sugar you want to add.


I do want to wish everyone a very, Merry Christmas!!!!!!


Pin It Now!

Sunday, December 20, 2009

Cake Mix Cookies

Posted by Lori:
Christmas cookies are fun to make, but they don't have to be difficult. Using a cake mix, you can whip up a batch of semi-homemade cookies in no time! And an added benefit is that the possibilities are endless of flavors to choose from.

2 eggs
1 package cake mix (desired flavor)
1/2 cup vegetable oil

Mix together cake mix, eggs and oil in a large bowl. Make little balls with the dough and set on ungreased cookie sheets. Bake at 350 degrees for 7 - 10 minutes.

Try rolling the balls in powdered sugar or a cinnamon/sugar mixture before baking. My family's favorite is using a chocolate cake mix and rolling the balls in powdered sugar.

Happy baking!

Pin It Now!

Saturday, December 19, 2009

Red Hot Apple Cider

Posted by Lori:
Red Hot Apple Cider is a favorite around here during the holidays.
Although the bought mixes are good, too, this recipe is simple and inexpensive.

Red Hot Apple Cider

1 quart apple cider or juice
1/4 cup Red Hot candies

Slowly melt candies in juice, stirring occasionally to prevent sticking. Serve and enjoy!
Pin It Now!

Thursday, December 17, 2009

Bayrum and Glycerin Lotion

Posted by Donna:

A few weeks back, I posted a homemade hand cream for women and mentioned another homemade lotion that would be posted later. This is especially good for men who have dry, rough hands. Both lotions would be great stocking stuffers for Christmas.

I'm going to write this verbatim from how my grandmother, Crystal Nell, wrote down the story about this particular hand lotion. It's quite a cute story.


BAYRUM AND GLYCERIN HAND LOTION HISTORY
by Crystal Nell

" This lotion dates back to the early 1900's. A doctor's wife gave the recipe to my mother. There is a little story to this that might be of interest to you. In 1919 before Bryan and I married in 1920, I wanted Bryan to eat dinner at my home. He wouldn't because he had been picking cotton and his hands were all chapped and red; so I told him about bayrum and glycerin lotion. He began using it, and a lot of other cotton pickers did also. Ben Brown, who used to work in the drug store at Hollis, told me that my daughters had encouraged a lot of other girls to start using it. I still use it as a powder base on my face."

I told you it was a cute story. This lotion has quite a history in my family. I remember how some of us kids would put the lotion on our hands, then lick it off. It probably wasn't as good for our "insides" like it was our "outsides!!!!!!"

To make the lotion you need: 2 ounces glycerin and 2 ounces bay rum (Mix the two ingredients together.) You can purchase the glycerin over the counter, but the bay rum will have to be purchased from the pharmacy. The bay rum is a little pricey. I buy both items from Wal-Mart. Usually the pharmacy has the bay rum on hand; but, they will order it for you if they're out of it. I store my lotion in a plastic travel bottle that is available at Wal-Mart. I think I was able to fill two or three small bottles. The last time I made this, my brother wanted to take some home with him. He had fond memories of it, also.

Before ending my post today, I want to share a short story with you that I received via the Hollis Church Bulletin this week. I posted it on my refrigerator to read every day. It's a great reminder to daily look for opportunities to do a kind deed. By doing so, it keeps our minds off of ourselves and also keeps away pity-parties.


UNEXPECTED REWARD

I recall that when I was a small boy, mother gave me a bouquet of Lilies-of-the-Valley and directed me to take them down the street to a neighbor who was ill. When I returned, she said, "Smell your hands." I sniffed, and to my childish delight, I found that my hands still bore the delicate odor of the flowers. Then my mother said something I shall never forget. "Flowers always leave some of their fragrance on the hands of the giver." Life itself is like that. Every good deed or action towards someone else is bound to leave us a sweeter person.
Pin It Now!

Salt Dough Ornaments


Posted by Lori:
This cute little Santa was made from salt dough, then painted using acrylic paints and slick paints.  It was made by my youngest son, Tyler.  The handprint shape was made using a handprint cookie cutter.  Be sure to make the hole in the top before the dough dries.

Salt Dough
2 cups of plain flour (I used a little bit of whole wheat flour to give it a darker look - maybe 1/2 cup)
1 cup table salt
1 cup water
1 Tablespoon vegetable oil

In medium mixing bowl, combine flour and salt.  Mix well.  Add oil and water, mixing into a soft dough.  Add a little more flour if it seems too sticky or a little more water if too dry.  Remove from bowl and knead for 10 minutes.  Roll out onto lightly floured surface to about 1/2 inch thick.  Cut with cookie cutters or form into desired shapes. Poke hole in top if wanting to hang after drying. Transfer to baking sheet or cooling rack.  Allow to air dry for a day or two.  To speed up drying, place in warm oven for a few hours.  Paint ornaments as desired.

Note:  Tyler also recently wrote his own recipe in his 1st grade class about how to cook a turkey.  To see this recipe, click here.
Pin It Now!

Wednesday, December 16, 2009

Oreo Lime Dessert

Posted by Lori:
This recipe is my mother-in-law's. She makes this every year at Christmas for my husband's side of the family. And, if she didn't, she'd be in BIG trouble by her 17 grandchildren and most of her six children and in-laws!

Oreo Lime Dessert
1 package Oreos (not Double-Stuff. Save those to eat!)
1 12 ounce can evaporated milk
1 3 oz. package lime jello
1/2 cup margarine
1/2 cup boiling water
1 cup sugar
1/4 cup lemon juice
Green food coloring (a few drops)

Chill can of evaporated milk in refrigerator overnight (or in the freezer for 3 or 4 hours)

In medium bowl, blend jello and boiling water. Add green food coloring. Add lemon juice and sugar, mixing well. Place mixture in refrigerator and let chill until set.

Crush Oreos (in blender or food processor)and place in medium bowl. Add margarine and mix well. Pat Oreo mixture into 9 x 13 inch casserole dish, reserving 1/2 cup of crumbs for topping.

In medium bowl, pour chilled evaporated milk and beat with electric mixer until thick. Add jello mixture to evaporated milk and whip together until blended. Pour over Oreo crumb crust and chill. Before serving, top with remaining crushed Oreos.
Pin It Now!

Monday, December 14, 2009

Sour Cream Mashed Potatoes

Posted by Lori:
I like the flavor of sour cream in recipes, so yesterday I decided to add some to our mashed potatoes. Because two of our children don't like sour cream, I didn't tell them until AFTER dinner.

Sour Cream Mashed Potatoes
6 large potatoes, peeled and cubed
1/2 cup (1 stick) butter
1/2 cup sour cream
1 cup milk
1 1/2 teaspoon salt
1/4 teaspoon pepper

Place cubed potatoes in large pot. Cover with water and cook on medium-high heat until potatoes are tender. Drain off water. In same pot or in large mixing bowl, beat potatoes until no large chunks remain. Add remaining ingredients and beat until smooth and creamy. Serve immediately or place in crock pot to keep warm. Potatoes can also be covered with plastic wrap, placed in the refrigerator, and reheated later on with meal.

The kids kept eating and eating the potatoes, then I told them my little secret! The two non-sour-cream-likers were kind of surprised, but agreed that it made the potatoes extra creamy and flavorful. We all liked the added ingredient, actually.
Pin It Now!

Sunday, December 13, 2009

Sour Cream Strawberry Jello Salad

laPosted by Donna:

This is another "go-to" jello salad I make when needed for pot lucks or funeral meals.

1 pkg. strawberry jello
1 cup hot water
1 small can crushed pineapple
1 pkg. frozen strawberries, thawed
1 pt. sour cream

Dissolve the jello in hot water and mix with the crushed pineapple. Pour half of this mixture into an oblong dish, place in the refrigerator and let gel. Afterwards, spread the sour cream on top. Pour the remaining jello on top of it and refrigerate until firm. Sliced bananas can be added to the jello mixture, if preferred.


Pin It Now!

Saturday, December 12, 2009

Cinnamon Applesauce Ornaments

Posted by Lori:


After my husband and I had been married for a year and a half, I was ready to make our Christmas tree more special and give it a "homemade" feel. I made lots of Cinnamon Applesauce Ornaments. Many of them have broken, but we still have three of those ornaments from 1989 on our tree. Our children always think that is neat that they are so old! (Funny - to me, 1989 doesn't sound that long ago - does it to you???)

This year our two youngest boys were home and the older two were gone. They wanted to do something fun and I suggested making this ornaments. It was smelly and messy and gooey - perfect for two little boys!


Cinnamon Applesauce Ornaments
1 1/2 cup cinnamon
1 1/2 cup applesauce
1 T. Glue

In small to medium bowl, mix ingredients all together and form a ball.  (Can add a little more glue if needed).  Roll out dough on waxed paper to 1/4" to 1/2" thickness.  Cut out with cookie cutter shapes.  Using straw or small dowel stick, make hole in top of ornament.  Place ornaments on parchment lined cookie sheet.  Bake at 150 for 2-3 hours.  Allow to cool.  Thicker ornaments may need to air dry a little more.  Paint with acrylic paints or puff/slick paint.  Allow paint to dry.  Tie with ribbon to hang on tree.


Variations:  Add more spices, such as nutmeg or cloves.  Spray with sealer to make them shiny and preserve them more.  Use as place card holders for Christmas parties.  Use as tags for Christmas presents.  If using a gingerbread man, poke holes in his hands and tie several in a row to make a garland.  Make real-looking cookies to set out on a tray...just leave off the ornament hole, but continue the other directions.

If you look closely at my boys' ornaments, you'll see some "unique" gingerbread men.  The youngest put big stars and hearts on his.  The other one made his more "offical" gingerbread-man-looking.  I look forward to having these ornaments for many, many years.  Then, they'll look back 2009 and think "that wasn't that long ago" and their kids will say, "Wow, those ornaments are OLD!" 

Pin It Now!

Thursday, December 10, 2009

Sausage Dip

Posted by Donna:

This is our favorite dip to serve during the holidays, although it's good anytime of the year.

1 lb. sausage
1 lb. ground beef
1 chopped onion
2 lbs. velveeta cheese

Brown the sausage, beef, and onion together and drain. Melt 2 lbs. velveeta cheese in a crockpot. When melted add meat mixture and the following ingredients.

2 cans mushroom soup
2 cans rotel tomatoes

Cook on low for about 45 minutes before serving.
Pin It Now!

Wednesday, December 9, 2009

Hot Mustard Sandwiches

Posted by Kimberly:

Last Friday I helped co-host a PTA board meeting. The lady who was the "main" host made these incredible sandwiches. Everyone there had a fit over them. My youngest daughter was with me, and she ate at least 3 or 4 of them. I am ashamed to admit how many I had! :) They are easy to make and can be done ahead of time. These can double as an appetizer or a meal.

Hot Mustard Sandwiches

1 package Hawaiian rolls
1/2 lb. shaved ham
1/2 lb. grated Swiss cheese
1 1/2 tsp. minced onion
1 tsp. poppy seeds
1 1/2 tsp. regular yellow mustard
1 1/2 tsp. Worcestershire
1 stick margarine

Assemble sandwiches (bread, meat, cheese). Melt butter and other ingredients. Pour over sandwiches. Refrigerate 2 hours or more. Cover with foil and heat 20 minutes at 350 degrees. These can be frozen.

Let me just warn you.... You will not be able to eat just one!!

Note to Mom: These would be really good to serve when we have our Christmas.
Pin It Now!

Tuesday, December 8, 2009

Praline Pecan Morsels

Posted by Lori:
Every year in December, our county has a pecan show. Because many grow pecans around here, there are lots of entries. The entries can be whole, shelled pecans or baked goods that have pecans as an ingredient.

My kids and I have entered food items from time to time. As 4-H leader, I've been encouraging my 4-H club members to enter something in the show. Trying to be a good example, I figured I should enter something, too. So, I searched for something simple for the contest and found these "Praline Pecan Morsels".

This is a Paula Deen recipe and it turned out great! If you like cinnamon, I think it would also be good to add a little bit of it to the recipe as a variation.

Praline Pecan Morsels

2 cups whole pecans
1/2 cup packed light brown sugar (I used regular)
4 tablespoons heavy (whipping)cream
Cooking spray

Preheat oven to 350 degrees. In a medium bowl combine pecans, brown sugar, and heavy cream. Spread into a square baking pan, sprayed with cooking spray. Bake in the preheated oven for about 20 minutes (mine baked about 30), or until coating is dry, and slightly crystallized, stirring once. Remove from oven to cool and stir once more. If not serving immediately, store in an airtight container.

Pin It Now!

Handprint/Footprint Christmas Canvases

Posted by Lori:

I hope you don't mind if during the Christmas season we post a few "craft" recipes for you.  We enjoy handmade crafts and thought you might, too!

Handprint crafts are so special.  They are special because it is a part of our children's or grandchildren's lives.  The handprints take our minds back to the time when the craft was made and bring back many happy memories.

I remember wanting to make this handprint tree for several years before we actually did it.  I wanted to wait until we knew our family was complete, so waited until baby #4 was born.  Since Tyler was born in December, I waited until the next year to complete the Christmas tree canvas.  At the time this was done, our children were 9, 7, 5, and 1.  They did a great job and even my husband cooperated and made his handprints for the bottom branches.  I'm pretty sure that's his first and last handprint craft!

The red balls on the tree have our names and the children's ages at that time.


That same year, in December of 2003, I had each of our children make their own handprint/footprint canvas.  While I wanted the Christmas tree perfectly shaped, this little reindeer Tyler (age 1) made is very imperfect, but also very special to me.  I remember taking his little hand and dipping it in the paint, then carefully placing his hand on the canvas, only to have him make a fist and smear it a little!  It's sweet, I think, even with the smear!


Jacob's (age 5 at that time) canvas was a footprint snowman.  Recently my boys have done footprint snowmen on gray sleep shirts for Christmas pajamas.  I bought them matching flannel pajama pants.  Our daughter hasn't had time to make hers, yet., but I look forward to taking a picture of them all together in their new pj's!  Jacob used his finger to make the snowflakes.

Zachary (age 7 at the time) made a handprint Santa.  I had him do this one because I knew he was the right age to be able to hold his thumb out and make the Santa hat look right.  To do this Santa, paint red across the child's thumb and the base of the hand.  Paint the palm a light flesh color and the fingers and the tip of the thumb white.  This is a great craft to make for an ornament.  Do painted handprint on a piece of cardstock.  Allow to dry.  Cut around the Santa with decorative scissors, make a hole in the top with a hole punch, tie a string and hang from the tree.


I remember that Lauren was excited to do her handprint/footprint angel mostly by herself.  She wanted to paint the eyes, hair and mouth without any help or suggestions.  At 9 years old, that was perfect for her at that time.  To make the angel, paint the heel flesh colored and the rest of the foot white.  Painted handprints on each side of the footprint make the angel's wings.
I am grateful for handprint/footprint crafts that bring back memories of my children's younger years.  It is a special keepsake and will be for years to come!

What are you grateful for on this Gratituesday?


Pin It Now!

Sunday, December 6, 2009

Mexican Casserole

Posted by Donna:

A few weeks ago, I was in Lubbock for our grandson's program at school. While there, Kimberly made this casserole. It came out of the recipe book that our grandchildren's school published. It has a lot of very good recipes that were submitted by teachers, parents, and grandparents. I really liked the flavor of this recipe. I kept waiting for Kimberly to post it; but since she didn't, I decided to. I fixed this for Larry and me this past week. I think I like it even better warmed up. The original recipe calls for 2 lbs. of ground beef; but, like Kimberly, I used chicken instead. Of course, Larry's first comment was that it was good, but it would have been better if I had used ground beef. Isn't that just like a man????

4 chicken breasts (boiled and shredded)

1 medium onion, chopped

1 (4 oz..) can chopped green chiles

1 can cream of mushroom soup

2 (4 oz.) cans taco sauce

1 (10 oz.) can enchilada sauce

1 can ranch-style beans

1 (16 oz.) pkg. grated sharp cheddar cheese

1 dozen corn tortillas

Heat oven to 375 degrees. Brown the onion and green chiles in a large skillet. Add the soup, taco sauce, enchilada sauce, and beans. Simmer for about 10 minutes. In a lightly greased 13 x 9 casserole dish, layer the tortillas, chicken mixture, and cheese. Repeat layers. Bake for 30 to 45 minutes. I only had to bake mine for 30 minutes.

Instead of the tortillas, 1 pkg. of Doritos can be used.

The original recipe suggested serving it with cornbread and picante sauce. And of course, I always have to have a side of guacamole.

Pin It Now!

Saturday, December 5, 2009

Peppermint Thumbprints

Posted by Lori:
When my husband and I were dating I was staying at his families' house one time. I had a really bad stomach bug and felt horrible. Joe told me that his mom had some peppermint oil up in the medicine cabinet and to go get that and use it - supposedly it would help with stomach ailments. I went to the bathroom and got the peppermint oil and drank some it. Well, I should have asked him exactly how much to take. The next morning I told him it made me even sicker and he asked me how much I took. Then he informed me I should have only tipped it onto my tongue, not actually drank it (a little late, don't you think - ha! ha!)

So, since that time, I've not cared for peppermint AT ALL. And now that I think about it, I don't think Mom and Kimberly do either. I didn't want you peppermint fans to be neglected, so am posting this Peppermint Thumbprints recipe for all of you. If I did like peppermint, I know I would really like these cookies. Why? Because they have cream cheese in them, icing on top, then candy garnish. Maybe I should try them, but just change out the flavoring....to caramel and chocolate :).

Peppermint Thumbprints

8 ounces cream cheese
2 stick butter
1 cup sugar
1/2 teaspoon vanilla
2 cups flour
Peppermint candies (for garnish)

Beat cream cheese, butter, sugar and vanilla with mixer until blended. Add flour and mix well. Refrigerate for several hours. Preheat oven to 350 degrees. Roll into 1 inch balls and place on ungreased cookie sheet. Indent dough with thumb and bake for 12-15 minutes.

Icing:


8 ounces cream cheese, softened
1/4 cup stick butter (real)
1 teaspoon vanilla
1 Tablespoon peppermint extract
4 cups powdered sugar

Beat cream cheese, butter, vanilla, and peppermint with electric mixer. Slowly add powdered sugar and mix until creamy.

Now either spoon icing into indention in cookie or use pastry bag and decorating tips for icing. Garnish with crushed peppermint candy.
Pin It Now!

Thursday, December 3, 2009

Family Memories Christmas Tree Skirt

Posted by Donna:

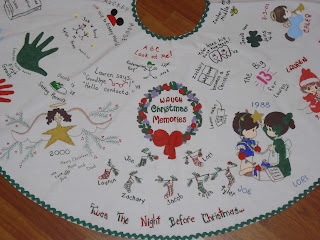
About eleven or twelve years ago, my aunt showed me her tree skirt that she had painted. Each year, she would paint a picture that would depict the major things that had taken place within her immediate family. I just loved it. She had started this before her children were married. It told, through pictures, so many things about her family and the major events that had occured--from marriages to grandchildren being born.

That inspired me to make a tree skirt for both of my girls. I started theirs in 2000. Of course, that year, there wasn't a lot on it. The angel on the left--- which had "Merry Christmas from Mom and Dad---- the wreath that said either Moore Christmas Memories or Waugh Christmas Memories---- the Precious Moments boy and girl showing the date when each daughter married--- a house representing the first family owned home---and the Precious Moments children representing the number each had at the time---were all that I had painted on it. Ten years later the tree skirts are full of so many memories. Hopefully, I can have enough room to continue painting on it for at least ten more years.

After Christmas is over, the girls give me back their tree skirts and I keep them here at the house for "safe keeping." In November, I talk to each daughter and they tell me the special "memories" they want painted on their skirt. It's so much fun to look at the skirts each year and relive the memories. Just a few months ago, Kimberly told me out of everything she has, her Christmas Memories skirt is her most special.

As you can tell, I am not an accomplished artist. These skirts have a very home-made look to them; but, that's what I first loved about my aunt's. Homemade gifts have always been my favorite. If I took away everything in my home that had been given to me, I wouldn't have much left in my house.

To make the skirts, I used a white heavy material. I can't remember if it was broadcloth; but, it was something very similar. I made them with a 52" diameter. After getting the skirt cut out and the slit cut, I took it to a friend of mine and she serged it for me. I glued red rickrack on one and green on the other. I always add a medium to my paints and heat set them after they've dried. Both daughters have taken very good care of the skirts; so, they've stayed very clean.
This has been such a fun thing for me to do for the girls.

I would love to hear about the special projects any of you all do. It's so much fun to get new ideas.


Pin It Now!

Wednesday, December 2, 2009

Creamy Corn Casserole

Posted by Lori:
I've made this recipe several times for church fellowship dinners. As I was flipping through my recipes tonight, and because it's soooooo cold outside right now, I thought this sounded good...and WARM!

Creamy Corn Casserole

1 cup butter, melted
4 eggs, beaten
2 (8.5 ounce) packages dry corn bread mix (I like Jiffy)
2 (15 ounce) cans whole kernel corn, drained
2 (14.75 ounce) cans creamed-style corn
2 cups sour cream

Preheat oven to 350 degrees. Lightly grease a 9 x 13 inch casserole dish. In a medium bowl, combine butter, eggs, corn bread mix, whole and creamed corn and sour cream. Spoon mixture into prepared dish. Bake for 45 minutes or until golden brown on top.
Pin It Now!

Tuesday, December 1, 2009

Italian Crostini


Posted by Kimberly:

One of my favorite things to eat during the holidays is finger foods. It takes me back to past Christmas Eves when I was in junior high and high school. It was always our tradition after my sister and her husband were married to have finger foods on Christmas Eve night, open presents, and play games. What good times and great memories...... This recipe is a delicious finger food that is perfect for holiday parties or any gathering.

Italian Crostini

1 lb. sausage
1 tbsp. Italian seasoning
1/2 stick butter
2 tbsp. flour
1 cup Parmesan cheese
milk or half & half
baguettes

Brown sausage and seasoning together. In a separate pan, make a white sauce using butter and flour. Add enough milk or half & half to make a thin gravy consistency. Pour sausage into white sauce and add one cup of grated Parmesan cheese. Spoon onto bread slices. Bake at 350 degrees for about 10 minutes or until brown.

The sausage and white sauce mixture can be made ahead of time and kept in the refrigerator until you are ready to bake it on the bread and serve.

Happy Holidays!!!!

Pin It Now!

Monday, November 30, 2009

Chicken Salad

Posted by Lori:
This Chicken Salad recipe is my favorite. I especially like it on a croissant, but of course that's not too healthy! Although you'll be glad to hear this interesting piece of information. My son, Zachary, was helping me get Christmas decorations out the other day and he found a book called, "The Little Book of Christmas Joys". He told me it said "DON'T COUNT CALORIES FROM DECEMBER 15TH THROUGH JANUARY 2ND." Wow! I'm glad to hear that, aren't you?! December 15th will be here before we know it!

CHICKEN SALAD
2 1/2 cups cooked chicken breast, diced or shredded and cooled
1 cup sliced seedless grapes
1/2 cup chopped pecans, toasted
1 cup celery, finely chopped
1 teaspoon salt
1 cup mayonnaise (regular, low-fat, or fat free)
1/4 cup whipped cream (regular, low-fat, or fat free)

Preheat oven to 350 degrees. Lightly spritz baking sheet with cooking spray. To toast pecans, put them on a baking sheet and toast them just until they become aromatic, about 5 minutes. Stir the pecans and toast a minute or two longer. Watch them carefully so that they do not become scorched. Allow the pecans to cool. Combine all ingredients in medium bowl. Mix well. Chill in refrigerator until ready to serve.

For an appetizer, use the tiny croissants or serve a small amount on top of a cracker. Chopped apple could also be added to this recipe, if desired.
Pin It Now!

Sunday, November 29, 2009

Recipe for Disaster

Posted by Donna:

I want to begin by saying this Thanksgiving brought on the worst cooking disasters I've ever experienced. The week started out just wonderful. Our younger daughter and her three children came down Tuesday and our son-in-law came the next day. We were so excited because this Thanksgiving we didn't have to share them with the other grandparents since they were going to be out of town. We love the other grandparents; but, it was fun having them for such a long length of time and all to ourselves. We had a very good meal on Tuesday and Wednesday. Wednesday night we all went to worship services together and enjoyed worship in song and visiting with friends. Afterwards, we came home and enjoyed watching Santa Buddies and playing Bananagrams. Thursday morning, we enjoyed a wonderful breakfast of sausage, eggs, pancakes, biscuits, and gravy. What a wonderful time it had been so far. Then, about an hour later, disaster struck.

First of all, the chocolate pie recipe I posted earlier, the pie that is so wonderful, the pie that I've never goofed on----goofed!! Actually I made two of them. I knew something was wrong as I was cooking the filling. It looked really funny--the color was wrong and the consistency was wrong. The right ingredients had been used, but something was wrong. It tasted terrible. Just as that happened, I checked my pecan pie that was baking and I instantly knew something was wrong with it. I've never had a "goof-up" on it either. It's always ready in 55 minutes--perfect everytime--that is, until today. I had to continue baking that pie for an hour and a half to get it done. It had shrunk and had turned dark brown by the time I took it out of the oven. By this time, I was so frustrated, I was acting very childish, to say the least. Anyway, Kimberly came in and reassured me that everything would be okay. We decided the flour and the sugar were the culprits. I had just opened new bags of both the day before. We decided to dump both of them from my bins, send Larry, my errand boy, (alias husband) to buy new sugar and flour and start all over. Kimberly helped out and made the chocolate pies and I made the pecan pie. This time, they turned out like they always do. Things, I thought, were back to normal.

However, the second disaster was lurking. Since my son-in-law was going to fry the turkey, I decided to cook a drumstick so I could have some "real" broth for my dressing and gravy. That's the only thing I don't like about frying a turkey--not having the rich broth you get from baking it. I cooked the drumstick on Wednesday and stored it in the refrigerator. As I was mixing my dressing and was ready to add the broth from the drumstick, I put the broth in the microwave---and a few seconds later---boom!!!!!! it exploded all over the microwave. My wonderful broth was gone. I did manage to salvage about a fourth of a cup which did absolutely nothing for the dressing. I was so devastated. Again, Kimberly assured me everything would be okay---and really everything was okay, regardless of the "disasters" that had taken place. We ended up having a wonderful meal with our wonderful family.

However, that's not the end of the story. Today, which was three days later from the first two disasters, I had another "situation." Our older daughter and her family come for worship services and Sunday dinner. I was so excited to have our whole family together--all thirteen of us. Nothing pleases a mother more than having all of her "little chickens" in her nest!!!!!! I had fixed roast, carrots, potatoes, fresh black-eyed peas, store-bought rolls, and gravy. As I was taking the roast out of the crock pot, something very strange fell off the roast. It was unidentifiable!!!!!! It was black and slimy. We finally figured out it was the black plastic "thing" that the roast sits on in the styrofoam package. I debated on whether or not we should eat the roast; but, I figured the germs or whatever was on it had been killed during the 14 hours it had cooked in the crock pot. Lori and I had a big laugh about it. We didn't share this little detail with everyone else.

Here it is Sunday evening. As I look back on the past six days, I can laugh at all these disasters and "situations." As bad as they seemed at the time, in perspective, they are so trivial. What really counts were the people that were in my home---both my daughters and their families. Both girls married Christian boys, and together, they are raising such good children who love God---and of course, their grandma and grandpa!!!!!!! I know it helps if the food is good; but, even if it "flops", it's not a big thing. I just feel very blessed to have the family I have; not just my immediate family, but also my extended family. They are all very, very special to me.

Well, I've just shared a very humanistic side of myself. Hopefully, it brought a smile to your face---and relief that it didn't happen at your house!!!!!!
Pin It Now!

Saturday, November 28, 2009

Recipe for a Happy Day

Posted by Donna:

Because I missed my scheduled post on Thursday night, I decided to post this special recipe that can benefit all of us by reading it every day and applying it to our lives.

1 cup friendly words
Dash of humor
2 heaping cups of understanding
Pinch of warm personality
4 heaping teaspoons of time and patience

Instructions for mixing: Measure words carefully. Add heaping cups of understanding; use generous amounts of time and patience. Cook on front burner. Keep temperature low---do not boil!!!!! Add dash of humor and pinch of warm personality. Season to taste with spice of life. Serve in individual molds.

I really think if we use these exact ingredients, this recipe for a Happy Day would never fail us.
Have a good weekend and many Happy Days ahead.
Pin It Now!

Friday, November 27, 2009

Puppy Chow

This is one of those recipes that you assume everyone has had....BUT, if not, this is one you don't want to miss out on.

Even yesterday, with all of the Thanksgiving food, snacks, and desserts still out on the tables, my youngest son asked, "Where's the Puppy Chow?". It's something we have a lot during the five week stretch after Thanksgiving, through Christmas, and until New Year's.

Puppy Chow

1/2 cup Peanut Butter
1/4 cup Butter
1 cup Chocolate Chips
1/2 tsp. Vanilla
9 cups Crispix or Corn Chex cereal
1-1/2 cups Powdered Sugar

Combine peanut butter, butter and chocolate chips in a microwave safe bowl.
Microwave for one minute then stir to blend all ingredients thoroughly. Add 1/2 tsp. vanilla. Stir well. Place the cereal in a very large bowl. Pour the peanut butter-chocolate mixture over the cereal and toss evenly, making sure all the cereal gets a good covering. Place powdered sugar in large container with a lid. Pour in coated cereal, seal the lid and SHAKE, SHAKE, SHAKE until it's well coated. Another way to do it is to put the powdered sugar in a paper sack, then pour in the coated cereal and fold down top of bag or scrunch it together at the top (hold it very securely)...then shake to coat cereal. Store in airtight container.

Note: If you happen to have kids in 4-H, Puppy Chow makes a great 4-H demonstration for the yearly demonstration contest. It's easy to demonstrate and most kids enjoy practicing for the contest because they get to eat the snack afterwards!

Pin It Now!

Wednesday, November 25, 2009

Pickle - Ham Spirals

Posted by Lori:
These make great little appetizers or snacks for yourself and your family. To make it a low-carb recipe use regular cream cheese or if you would rather have low fat, use the light or fat free variety.

1 package ham slices
1 jar kosher dill spears, drained
1 8oz package cream cheese, softened

Pat ham and pickles dry with a paper towel. Spread 13 ham slices each with about 1 tablespoon cream cheese or enough to cover the ham slice. Top each slice with 1 pickle & roll up. Refrigerate at least one hour. Slice each pickle roll into 5 to 6 pieces. May secure with a toothpick if desired. Store in refrigerator until ready to serve.

Pin It Now!
 
Pin It button on image hover