Thursday, January 31, 2013

Shabby Baby Banner

I've always wanted to make a "shabby" banner, the ones that have strips of torn material and ribbon hanging.  Of course, I realized that stripping the material and tying it would take a little time, but the look makes it all worth it!

This banner was made for a vintage-music themed baby shower. I was thankful to have the burlap BABY pennant taking up some of the space by the time I had torn and tied a while!
For this banner, I used strips of cut burlap, torn muslin, and other torn thin cotton material, and several varieties of ribbon.  (To tear material, snip it where you want to begin, then tear it all the way to the end of the other side.  Be careful not to tear too fast or it will get wider or thinner!) The pennant was cut from burlap.  I actually cut it double so that the fold is hanging over the jute cord.  I cut a piece of poster board and glued it in between the two layers of burlap - just to make it more sturdy.  The chipboard letters were covered with music-themed scrapbook paper and hot glued to the front of the pennant triangles.

The pennant was hung on the fireplace and went home with the parents-to-be for the baby's room. It will be a sweet addition to their other accessories, plus a reminder of the shower anticipating baby's arrival!
Pin It Now!

Tuesday, January 29, 2013

Coffee Filter Pom Pom Balls

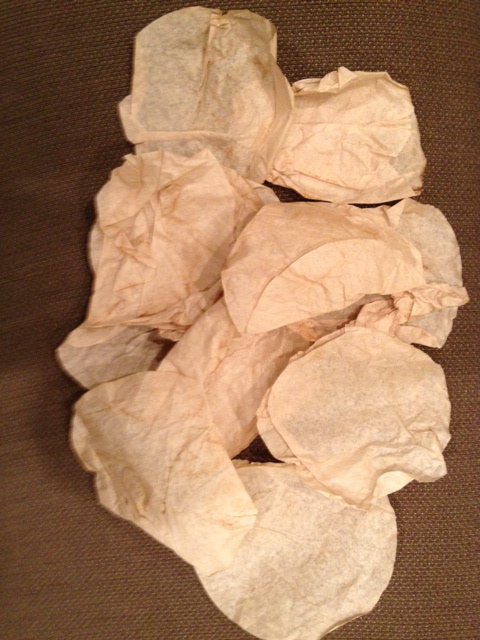
To make vintage looking coffee filter pom pom balls, boil tea bags in a large pot.  Turn off heat and allow the tea bags to set a while.  Place coffee filters in the tea and soak to absorb tea.  I did some for about five minutes and left some in for a day.  
The five minute ones were just ivory colored and the others were as in the picture above and below.  It didn't get any darker, but could have with more tea bags.  Some tea grounds seeped out after a day or so, but it just added colored spots to the filters and made it even neater - so don't worry about that.
Place the wet filters on a cookie sheet or baking pan. It's okay to overlap some, but be sure to pull them apart to hasten drying time.  I put them in a warm oven (to warm setting) for 30 minutes or longer.  Sometimes I would take them out when they weren't completely dry and let them finish drying on the counter.  FYI:  It took over 100 filters to make one pom pom ball!  Thankfully, filters are cheap!
Gather the filter in the bottom center and twist to keep the "flower" in place. I did groups of three together, then secured with a floral pin - which look like a long staple.
This ball was bigger than it appears.  It was big enough so that the floral pin didn't poke out the other side.
For the white pom poms, I just used the filters as they were - without dipping them in a liquid.  If you want them to look more vintage, you could dip them in water, then dry.  I just didn't have the time with the white ones.
Because I used a smaller styrofoam ball for the white pom poms, I used straight pins.  I put three "flowers" together, then inserted them as shown below.
Continue with the filters until the ball is all filled.  Insert a floral pin into the ball, but not all the way down to the ball.  This will be your hanger.  Be sure to wait and do this when you're ready to hang them or tie your string (I used jute) on with the pin....otherwise you might have trouble finding it! (or I would, anyway!)
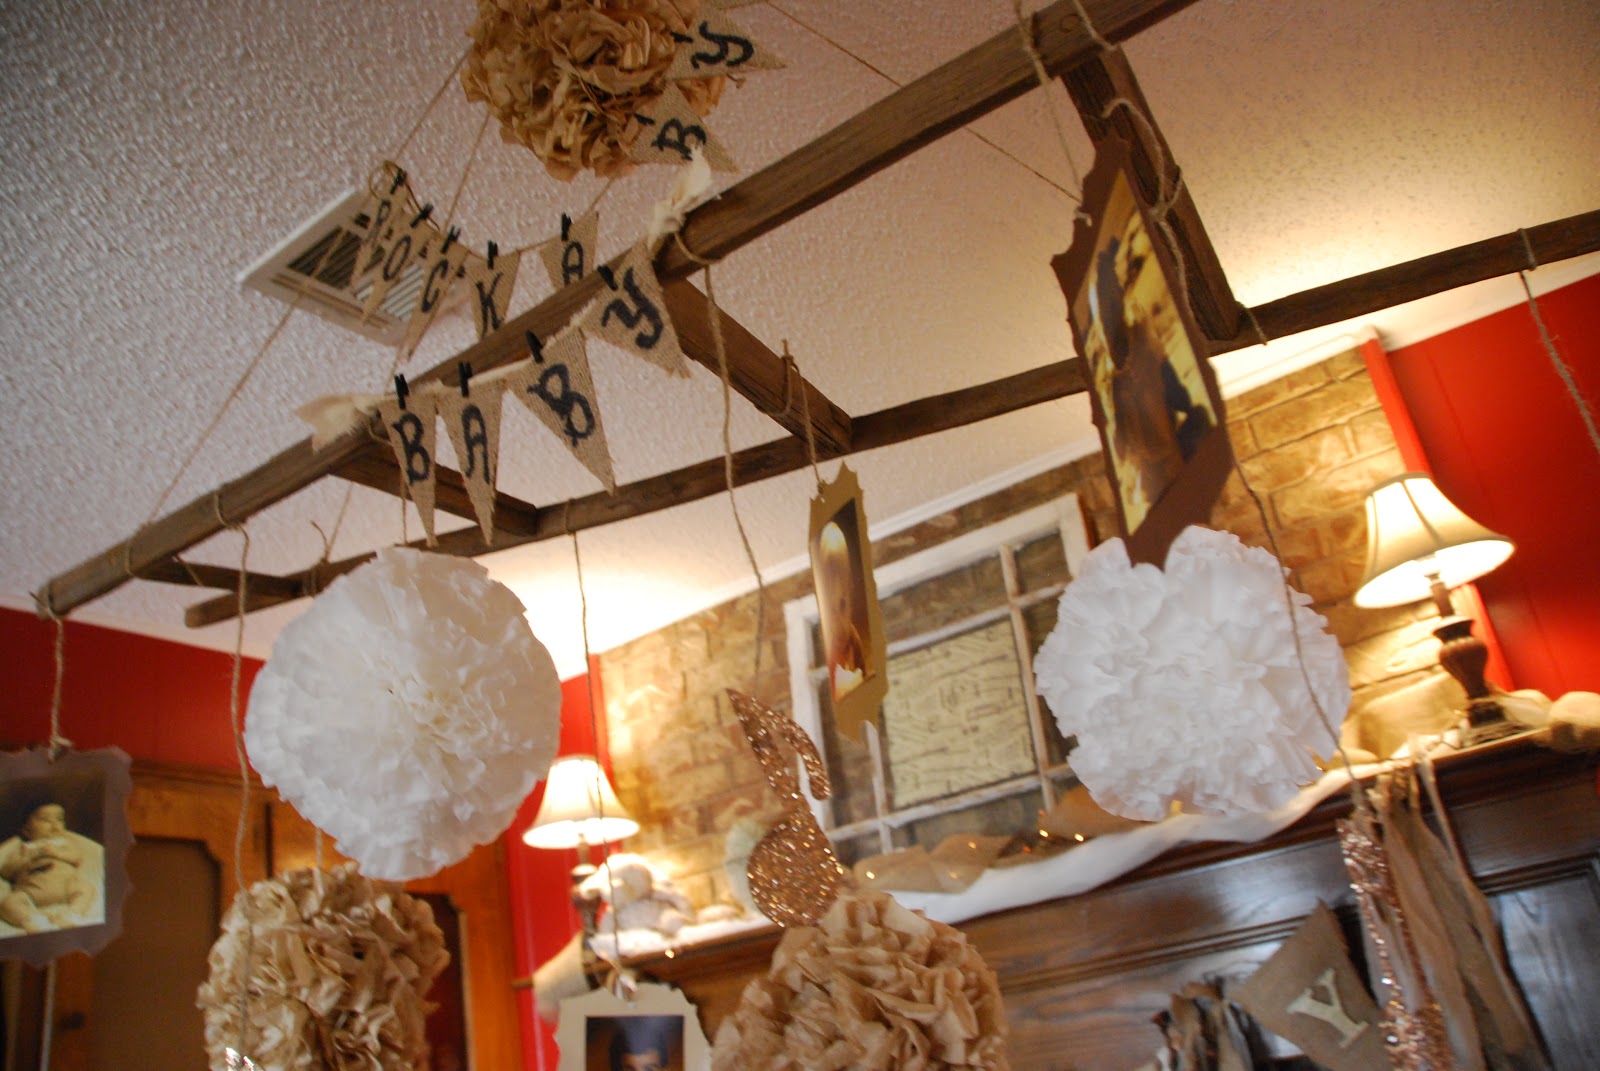
My pom poms were tied to an old ladder above the table.  A little time consuming, but so much cheaper than the store bought pom poms, plus the vintage look needed for the shower.
Pin It Now!

Monday, January 28, 2013

Mocha Punch

For a vintage-themed baby shower yesterday, we served a pretty colored Mocha Punch.  A friend has this beverage server, which is BEAUTIFUL, and I remembered that at my nephew's wedding they had a Mocha Punch.  My niece-in-law shared the recipe with me so that we could serve it to the guests.  I'm not a coffee drinker, but it's really good!

I'm sharing the two variations of the recipe.  We used the bottom recipe for the shower. FYI:  I didn't read the instructions, so didn't have everything refrigerated in advance.  We cooled it off with ice to speed up the cooling process and it worked just fine!

Mocha Punch

Brewed Coffee (1/2 gallon) - 64 oz
Sugar (1 cup)
Milk (1/2 gallon)
Chocolate ice cream (1/2 gallon)

Instructions:
In a container combine coffe and sugar
Stir until sugar is dissolved
Refrigerate until chilled
Just before serving, pour into a punch bowl
Add milk, mix well
Add ice cream and stir well
(Some recipes added 1 tsp. of vanilla)

Recipe Variation:

20 cups of brewed coffee
1 cup vanilla creamer (liquid)
1/2 cup sugar
1/2 gallon chocolate ice cream
1/2 gallon milk

Follow directions above....

Pin It Now!

Thursday, January 24, 2013

5 Minute Chocolate Cake

A friend posted this recipe on Facebook last night.  I look forward to trying it!  However, it could be dangerous that all of us could have cake in a matter of five minutes.  Maybe just as a special treat from time to time, not a nightly thing! :)  Thanks, Jamey!

This would make a perfect gift for someone!

5 Minute Chocolate Cake: 

2 Tbs of sugar
2 Tablespoons flour
2 Tablespoons cocoa
1/4 teaspoon baking powder

Mix, then add:

1 egg
2 Tablespoons Milk
2 Tablespoons oil
A pinch of salt 
Vanilla (a few drops) 

Mix together and microwave in a microwave-safe mug for 1 to 2 minutes. Sprinkle powdered sugar on top. Enjoy.
Pin It Now!

Wednesday, January 23, 2013

Felt Christmas Tree Wall Decoration

My mother-in-law had a cute felt Christmas tree on her wall this year.  It was perfect for the little great-grandchildren our family has been blessed with in the past few years.  I was thinking how cute it would be to have some kind of felt decoration on the wall for each holiday or season.  A snowman for winter, a heart for Valentine's Day, a bunny for Easter, maybe a flower for the spring.  The possibilities are endless!

The tree is probably stapled onto the wall, but you could even glue it to cardboard and just stand it against the wall if you didn't want to staple it.  The "ornaments" have a piece of velcro (the rough part of velcro) attached to the back.  Children can decorate and redecorate the tree over and over again.

Lots of fun for little ones!
Pin It Now!

Sunday, January 20, 2013

Caramel Ice Cream Dessert


My sister gave me this recipe recently.  A friend had made it and she said it is great! I'm looking forward to making it some time!

Caramel Ice Cream Dessert
2 cups flour
½ cup brown sugar
½ cup oatmeal
1-1/2 cups chopped pecans
2 sticks butter or margarine
1 12 ounce jar caramel sauce
½ gallon vanilla ice cream


Combine first 5 ingredients, mix well. Spread on a cookie
sheet lined with foil. Bake at 350 degrees for 25-30 minutes
(will need to watch so it does not burn). Stir every 5-10 minutes
to toss the mixture so it is nicely browned and the pecans
are toasty.

Cool crust mixture and layer ½ of crust in the bottom of a
9x13” pan. Heat caramel sauce to warm and pour half over
crust. Spread softened ice cream over sauce and add another
layer of caramel sauce. Top with remaining crust.

Freeze for at least 1 hr. Cut into squares and serve. Can be made

into 2 9” pie pans. (I usually have some of the crust mixture left over)
Pin It Now!

Thursday, January 17, 2013

Homemade Gift Week #2 - Picture Frame

Here's a very cute and very versatile picture frame you could make for any occasion!  It is laying down instead of standing up because I kept getting a glare on the picture. 

Take a wooden frame and paint it.   Paint a mini bulldog clip and glue to the front glass.  Insert a piece of scrapbook paper (cut to appropriate size) into the frame, and clip a photo to the front!  

This gift was made by my niece.  Thanks, Shanelle!

Pin It Now!

Wednesday, January 16, 2013

Homemade Gift Week #2 - Fabric Ornaments


My mother-in-law made these cute fabric ornaments as her homemade gift this year.  The turquoise one was made from leftover material she used to make my daughter's banquet dress last year, so that was pretty neat!  (NOTE: By the way, I have a LOT of that sequined material left....about 3 yards and it's 60 inches wide, I think.  If anyone needs it let me know. I'll give you a great deal on it!)
This is the back of my ornament to show you how she did it.  Gather the ribbon and hot glue it to a fabric covered circle.  The edges of the fabric are on the front side.  You will cover it up with the top, shown below.
The top part is another fabric covered circle.  Click HERE for a link that shows how to gather the fabric onto a circle.  It's easier than you might think, but does involve a little bit of hand sewing.

Cute, isn't it?!  Thanks, Sharon!

Pin It Now!

Tuesday, January 15, 2013

Homemade Gift Week #2 - Hanging Pinecone Decoration

Okay....This is the last sister-in-law gift!  The last few homemade gifts are family, but not sisters-in-law.  This pretty hanging pinecone decoration is simple to make and versatile.  When we first saw these, they were all hanging in a window, by a tension rod.  Imagine how pretty it was having 10 or so of them strung along the window!  So, there's an idea for you.  Of course, one alone is pretty, as well.
Andrea used white spray paint to lightly coat the pinecones and give them a wintery, snowy look.  She then hot glued them to sheer white ribbon, adding snowflakes and more ribbon.  I can think of all kinds of possibilities to do with this example, can't you?  I may do several of these next year for my entry (shown in top picture), where I usually use pinecones and snowflakes.

Thanks, Andrea!
Pin It Now!

Monday, January 14, 2013

Homemade Gift Week #2 - Chocolate Pretzels

Simple and yummy describes this homemade gift made by another sister-in-law. (Yes, I have LOTS of sisters-in-law! :)  I'm not sure what size these pretzels are, but they were bigger than the regular sticks and smaller than the big rods.  But they were perfect for this little pint canning jar. 

I like this gift because it can be adapted to any occasion. For Valentine's Day, you could sprinkle the white and chocolate coating with Valentine sprinkles and make a cute topper for the jar.  Have you seen where you use a cupcake liner on the top?  The liner goes over the flat top part of the jar lid, then the round ring part screws on over the liner.  A cute, easy and inexpensive give for a teacher or special Valentine!  The possibilities are endless.  And yes, the chocolate pretzels taste great, too!

Pin It Now!

Friday, January 11, 2013

Homemade Gift Week - FIND IT! Christmas Ornament

Remember when I posted about an "I Spy" Christmas ornament that I did with the 4-H Club, but it didn't work out???!  THIS is the solution to my problem!  I can't wait to do this with the 4-H members next year for the fair.  They'll have lots of fun making these and they work....like they're supposed to!  (That's always good :).  

My sister-in-law, Michelle, made these for her homemade gifts this year.  She personalized them a little big by putting mine and my husband's initial letter in the list below.  Her list is laminated and tied to the ornament.  I haven't looked for everything yet, but will.  It's a lot of fun and will be for years to come!  Be sure to buy the glass ornaments that are big so that the opening is big.  Fill with foam and small plastic "goodies" and fill the remainder of the ornament with pony beads.  Super idea and super fun!

Pin It Now!

Thursday, January 10, 2013

Homemade Gift Week - Mattress Spring Christmas Bell

When several of us went to Canton Trade Days in Canton, TX, I bought three old mattress springs for $1.00 - not quite sure what I was going to do with them. I thought they were so neat and unique!

Later on in the day, when I saw one of my sisters-in-law, she noticed my springs and looked a little shocked!  She said she had bought some, as well, and got hers for only $.75.  I could tell by her reaction that she was planning to use the springs for her homemade gifts for our family this year.  Since I had no clue about what to do with mine, I decided to wait and see what she did with hers.  

Here is the finished craft!  A mattress spring Christmas bell!!  I LOVE IT! Isn't it cute??!  

Next year I'll make bells with the three springs I bought and hang them around the house.  Thanks, Deborah!


Pin It Now!

Wednesday, January 9, 2013

Homemade Gift Week - License Plate Dust Pan

This may be the most useful homemade gift of all!  A dust pan!  But not any old dust pan....a special license plate dust pan!

When several of us went to Canton Trade Days in November, one of my sisters-in-law found these old license plates for $1.00.  She bought some and said she wanted to use them for her homemade gifts.  She was going to need some help from her husband with the wood part of the gift, but knew he could handle it.  He did, but it was harder than they both thought!  It ended up taking several hours of work to make them.  Of course, the rest of the family is really excited about this gift and the hard work involved in making them!  Thanks, D & R!!

I'm sure you can "Google" directions on making these, if you are interested.  It would be fun to keep license plates from a child's first car or a grandparent's car or something and use them for a special gift.  The possibilities are endless, really!

***After I wrote this post, I found this video on YouTube that shows great directions on how to make: http://www.youtube.com/watch?v=GfRk3TTnjWA

Pin It Now!

Tuesday, January 8, 2013

Homemade Gift Week - Screen Painted Cross

Another homemade gift I want to share with you is this painted cross made out of a screen....like a window screen.  Laura cut the screen with a heavy duty pair of scissors/cutters, then dipped it in brown paint....stencil painted the designs around the edge....and decorated the center by cutting out a flower design and curling the edges.  She finished the look with some flat stones and put a wire on top to hang.  So pretty,  and lots of possibilities for other crafts done in this way! 

Pin It Now!

Monday, January 7, 2013

Homemade Gift Week - Day 1 (Cheesy and Easy!)

My husband's side of the family does a homemade Christmas gift exchange every year, and we had our Christmas together last Saturday. For the next two weeks, I'll be sharing these gifts with you.  There are some really unique ideas for cute gifts!  Some are easy and some will take a little more time, but all of them are great ideas for most any time of the year.  There are a few that will be strictly Christmas ideas.

The first I want to share with you is my own homemade gift.  I like to call it "Cheesy and Easy"!  Whoever came up with this idea (found on Pinterest), was smart to think of it!  I say "cheesy" because of the play on words, but obviously I liked the "easy" part!  We were gone for two weeks during Christmas break, so it was nice to be able to quickly get my gifts together before we left.

I used various kinds of Hershey's Kisses: Dark, Almond, Regular and Caramel.  I made the little tags on brown kraft card stock paper, using a cute font (www.kevinandamanda.com has LOTS of cute/free fonts!).
And the final tag words for my "Cheesy and Easy" homemade Christmas gift:  "We WHISK you a Merry KISSmas!"
Pin It Now!
 
Pin It button on image hover