Showing posts with label Decorated Birthday Cakes. Show all posts

Tuesday, September 29, 2015

Minnie Mouse 21st Birthday Party


Our oldest and only daughter wanted a Minnie Mouse themed party to celebrate turning 21.  I didn't want it to be a "kiddie" party, of course, and neither did she. We ordered special sugar cookies from a friend.
Her grandmother made her a Minnie cake.
I did chocolate covered strawberry marshmallows with candy shred (it was yucky, in our opinion) and melted candy squiggles.
Cherry limeade punch, which is a favorite of ours. (Braum's sells the cherry lime sherbet and just add 7up.  I also put some maraschino cherries in there and garnished with a slice of lime.)
The chandelier light was transformed into a goofy Minnie-themed light.
The cheeseball was shaped into a Mickey head, then a fruit roll up bow made it a Minnie!
I had the polka dot pots for many other occasions, but spray painted styrofoam balls and created a Minnie head with a big pink bow.  Spray paint melts the styrofoam, but it worked, still.  Just in the back where I laid them to dry, they are flattened. I should have allowed it to dry stuck into the pot, standing up.
And see the balloon wreath with the right ear showing white?  Lauren had made this wreath to take to Disney World last summer when she worked there, but it broke.  I surprised her by getting new balloons and redoing the ears.  It's such a cute wreath and lots of work!  You can find directions if you search balloon Minnie Mouse wreath.

It was such a fun party! I haven't taken the decorations down just yet.  I don't want it to be over :).

Pin It Now!

Friday, October 25, 2013

Homemade White Cake

I needed to make cupcakes and freeze them to save some time next week when I make 65 little Minion cupcakes for our elementary school.  I didn't have any cakes mixes, but was kind of glad.  I've wanted to make from-scratch white cake, and had a few times, but wasn't completely satisfied with the results.

I think I'm now satisfied! This is a GREAT recipe!  I'll probably switch to only homemade because it's just so much better than a box....and healthier, I suppose (as healthy as a cake can get, anyway!).

Instead of typing out the recipe, I've just posted this link to is at "Add a Pinch".  Enjoy!

http://addapinch.com/cooking/2013/08/09/the-best-white-cake-recipe/#.UmloVCh8vzI
Pin It Now!

Tuesday, July 23, 2013

Golf Ball Birthday Cake (With imperfect golf balls!)


Here's an idea for a golf birthday cake, although I forgot to indent the golf balls until party time, so used something that really didn't work very well.  Nevertheless, it worked for our son's 17th birthday party. Also, I thought the cake was pretty squared up but obviously, the left front of the cake droops down some.  Oh, well.... :)
The base of the cake is a Wilton 14 x 14 inch square cake pan. I used three cake mixes for the two layers.  The four balls were made from cupcakes. Just cut off the tops of the cupcakes for the ball to be in the grass. I used toothpicks to secure the balls to the cake better.

So, maybe you have a golfer in the family and need a golf-themed cake.  Here's one idea of how to accomplish that with a simple design.  I have other golf cakes on this site.  Use the search OR look in Decorated Birthday Cakes.
Pin It Now!

Sunday, July 7, 2013

Go Fish! Birthday Party

 
 Recently we celebrated our great-nephew's 3rd birthday. His mom made some really cute things for his party.  This 'fish' birthday banner hung at the par pavilion where his party was held.
 She also made these party favors using crushed Oreos and gummy worms.  The fish thank you said, "Thanks for making my party reel fun"!
These fish-themed cupcakes were so cute! The colored Goldfish cheese crackers made perfect 'fish' which were caught with a pretzel reel and icing string.  
My mother-in-law made Levi's fishing-themed birthday cake.  What a great way to end the celebration by eating yummy cake and ice cream!

Pin It Now!

Wednesday, September 26, 2012

MLB Birthday Cake

If you read my devotional blog (Shine Like Stars), you've already seen this cake, but I have to share it with the rest of you.  My mother-in-law has made almost all of the cakes for my daughter's birthdays.  This one is for her 18th birthday celebration.
Lauren is a HUGE Texas Rangers' fan and this is the second year - in a row - she's had a Rangers' themed party.  I always told the kids they couldn't repeat themes and they couldn't duplicate each others' themes, but after having 57 (YES, THAT'S RIGHT!) parties for the four kiddos, well........it just had to.  So this year it was the MLB logo.  Isn't it great?!  It looks perfect!
Ever since she was little, Lauren would pick the part of the cake with her name.  I think we missed a few pictures, but for the most part, we have a yearly picture with her name on piece of cake.  She said "Grammy" made her name long this time, so she didn't want people to think she ate the whole piece!  I just had to have it on the plate for the picture! :)
Pin It Now!

Thursday, August 23, 2012

Layered Zebra Birthday Cake

Posted by Lori:

A few days ago I was asked to make a zebra birthday cake for a young lady who was turning 16.  I was excited about making it, but not sure about the zebra stripes.  I think they would be easy, but didn't have the time to test it out like I would have wanted.

To me, a layered birthday cake is just as easy as a flat cake, but looks even better.  For this cake I used two cake mixes (I prefer Pillsbury) and baked 2 - 8 inch round cake pans, a 6 inch round cake pan, and a small spring form pan - probably 4 inches.

I used this BUTTERCREAM ICING recipe.

So, back to the zebra stripes:  I had a small roll of zebra ribbon and cut it to go around the top layer.  I liked it and it was perfect for the zebra effect!  Hobby Lobby had other zebra ribbon rolls in various sizes, so I bought them to go around the middle and bottom layers.  It worked out perfectly!  I will say that it would be BEST to put the ribbon on BEFORE the black border, but I didn't have time to do it that way.  I just had to be very, very careful with the ribbon.

To finish off the cake, I found an "A" cake topper - also at Hobby Lobby, and sprinkled hot pink sugar crystals around the edges of each layer.  Finally, 16 zebra-striped candles were added to the middle layer and the birthday girl's special cake was ready.
The birthday girl was very proud of her cake!  What a fun cake to make for her special day!
Pin It Now!

Monday, May 7, 2012

Sunshine Cupcake

(Photo from Taste of Home)

Posted by Lori:

Doesn't this just make you smile?  Reminds me of the song, "I Can See Clearly Now" with the lyrics, "it's gonna be a bright, bright sunshiny day!" This would be a cute "Creation - Day 4" snack for special treat at Bible class or VBS, too!

Here's the link for the Taste of Home recipe:
http://www.tasteofhome.com/Recipes/Sunshine-Cupcakes


Pin It Now!

Wednesday, March 7, 2012

Fish, Buzzard, and High Heeled Shoe Cupcakes

Posted by Lori:

I bought the neatest cookbook at Sam's Club on Monday (not that I needed another one at all!).  It had all sorts of ideas for cupcakes, cookies, and rice krispie treats made into different things.  Here are a few my daughter made tonight.
Fish:  Red hot lips, M & M's for scales, and fruit roll ups for fins. Eyes were bought at a cake supply place (Michaels maybe?? Can't remember!)
Buzzard Cupcake:  Cupcake body with a small chocolate donut towards the front for the mid-body part.
Head is a round donut.  She used carrots for beak/feet, but the recipe said banana shaped yellow candies.  The eyes are the same mentioned above.
Now, these high heeled shoe cupcakes are really cute, but she needs to practice more and get the right consistency on the icing for the heel part.  She used a pretzel rod.  Recipe suggested a cinnamon stick.  After iced, roll in colored sugar to coat. (She didn't do because it was getting too late.)
The blue bow is gum!

Thanks, daughter!  Looking forward to seeing more of your creations using that new cookbook!


Pin It Now!

Tuesday, July 5, 2011

July 4th Cupcakes

Posted by Lori:

Last week my family was away at camp all week.  We had a great time! 

For a recipe tip today, I wanted to share with you how to make striped icing.  I showed my daughter this technique and she created these cute July 4th Cupcakes for our youth group Sunday night.

Make Buttercream Icing:

1/2 cup shortening

1/2 cup butter (not margarine), softened
1 teaspoon vanilla extract
4 cups powdered sugar
2 Tablespoons milk

In a large bowl, cream together butter and shortening. Add vanilla. Blend in the powdered sugar - one cup at a time - beating well in between additions. Add milk and mix until light and fluffy.

Directions for striped icing:

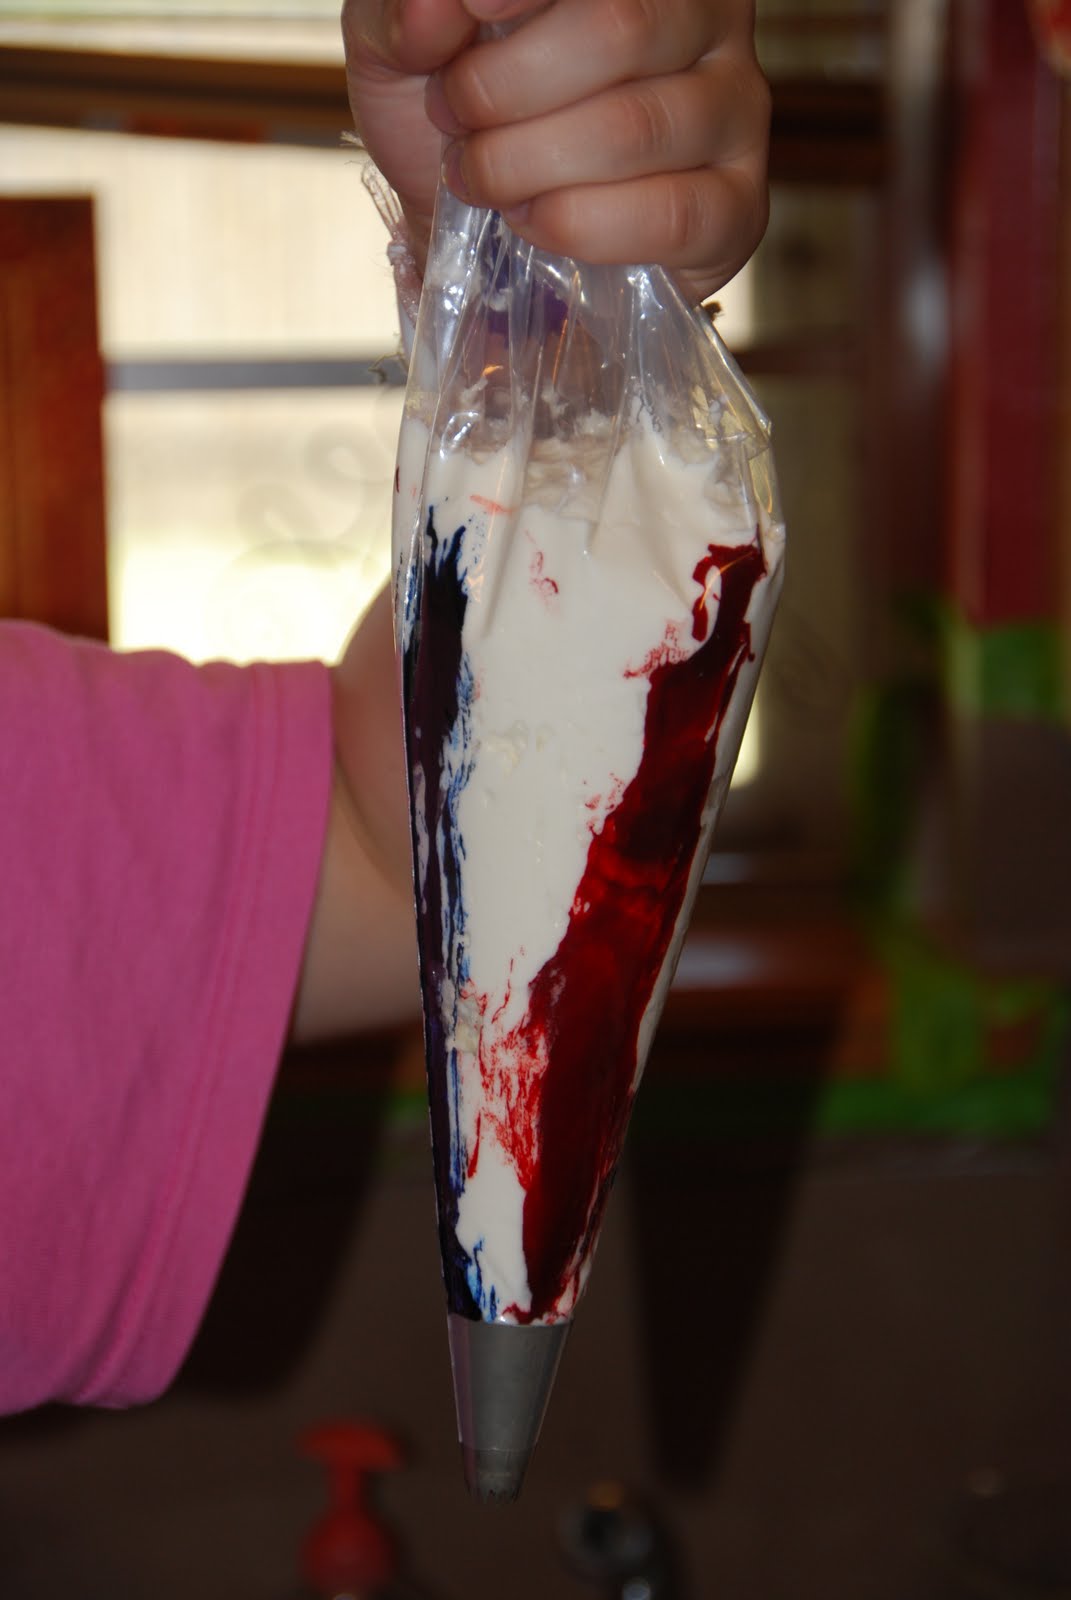
Place desired decorating tip into icing bag.  Place icing bag into large cup.  Roll down top of bag to the edge of the large cup.  Carefully paint on stripes of icing color (we used Wilton gel, but I originally learned to do this with paste.  The gel is more "goopy" so we should have started with less of the gel for the stripes. You can tell that some of the cupcakes are iced at the beginning of the gel tinting and some are later on.)
Place large spoonfuls of icing into tinted bag.  Roll up bag to secure and decorate cupcakes as desired.  We used a large 4B star tip.
(Obviously this is a first one, where we used too much gel in the stripes.  I just wanted you to see how it looked close up.  The kids didn't mind, but it wasn't appealing to me!  Pretty to look at, though!)
Pin It Now!

Monday, June 6, 2011

Birthday Cake in a Jar

Posted by Lori:
I'm really excited about this recipe because the possibilities are endless!  These little individual jars would be cute decorated and given as birthday gifts or when someone has been sick.  They would be great for Christmas homemade gifts, school parties (when homemade goodies are allowed) and even fundraisers.
A couple of months ago, a family friend sent me a link for "Rainbow Cake in a Jar".  It was so cute and my plan was to make it some day.  However, I never had the time to do it, but kept thinking about the idea.  Since my son, Jacob, was having a birthday last week, and another son asked me to buy a Pillsbury "Funfetti" cake mix, I decided to make a Birthday Cake in a Jar and try it out for the birthday boy (it ended up being 'in addition to' his birthday cake - not 'in place of' his birthday cake!
Instead of pint jars as the rainbow cake had mentioned, I decided to get smaller 1/2 pint jars.  They are the perfect size for one serving.  To begin, remove the caps and rings from the jars.  Wash jars and dry them.
Place all 12 jars on a baking sheet. Preheat oven to 350 degrees.
Mix cake mix (desired flavor) per package directions.  Pour approx. 1/3 cup of mix into each jar.
Bake until toothpick inserted into center of cake comes out mostly clean (a few crumbs is what I prefer so it's really moist).  Mine took 28 minutes.  Take cakes out and allow them to cool.  Now either top them with the caps and rings them until ready to use or freeze until ready to use.
Top with icing and sprinkles.  I used homemade butter cream.  Canned would work, too.  I used a 10 M Wilton tip to decorate the top with icing. Note: You could do a small amount of icing before putting the rings and lids on then they would be ready to give to someone.  The only thing is that the icing wouldn't be as generous of an amount as I've shown here.
This one is topped with squirt-type whipped cream and sprinkles.

Another friend mentioned making Neapolitan cakes using strawberry, vanilla, and chocolate cake mixes.  Wouldn't that be cute??!!  And, how about chocolate and strawberry making the very-popular pink/brown party ideas??  Of course, some may want to use the bigger pint jars for some of these other creations.  I definitely want to do the rainbow cake some time.  I may have to teach Noah in Bible class soon!  That would be so much fun for the story of the rainbow!

On this GRATITUESDAY, I am grateful for a friend telling me about cakes in jars.  It's such a fun idea for your own family, but also a great way to brighten up someone else's day!  I am grateful for new ways to have fun in the kitchen!
Let me know what creations you think of making!

This post is linked to Tasty Tuesday and Tempt My Tummy Tuesday.
And....join us for GRATITUESDAY at Heavenly Homemakers!
Pin It Now!

Monday, November 1, 2010

Cupcakes with Butter Cream Icing

Posted by Lori:

Last week was Red Ribbon Week and in most United States schools, that designated week is celebrated in some way, by encouraging students to say no to drugs.  Our elementary students had fun wearing red clothing, wearing their favorite hat, bringing their favorite stuffed animal/toy, and on Friday celebrated by wearing our school colors.  At the end of the day on Friday, the students were be treated to a "Really Red Party", hosted by the PTO.  They were served red juice drinks and red-iced cupcakes. (I used these pumpkin paper liners because that's all I had.  They really didn't go with the red icing, but I doubt the kiddos cared :).
I spent the day last Thursday baking and decorating cupcakes for some of the classes.  Maybe you already know this, but I just found it out last year - after trying to make the cupcakes for this same event.  To get the pretty swirl on top, use a 4B or larger star tip. You must start at the edge of the cupcake and work in towards the middle and getting smaller and smaller and mounding up a little on the top.  I couldn't ever figure it out last year, so searched for decorating tips online. Maybe there is at least one of YOU who also wanted to know how to get the pretty little swirl, too!

These pictures are from Red Ribbon Week and also just regular fall decorated cupcakes, using sprinkles in leaf shapes.

Here is my Butter Cream Icing recipe:

1 cup (2 sticks) butter, softened
1 cup shortening
2 pounds powdered sugar
1 tablespoon vanilla
1/4 cup milk
Food coloring, as desired (I use Wilton gel color)

In large mixing bowl, using electric mixer, beat together butter and shortening.  Add powdered sugar about 3 cups at a time, mixing well between additions.  Add vanilla and milk, mixing well.  Add coloring if desired.

For decorating swirled cupcakes, as shown, insert large decorator tip (No. 4B or larger star tip) into pastry bag (you may need to trim the tip of the bag to make it a little bigger for the tip).  Fill bag 2/3 full with icing. Twist or fold down excess of bag.  Gently press until icing begins to come out.  Decorate as desired.

This post is linked to Tasty Tuesday, Tempt My Tummy Tuesday, and Tuesdays at the Table.
Pin It Now!

Wednesday, June 2, 2010

Peanut Butter Rice Krispie Treats

Posted by Lori:
Plain Rice Krispie Treats are a favorite of most people, but a few years ago we began adding peanut butter to our recipe. The peanut butter adds protein so they're much more filling. And, for some of us (no names mentioned), the peanut butter addition makes them more addictive.

PEANUT BUTTER RICE KRISPIE TREATS

1/4 cup butter
1 package regular marshmallows or 4 cups miniature marshmallows
1/2 cup peanut butter
5 cups Kellogg's Rice Krispies cereal

In a large saucepan, melt butter over low heat. Add the marshmallows and continue to stir until the marshmallows have completely melted. Add peanut butter and stir until dissolved. Remove from heat.

Stir in the Kellogg's Rice Krispies cereal coating them well with the melted marshmallow/peanut butter mixture.

Using a buttered or silicone spatula, press the mixture evenly into a 13 x 9 x 2 inch pan which has been buttered or sprayed with non-stick spray or lined with wax paper.

Cut into squares when the mixture cools.
Pin It Now!

Wednesday, May 26, 2010

Sheep Cupcakes - BAAAAAA!

Posted by Lori:
First of all, I must admit that my sheep cupcake has some flaws.  I used a chocolate cake mix instead of a white cake mix because that's what I had in the pantry.  SOOOO, there are a few crumbs in sight as you can tell by this picture!  But, the real reason there are crumbs is because this little sheep was made as a sample and trial run for tomorrow. 

This week is VBS and tomorrow my 1st and 2nd grader class are learning about God, the Shepherd and studying about Psalm 23.  Their snack craft will be these cute little sheep.  I made this one just to see how it would look.  I didn't want to use up ingredients trying to make him perfect (There's a lesson there:  Sheep aren't perfect.  People aren't perfect.  But, sheep cupcakes are sweet.  We should be sweet, too :).  I can't wait to see what the VBS children's sheep look like!  I'm pretty sure theirs aren't going to be perfect, either!

CUPCAKE SHEEP
1 cake mix (white is best, but any kind will work.) 
Homemade buttercream or store-bought vanilla icing
Large marshmallows
Small marshmallows
Mini chocolate chips

Mix cake mix according to package directions and bake into 24 cupcakes.  Allow them to cool completely.)
Ice cupcakes with a thin layer. Put a small mound of icing in the center.  Cut mini marshmallows in half.  Arrange them in two circles around the edge of the cupcake.  Cut one large cupcake in half.  In one half, using a toothpick (use a twisting motion), make two holes for eyes and one hole for a nose.  Place the half with the holes on the icing mound, making the face.  Cut the other marshmallow in half and place next to each side of the face, making ears.  Cut a few more small marshmallows in half and place them behind and on top of the little sheep's head.

BAA!  BAA!
Pin It Now!
 
Pin It button on image hover