Wednesday, August 16, 2017

The Easy Way of Freezing Fresh Peaches

We love fresh peaches! In fact, we had just gotten two cases of fresh peaches from Cunningham Peaches out of Colorado (Look them up.  They will be making OK and TX deliveries again soon!) and was planning to freeze a lot of them to enjoy for several months.  I wasn't looking forward to working them all up. I'm not really good about things like that and knew I had to get it done and not allow any time to get rotten.  Thankfully in my Facebook newsfeed, a brilliant tip came into view by Heavenly Homemakers!  It was about freezing peaches WHOLE, then just being able to get out one, two, or more...for anything we wanted to use them for! Wow! What a GREAT idea!

Lay washed and dried peaches out on a pan.

Freeze several hours.


Freeze in freezer bags.  Pull out of bag as needed.  Peaches will take a while to thaw. I haven't thawed out any, yet, but Heavenly Homemakers also says that when it begins to thaw, the skins will peel off easily if desired.

After telling my mom about this tip, she talked to some friends and they've done it this way for years, so it's not a new idea; however, it's new to me, and I'm excited! Maybe it's new to you, too :).

Pin It Now!

Tuesday, March 28, 2017

Snow Punch

 For the elementary Christmas party of 2016, the them was "Snowman".  The recipe used for "Snow Punch" was delicious!  I found it on creationsbykara.com.

Here's the recipe:

1/2 cup sugar
1/4 cup hot water
3 oz evaporated milk (6 Tbsp)
1/2- 1 tsp almond extract (I used a teaspoon)
1/2 gallon vanilla ice cream
1 2-liter bottle of 7UP®
Whipped cream and sprinkles (optional)

Combine sugar and water in a small glass bowl. Heat in the microwave for about 30 seconds or till sugar is dissolved. Cool and stir in evaporated milk and almond extract. Pour into a large punch bowl and add vanilla ice cream. Use a potato masher to break ice cream into small chunks. Slowly stir in the 7UP®.
Spoon into serving glasses. Garnish with whipped cream and sprinkles if desired. Serve immediately.

Serving it from the snowman punch bowl made it extra fun!
Pin It Now!

Monday, March 20, 2017

Copycat "Cracker Barrel" Buttermilk Pancakes


Last week I made this copycat "Cracker Barrel" recipe from food.com.  These pancakes were so good!  Much like the ones from Cracker Barrel.  The whole family liked them a lot, so it is definitely going to be my go-to recipe for pancakes from now on.


"Cracker Barrel" Buttermilk Pancakes
2 cups sifted all-purpose flour
2 teaspoons baking soda
1 teaspoon salt ( heaping)
1 tablespoon sugar
2 eggs
2 cups buttermilk
oil (for cooking) or butter ( for cooking) butter
Pancake syrup, for serving

DIRECTIONS Mix all ingredients together until incorporated, but do not over mix. Heat a griddle or non stick pan under med. - med. high heat, and grease with a little butter or oil (more if you like a crispy edge). Drop batter using a 1/4 cup measuring cup onto hot pan. Once the bottom side is golden, flip and brown remaining side. Serve with pancake syrup and butter, if desired.
Pin It Now!

Monday, March 13, 2017

Flaky Buttermilk Biscuits

Long time no post, huh?  I honestly can't believe I haven't posted in over a year. Soon my daughter and oldest son will be helping me with this blog (YAY!) and so we will have more recipes to share!  It seems that blogging has lost it's way through the social media era, but to me it's more like a scrapbook of life and family, so I'll share some when possible....or when I think about it.

Flaky Buttermilk Biscuits

Adapted very slightly from original recipe found at this link:  cookingmaniac.com.

2½ cups all-purpose flour, plus more for dusting
2 tablespoons baking powder
1 teaspoon sugar
1/2 teaspoon salt
8 tablespoons cold butter
1 cup buttermilk
2 tablespoon salted butter, melted

Preheat oven to 425. Sift flour, baking powder, sugar and salt into a large mixing bowl. Transfer to a food processor. Cut butter into cubes and add to flour, then pulse 6 or 7 times until the mixture resembles rough crumbs. (Alternatively, cut butter into flour in the mixing bowl using a grater, fork or a pastry cutter.) Return dough to bowl, add buttermilk and stir with a fork until it forms a rough ball (don’t worry if it is a little sticky). Turn the dough out onto a floured surface and roll it into a rough rectangle, about an inch thick. Fold it over and gently roll it down again. Repeat 6 times. Gently roll out the dough some more, so that it forms a rectangle. Cut dough into biscuits using a floured glass or biscuit cutter. Do not twist cutter when cutting; this will crimps the edges of the biscuit causing it not to rise. If you have scraps just reform a rectangle and cut additional biscuits. Place biscuits on a baking sheet and bake until golden brown, approximately 10 to 15 minutes. Serves 6 to 8.
Pin It Now!

Tuesday, March 1, 2016

Homemade Enchilada Sauce

I found a homemade enchilada sauce recipe and adapted it to include and exclude some ingredients.  It is delicious! I've made it twice already, and used it for both beef and cheese enchiladas.  I like Old El Paso in a can, but it never seems to make "authentic" restaurant-style sauce, so we're really excited about this recipe!

I made enchilada sauce many years ago - during our first year of marriage - but it bothered me to start with oil and flour (I don't know why because so many things do!).  I guess I got over that.... :)

HOMEMADE ENCHILADA SAUCE
2 cups water
2 teaspoons chicken base
3- 4 teaspoons chili powder
1 teaspoon ground cumin
2 teaspoon garlic powder
3/4 teaspoon salt
A pinch of cinnamon
1/4 teaspoon sugar
3 Tablespoons plus 1/4 teaspoon white flour
3 Tablespoons vegetable oil
1 - 8 ounce can tomato sauce

In a 2 quart sauce pan add the oil over medium high heat. When the oil is hot, lower the heat to low and add the flour. Mix with a wire whisk for about 1 to 2 minutes stirring constantly. You want to see a little bubble going on. Then add the chile powder and whisk in till fully mixed.

Add 2 cups of water and the 2 teaspoons of chicken base. Turn the heat up to medium again and stir till fully mixed.

Add the cumin, garlic powder, salt, cinnamon and sugar stirring after each addition. Bring to a boil as you continue to stir. Once boiling, stir and cook for 3 to 5 minutes. Turn off the heat.

As the sauce sits, it may form a "skin" on top.  Stir occasionally to break that apart, until ready to use for your enchiladas.
Pin It Now!

Tuesday, February 16, 2016

3 Cheese Italian Bread Pizza Sandwiches


I've posted this sandwich before, but with plain bread, but just in case you missed it, I wanted to share this newly-found Italian 3 Cheese Bread idea with you! This makes four sandwiches.
Melt several pats of butter on medium-hot griddle.  Sprinkle with garlic powder.
Take four slices of 3 Cheese Italian Bread slices and place on griddle.
Sprinkle with grated or sliced mozzarella cheese.
Top with pepperoni (I used all I had, but would use more in the future.)
Place another slice of bread on top.  Add more butter and garlic, if needed.
Flip sandwiches over to grill the top side.
Grill until nicely browned and crisp.
Serve with warm marinara sauce.
Pin It Now!

Tuesday, January 19, 2016

The Best Homemade Flour Tortillas

While our son was home from college during his Christmas break, he helped cook a lot.  We told him he couldn't go back because he was so helpful and made such delicious food!  Cooking and baking during Christmas gets kind of hectic at times, so having him as a huge helper was wonderful.

For my husband's side of the family, we had a day where most of us were able to get together. We had Mexican food and he made homemade tortillas.  They were WONDERFUL!  He was here again over the weekend and made them for us.  

I wish he would take up his little brother's offer:  "I'll pay you $5.00 a week to stay home!"  Ha ha!  He's sure fun to have around - and helpful!  We eat better when he's around, too!  He spends more time cooking great things than I do. I seem to cook in a hurry.  He inspires me!

HOMEMADE FLOUR TORTILLAS
via seriouseats.com

2 cups all-purpose flour
1 1/2 teaspoons baking powder
1 1/2 teaspoons kosher salt
3 tablespoons lard or vegetable shortening (He uses lard.)
3/4 cups warm water (approximately 110°F)

Whisk together flour, baking powder, and salt in a medium bowl. Rub lard into flour mixture using your fingertips until mixture resembles coarse crumbs. Add warm water and work dough with hands until completely combined and no dry flour is left in bowl.

Turn dough out onto a lightly floured work surface and knead until smooth, about 1 minute. Cover with a damp cloth or plastic wrap and let rest for 10 minutes. Divide dough into 8 equal pieces; roll each piece of dough into a ball. Cover dough balls with a damp cloth or plastic wrap and let rest an additional 15 minutes.

Preheat cast iron skillet, griddle, or comal to 500°F. Place one ball of dough on a lightly floured surface and pat down into a flat disc. Using a rolling pin, roll dough out to an 8-inch round. Place dough in skillet and cook until bubbles form on top side and bottom side has brown spots, 30-60 seconds. Flip tortilla and cook until second side develops brown spots, 30-60 seconds longer. Transfer tortilla to a plate and cover with clean dish cloth. Repeat with remaining balls of dough. Serve immediately while still warm.

Special notes about the recipe can be found here: http://www.seriouseats.com/2015/05/how-to-make-tex-mex-soft-chewy-flour-tortillas.html
Pin It Now!

Friday, December 25, 2015

Merry Christmas!


From my family to yours: Merry Christmas and Happy New Year!
Pin It Now!

Thursday, December 10, 2015

Bakery Tasting Cake from a Mix

For our youngest son's 13th birthday cake last week, I decided to try some of the tips I had seen on making a cake mix taste more like a bakery cake.  It was really good!! It was moist, denser, and even richer tasting.

Here is what you do:  Using a cake mix, substitue milk for the water, butter for the oil, and add an extra egg.  In the chocolate cake, I used Starbuck's Frappuccino in place of the milk. It tasted really good, but I had accidentally turned off the oven and didn't realize it, so they didn't bake well (it's a new oven, so I'm just not used to everything, yet!). However, with the new oven, the birthday cake cooked so evenly it was amazing!!! I didn't realize that was possible! Ha ha!!  


Pin It Now!

Tuesday, November 17, 2015

Caramel Pecan Pie

Oh, this pie is soooooooo good!  It's just as I imagined it would be....caramel, nutty goodness!

I found this recipe on allrecipes.com and made it Saturday for a Thanksgiving meal.  It's delicious!

Caramel Pecan Pie

1 (9 inch) unbaked pie crust (I use mom's recipe that's posted on this blog)
36 individually wrapped caramels, unwrapped
1/4 cup butter
1/4 cup milk
3/4 cup white sugar
3 eggs
1/2 teaspoon vanilla extract
1/4 teaspoon salt
1 cup pecan halves

Preheat oven to 350 degrees F (175 degrees C.) In a saucepan over low heat, combine caramels, butter and milk. Cook, stirring frequently, until smooth. Remove from heat and set aside. In a large bowl, combine sugar, eggs, vanilla and salt. Gradually mix in the melted caramel mixture. Stir in pecans. Pour filling into unbaked pie crust. 3Bake in the preheated oven for 45 to 50 minutes, or until
pastry is golden brown. Allow to cool until filling is firm.
Pin It Now!

Friday, November 6, 2015

Magical Butterfinger Bites


Pin It Now!

Wednesday, October 14, 2015

Chicken Alfredo Lasagna

Chicken lasagna has been one of my favorite things to make for large groups or to take to people for many years. The first recipe I created several years ago is good, but through the years, I decided to get away from condensed soups. That one has cream of chicken soup.  If you still like to use canned soups, then go ahead! It's very good!  But if you like Alfredo sauce and whole foods better, then go with this one.  It's not low fat, but uses whole foods such as real butter, whipping cream, and cheese. You could easily make it gluten free by buying gluten free lasagna noodles or serve the mixture over a different variety of gluten free noodles.  Anyway, it's delicious!  I had never written down the recipe, just eyeballed it, but recently I needed to make it for the football team, so took the time to measure everything.  If making for a large group, double the recipe. Three of each layer will fit well into the large catering disposable pans from Sam's Club.

ALFREDO CHICKEN LASAGNA

1 - 2.5 lb. bag frozen chicken tenderloins
2 tsp. salt (divided)
1 quart heavy whipping cream
1 stick butter
6 cups grated Parmesan cheese (not the canned variety, but fresh)
3 T. granulated garlic
6 - 9 uncooked lasagna noodles (no need to buy the special no-cook variety)
2 lbs. shredded mozzarella, Monterey jack, or colby jack cheese

In large pot, cook frozen chicken tenderloins and 1 tsp. salt, covered, over medium-high heat.  Cook until chicken is white.  Leave lid on pot and allow to sit for 5-10 minutes.  Remove lid and rinse chicken pieces. (I don't like the "goo" that the chicken collects!  I also remove the membrane at this time.)  Drain juices and return the chicken back to the pot.  With electric mixer, shred chicken.  Add to pot remaining tsp. of salt (or more to taste),  heavy whipping cream, butter, Parmesan cheese, and granulated garlic.  Cook until cheese and butter melts.

Depending on the depth of your 9 x 13 dish, you will have 2 or 3 complete layers. The disposable pans and lasagna pan types are deeper.  Layer 3 lasagna noodles,  a third or half of the chicken mixture, a layer of mozzarella, Monterey jack, or colby jack cheese.  Repeat layers.

Bake on 350* for 45-60 minutes, depending on how browned you want it. I usually cover it for the first half of the baking time.  For the larger pans, you can put in the oven several hours in advance, on 200*, then just turn it up the last hour or heat until bubbly and browned.

Pin It Now!

Tuesday, September 29, 2015

Minnie Mouse 21st Birthday Party


Our oldest and only daughter wanted a Minnie Mouse themed party to celebrate turning 21.  I didn't want it to be a "kiddie" party, of course, and neither did she. We ordered special sugar cookies from a friend.
Her grandmother made her a Minnie cake.
I did chocolate covered strawberry marshmallows with candy shred (it was yucky, in our opinion) and melted candy squiggles.
Cherry limeade punch, which is a favorite of ours. (Braum's sells the cherry lime sherbet and just add 7up.  I also put some maraschino cherries in there and garnished with a slice of lime.)
The chandelier light was transformed into a goofy Minnie-themed light.
The cheeseball was shaped into a Mickey head, then a fruit roll up bow made it a Minnie!
I had the polka dot pots for many other occasions, but spray painted styrofoam balls and created a Minnie head with a big pink bow.  Spray paint melts the styrofoam, but it worked, still.  Just in the back where I laid them to dry, they are flattened. I should have allowed it to dry stuck into the pot, standing up.
And see the balloon wreath with the right ear showing white?  Lauren had made this wreath to take to Disney World last summer when she worked there, but it broke.  I surprised her by getting new balloons and redoing the ears.  It's such a cute wreath and lots of work!  You can find directions if you search balloon Minnie Mouse wreath.

It was such a fun party! I haven't taken the decorations down just yet.  I don't want it to be over :).

Pin It Now!

Wednesday, September 16, 2015

I'm Thankful for YOU!


I wrote more about using this fall themed tableware over on my other blog HERE, but wanted to share it as a decorating post on this blog. 

We are still in the process of putting together the cookbook.  Mom is doing a lot more of the work than I am, so far.  I have lots of catching up to do, so am thankful for her help!  We hope to have them ready by Christmas, if at all possible.
Now back to fall themed tableware....
This is at Hobby Lobby.  I can't remember what the lunch-sized napkins said, but I wanted the small ones for my event because of what they said: "I'm Thankful for YOU".  I realize the tablecloths don't match exactly, but my original plan was to do burlap.
The centerpieces were going to be wood slices (as I have in the picture above), but also using sticks and mason jars, more fall printed burlap and brown jute....but it didn't happen. 
Years ago that would have bothered me that it didn't all match exactly.  Now I don't care as much.  I also don't care that it wasn't quite fall when I used it. It's close enough! :)  Happy Fall, Y'all!  Have a great day!

Pin It Now!

Wednesday, August 19, 2015

Hobo Dinners


Last week, instead of cooking for five or six, I was only cooking for three. That's always weird!  But also, I had just gotten the whole, messy kitchen cleaned up a little while before, so I wasn't wanting to make a mess.  Hobo Dinners came to mind!
The kids have just begun liking cabbage! I'm SOOOOOOOO excited!!  No one else liked it, but me, so a big head of it often went to waste.  Now I can use it all up quickly!
I used a square piece of foil and a few pie tins for the hobo dinners (just used the pie tin for fun).  Each one had a slice off chunk of cabbage, a thinly sliced potato, a thinly sliced carrot, salt, pepper, onion powder, and one or two hamburger patties. (Sprinkle on more salt, pepper, and onion powder (or use real onion) on top of the meat.)
Bacon slices were placed over the top, then the dinners were sealed with the foil.  Some people add Worcestershire sauce, but I didn't want that.
Baked at 350* for 1 1/2 hours.....eaten in 30 minutes (only because it had to cool off before we could begin eating! ha ha!)....and clean up in 5 minutes or less!  Woohoo!!!
Pin It Now!

Monday, August 10, 2015

Cinnamon Roll Donuts


Last week we were on vacation. Instead of having a can of biscuits like I thought I had, we had an extra can of Pillsbury Cinnamon Rolls. I decided to fry them like donuts. The results were DELICIOUS!

Put oil in medium saucepan, filling at least half way up. Heat oil to medium-medium/high (mine was too hot at first). Make a hole in the center of each cinnamon roll. Fry a few donuts at a time, turning to brown both sides. Drain on paper towels. Scrap icing into small bowl and thin it some with milk. Drizzle over the donuts. Serve warm. 

Pin It Now!

Wednesday, August 5, 2015

Cookbook is Coming!

I can't believe I forgot to announce this on the blog! We've been busy with summer and are getting the recipes complied for the publisher! We will let you know more as soon as possible! 

Pin It Now!

Wednesday, July 8, 2015

Crafts at QMCC 2015


Coming up with crafts for a week at QMCC isn't hard, but finding some new unique ones is sometimes a challenge.  And then sometimes I provide the supplies and the campers come up with something totally unplanned! That's GREAT!
My husband's workplace had chopped down some trees.  No one realized that the insides of the trees were rotting until they came down, so a really strong wind could have toppled the trees at any moment, but much of the tree was cut into logs and for firewood and other projects. I decided to have some small logs cut into chunks to be used at craft time.  One of the campers took the inside of the log out, leaving these bark "frames".  Soon that idea caught on and others did the same! So unique!!
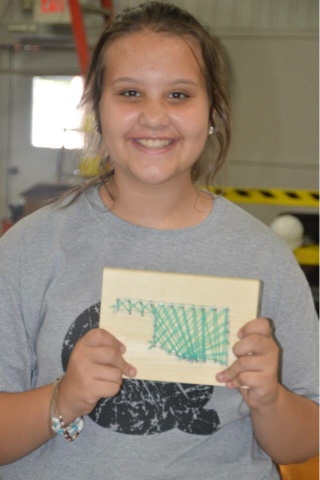
I also went to Lowe's and had planks of wood cut so that campers could do string art. C.J. spent several days working on his craft and will enter it in the fair!
I loved the Oklahoma that Emma and another young girls did! We made a template of the state, she nailed around the outline, and used string to fill it in. It was so cute!
Others did initials, words, shapes...anything they could think of.
Another craft project with string was using buttons and making bracelets. This one turned out really cute! The hemp string is just woven through buttons.  The anchor button is actually on top of another button.  Such a simple, but very cute and easy, project!  
Pin It Now!
 
Pin It button on image hover