Wednesday, October 31, 2012

What's the Motto with You?

This year is our youngest, Tyler's, first year to be on the elementary academic team.  If you read my "Shine Like Stars" blog, you'll recognize this son as "Biscuit" from 'The Chronicles of Biscuit' posts.

Yesterday at practice the teacher was telling the team about what "motto" means.  When they got to the question, Tyler buzzed in and, instead of giving the definition of motto, he said, "What's the motto with you?"

If your a parent of children who love watching Disney movies, most likely you know what that answer/question is referring to, but if not, here is the quote from "The Lion King".

Timon: Thats our motto
Simba: What's a motto
Timon: Nothing. What's a-motto with you? hahahaha!

Tyler better not answer that way in a real quiz!  There's a possibility that I'll be the reader or the judge!  It would be sad to get in trouble by your mom at an academic meet, wouldn't it....right in the middle of the contest!??
Pin It Now!

Monday, October 29, 2012

Quick & Easy Cherry Cobbler

Saturday after being gone for almost a whole week to the National FFA Convention in Indianapolis, our oldest son arrived home safely.  As a welcome home meal - and also because the temperatures had dropped during the previous 24 hours - I decided to make stew, cornbread, and cherry cobbler.  The whole family was excited about him coming home, the cooler temps, and the food, of course :).

I found a quick new recipe that is basically "Dump Cake" without the pineapples and pecans.  Super simple and super tasty!

Interestingly, as I visited with my brother-in-law/minister yesterday after morning worship, he mentioned this very same dessert!  He had served it just the day before for the community meal he does each month!  So weird we had done the same thing - not knowing the other one did it.  Then someone who had eaten his dessert asked for the recipe.  I was planning to post it anyway, so it all worked out!

QUICK & EASY CHERRY COBBLER

2 cans cherry pie filling
1 yellow cake mix (My bro-in-law used yellow and golden buttery.  Another recipe said white.  I think if you liked chocolate, you could use it, too.)
1 cup butter (2 sticks, real butter)

Spread cherry pie filling in bottom of 9 x 13 inch cake pan.  Sprinkle dry cake mix over pie filling.  Melt butter and pour over cake mix.  Bake for about 50 minutes or until golden on top.  Serve with whipped topping or ice cream, if desired.

Pin It Now!

Samosas

Recently, on a Sunday evening, we had finger foods and game night after worship services.  One sweet lady made a recipe than none of us had ever tried before.  Samosas!  They were delicious, and I asked her for the recipe to share with you.

Samosas is an Indian dish, but probably since beef was used instead of lamb, it wouldn't be "Indian" any more.  I'll give you her recipe, then share the Indian version of the recipe, in case you would like to try it.  She used the pastry from one recipe and the mixture of another.

Samosas - Pastry (Original Indian version)

4 cups flour
2 teaspoons salt
6 tablespoons margarine
3/4 cup yogurt

Combine flour and salt in a bowl and drizzle margarine over mixture.  Add yogurt by the spoonful and blend until mixture holds together.  Take walnut-size lumps and under the heel of your hand slide in a streak across lightly floured surface (this is brissage, a French mixing refinement.) Pat dough together, wrap airtight and let rest in refrigerator.

FILLING - BEEF

1 teaspoon flour
2 tablespoons water
1 lb. ground beef, cooked, drained
1 medium onion, finely chopped
1 garlic clove, finely chopped
1 teaspoon salt
1/2 teaspoon ground coriander (MY FRIEND USED Cayenne Pepper instead)
1/4 teaspoon ground cumin
1/4 teaspoon ground ginger
1/4 teaspoon freshly ground pepper
Vegetable oil for frying
Chutney or sweet and sour sauce for dipping (*optional)

(*Note:  This meat mixture recipe originally used wonton wrappers.)

In small bowl, whisk together flour and water to make a thin paste.  In large bowl, combine beef, onion, garlic, salt, coriander, cumin, ginger and pepper; mix well.

When ready, divide pastry in walnut size pieces into round pieces, cut into half.  Place some filling on one piece and seal edges with yogurt then place another piece of pastry on top and seal.  To cook, heat electric skillet to 400 degrees or heavy skillet over medium heat and add 1/4 inch of oil.  Add samosas to hot oil, do not crowd them.  Cook 2-5 minutes or until golden on both sides.  Serve with sauce, if desired.

ALTERNATIVE FILLING - LAMB

2 tablespoons oil
1 large onion, chopped
1 green pepper, large, seeded and minced
1 fresh ginger root, peeled and minced (1/2 teaspoon ginger may be substituted.)
1 teaspoon tumeric
1 1/2 teaspoon salt
1/2 teaspoon monosodium glutamate
1 teaspoon chili powder (cayenne pepper if you want it hot)
1 large tomato, chopped
1/4 teaspoon fresh ground pepper
1/4 teaspoon caraway seed
1/4 teaspoon ground cloves
1/4 teaspoon ground coriander
1/4 teaspoon cinnamon
1 pod cardamon, peeled and seed crushed
1 tablespoon fresh lemon juice
1 1/3 pounds ground fresh lamb, sauted
2 cups diced potatoes simmered
2 cups frozen tiny peas

Simmer potatoes, blanch peas.  Heat oil in your largest heaviest skillet and add onion, pepper, and other seasonings with tomato and saute over medium heat two minutes.  Use wooden spoon.  Add lemon juice and lamb that has been sauted and drained, and potatoes and peas and enough hot water to simmer gently about 15 minutes.  Potatoes should still be intact.  Refrigerate until cold.  It will taste better if made a day ahead.

Finish recipe in manner listed in recipe above.
Pin It Now!

Thursday, October 25, 2012

Burnt Gravy "Fix"

Ohhhhhh, I apologize!  After the fake fingernail incident, I promised a post about a gravy problem I had.....I mean a problem other than the lost fingernail.  But after that incident Tuesday and even all day Wednesday my brain was kind of in a fog. I'll blame it on my mom.  Isn't that what you're supposed to do?  Blame your parents?  (Ha ha!!  I'm only joking!  My daughter says since she's getting more like me that it's time to admit that it's just "ME".  That's how God made me.  Unique I like to say :).

So on to the gravy problem.  Well, since I was making it for about 100 people, I decided to do half "real" gravy with grease and the other half with a mix.  The real gravy had milk, the mix water.  The real milk gravy apparently got too hot and some of it stuck on bottom, but I didn't realize it.  As I mixed the two together, I could smell the scalded/burnt smell.  YUCK!  But, it was too late to do anything else but go with it.

I remembered hearing that a raw potato would absorb burnt taste so I quickly peeled two big potatoes and plopped them into the two pots of gravy.  Then I went to the internet for suggestions and found that peanut butter (Really???!! YES!!  Peanut butter!) helped the burnt taste, too.  It said to put a tablespoon in at a time, stirring and tasting a bit to see when the amount was right.  I had two big pots and not much time, so I plopped about 1/2 cup into each pot and stirred.  The little sample seemed good and the burnt taste was hardly noticeable at all.  Much less noticeable than a floating fake fingernail would have been, I'm certain!

So there you go!  Maybe not the best way to go about making gravy....or burnt gravy better, that is, but you know what?  Things happen.  Things sometimes don't go like you think they'll go or plan for them to go.  But we've got to adjust to whatever comes along, don't we?  Yep.  We must adjust and go with the flow......or burnt gravy.....or loose fake fingernails.

Have a great weekend, everyone!
Pin It Now!

Wednesday, October 24, 2012

Fall Burlap Wreath

(New Wreath for Friend)

A few weeks ago a friend asked me to make her a burlap wreath with some fall decorations on it.  It took me a while to find the time to get it done, but today I finally managed to finish it!  I actually like it better than the one I made myself.  I think I tried to do mine too sparingly and used just two rolls of burlap.  This wreath has 3 1/2 rolls making it fuller.  I may have to add to my own!

Directions for the wreath can be found on THIS post. (Now that I look back at that wreath, it wasn't very pretty with just the leaves on it, but I knew it needed more.  Was in a hurry to show you the "how to"!) I used a 12 inch wire wreath form for this wreath and the one in the directions.  The fall picks are just inserted into the wreath and the wired ends wrapped around the wreath form.  They'll be easy to remove when my friend wants to change it up.  The brown burlap ribbon bow is tied on for easy removal.  Other smaller brown burlap ribbon is tucked into the wreath, not even secured - just poked into the loops.

(This is my first wreath, but updated with a burlap bow topped with a brown burlap ribbon bow.  Satin orange ribbon and brown burlap thinner ribbon is weaved in and out within the loops. This is only two rolls of burlap, so thinner and less full, but still full enough to work.)

The cost for the wreath for my friend (top picture) was about $48.00 and that is with some items 50% off.  Maybe if you hit it just right you could get a few things a little cheaper, though.  When my friend left she said she'd send others my way.  I told her not to!  I certainly don't have the time to sit around making wreaths all of the time, though didn't mind doing it for her at all.  And if I did, I'd have to start charging for my time.  Not sure anyone would want to pay $75.00 for this wreath.  But maybe you do and maybe you would like to make these wreaths.  Have at it!  I'll just do it for fun......and only occasionally! :)  Like once or twice a year! (ha ha!)

Pin It Now!

Tuesday, October 23, 2012

You'll Never Guess What Happened Today

If you're on Facebook you have seen the "awkward moment" posts.  Most of the time they're not really awkward, but people just say they are.  My daughter (who is 18) believes that if you're over a certain age, you shouldn't do certain things the teens do.  Things like "awkward moment" posts, "LOL" and other text slang abbreviations.  She believes that those are for the younger people - of whom I am NOT a part of.  Well, she deleted her Facebook page for a while, so today, when the perfect "awkward moment" opportunity arose, I posted it.  Here it is:

That awkward moment when you've made enough mashed potatoes and gravy for a funeral meal of 100 people and notice that one of your fake fingernails is missing. What would would you do????

Isn't that a GREAT awkward moment???!!!!  Well, I can tell you that it was a lot more awkward when it was going on than it was when I posted it, after the fingernail was found!  This whole thing happened this morning.  And it is funny now, but wasn't at the time.

A dear sweet, Christian woman passed away - just two months shy of her 100th birthday!  Her large family was gathering to remember her life as a faithful servant of God.  I had been asked to make mashed potatoes and gravy and told that there would be around 100 family members. 

Last night my husband and daughter peeled the potatoes for me.  I cooked them last night and kept them hot all night, mashing them early this morning.  Thirty pounds of potatoes in a large roaster pan.  The gravy was put into two large dishes - a big crock pot and a stock pot.  I got done with enough time to spare to run to the nearest town with a Sonic - which is about 15 minutes away (99 cent drink special every morning, you see :).  

On the way home from Sonic, I noticed something like flour or potato on my finger and wiped it off, only to find that the fake nail was gone!  I've never, ever had fake nails before!  I had only had them on for about 10 days because two nails had broken off really deep and I thought it looked goofy having two short ones and the others long.  I didn't want to cut them all off.  I had the fake ones fairly short, too.  So, I prayed all the way home....that I would find the nail.

When I got home, I panicked!  All I could think of was that I had 100 people to help feed and had this huge amount of potatoes and gravy - with a possible fake fingernail floating around in one of the huge pans.....maybe.  So I prayed some more.  I wondered what to do......take them wondering if it was in there or throw them out leaving the family hungry.  What a dilemma!  I didn't like the options at all.

So, I kept praying that I would find the fingernail.  I happened to look down on the kitchen floor in front of the stove top and there it was!  The missing fake nail!!!!  OH, JOY!!!!!!!!!  Mystery solved!  Dilemma eliminated!

You should have read some of the responses my Facebook friends suggested!  They should be ashamed of themselves!!! (Ha ha!!!)  Here's my favorites:

Tell them that whoever has it gets their pick at desserts first!

 If that happens again, just go ahead and serve it but let people know what happened before they eat. If they've had ur food before, they'll eat in anyway and not care. I know I would.

Stay tuned.....tomorrow I'll share something else about the gravy.  A tip.  A tip that doesn't involve any foreign objects in food, though.

P.S.  I told my daughter that I put the "awkward moment" post on Facebook.  Yes, she was appalled.  She'll get over it :).
 
Pin It Now!
Monday, October 22, 2012

Homemade Tortillas

In his Spanish class last week, my son and his classmates were having a "Fiesta" meal.  He decided to make tortillas and searched online for a recipe.  He made it once to try it out and really liked it.  So, for the Fiesta, he made them again.  They are delicious!

HERE is the recipe, from "What's Cooking America".

Thanks, Zachary, for finding this great new recipe for us!  I look forward to you making them again really soon.....for us! :)
Pin It Now!

Wednesday, October 17, 2012

Addition to "Fire for Cookout" Post

Yesterday I posted about using an old washing machine tub for a fire at a cookout. I was telling my husband about someone commenting that their husband put legs on the washing machine tub.  He said, "That would sure beat bricks under it!"  I didn't realize he had bricks under it.  It would work without something underneath, but the air underneath will help the fire and could also be safer.
Pin It Now!

Fire for Cookout - Idea

**Put bricks under tub to increase air circulation and safer fire on some surfaces!  Some people put legs on their tub.**

Many years ago we were having a group of friends over for a hot dog cookout.  One of our adult friends said he would bring us the inside of an old washing machine to use for the fire.  He lived in a town about 30 minutes away, but after everyone had been here for at least 30 minutes, our friend still hadn't arrived.  We finally called him, and he had taken the wrong turn, driving waaaaayyyyyy out of the way to get to our house.  It was really funny!  He finally showed up and the cooking began!
I can't tell you how many times we've used this tub for cookouts, but it has been a great thing to have around!  There's nothing like a hot dog cookout and roasting marshmallows over the open flame.  

Sunday night was especially nice with our youth group.  The stars were shining brightly, there was no wind, and the singing and devotional time was wonderful.  Special memories are made around campfires, for sure!  Just thought it was an idea you all might enjoy knowing!

Pin It Now!

Monday, October 15, 2012

More Cute & Easy Costumes.....

When our first child and only daughter was a baby, I decided she would be a pumpkin for our Fall Carnival.  
I don't think she liked being a pumpkin because all of the pictures of her in the costume are of her crying or unhappy!  But she was still my cute little pumpkin!
The next child and oldest boy was also a pumpkin. I remember wanting him to wear that first costume, but it just wouldn't work.  I had to give in and buy a new one that was bigger.  He's a lot happier, too.  He wouldn't have been if I'd persisted in the smaller size! :)
Thankfully #3 could wear #2's costume.  He started out smaller, anyway, and is perfectly content in his costume!
I don't like change so when #4 came, of course I wanted him to also be a pumpkin, but because he was a December baby, he was much, much bigger came Fall Festival time!  I reneged and made the four kiddos into Wizard of Oz characters. I shared that photo recently, so just cropped out the little lion....our youngest son.  I'm not sure he was too happy at this time, either!
I loved dressing up the kids for the annual party when they were younger.  They had so much fun! Here's the oldest boy as Raggedy Andy.  My mother-in-law had made these costumes for other grandkids years before.
And here's Raggedy Ann! So cute!
 For several years in a row, my oldest two children (even one being a girl) were chosen to play Santa in the school Christmas program, so, we already had a Santa suit ready.  I decided to have the kids dress as Christmas characters.  The reindeer costume was actually a horse I converted to a reindeer.  The horse costume was also made by my mother-in-law.  The other costumes were easy to put together quickly.  I used this picture for my Christmas card picture, too!
Here's the youngest....the little elf.  I love this picture!  So sweet! :)
Pin It Now!

Thursday, October 11, 2012

Halloween Snacks

At yesterday's 4-H meeting, the 4-H members were treated to some fun Halloween snacks by one of the moms.  She found the recipe ideas on Pinterest, and even used one of the snacks to teach the members how to make them themselves.  They really enjoyed making the treats and eating them, too!
Witch's Hats
Fingers (carrot sticks with almond sliver nails) & Dip
Getting the apples ready for the Monster Mouths.
 Demonstrating how to make the Monster Mouths.
J.W. showing his "Mouth"!  The Monster Mouths are made using apples, caramel, and torn marshmallows for teeth.
Pin It Now!

Acorn Donut Hole Snacks

Last weekend at the ladies retreat, one of my friends made this cut acorn snacks.  They were cute and tasted good, too!  Here are the instructions, per Bridget:  Take a donut hole, dip one end into Nutella and roll it in toffee bits.  Stick a pretzel stick in the end and you have an acorn snack!  Perfect for fall!

This recipe was found by Bridget on Pinterest.  Thanks to whomever was the original creator of this recipe!  Great idea!
Pin It Now!

Tuesday, October 9, 2012

Caramel Corn Mix

Do you like caramel?  Have you tried the new candy corn that is caramel flavored?  I don't like the regular candy corn, myself, but the new caramel flavored corn is YUMMY!  Not that I needed something else to like and eat.......

Isn't the mixture pretty and "fall" looking?

This weekend at the ladies' retreat, a friend brought a mixture of the caramel candy corn and peanuts.  It was delicious and enjoyed by everyone.  You could always add chocolate to the mix, too.  The fall colored M & M's would be just perfect!

Pin It Now!

Monday, October 8, 2012

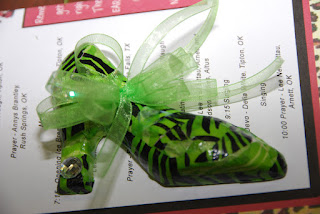
High Heeled Shoe Plaster Craft

This past weekend was a special ladies' retreat at our Bible camp.  Click HERE to see all about the inspirational and fun retreat.  The retreat theme was "W.I.L.D. - With In the Lord's Design".  High heeled shoes were added to the theme, just for fun.

Finding inexpensive shoe crafts/items wasn't very successful at first.  Eventually we thought of a few ideas that worked out perfectly.
One craft I want to share with you was made with shoe molds ordered from eBay.  It's was a 4-inch mold that had four shoes.  I had two molds to use so did eight shoes at a time.
 The molds were made by using this pottery plaster.  All you add is water.  For 100 shoes it took less than two of these big jugs of plaster (the first container was about half way full and the second has a little bit left.)
The shoes were decoupaged using decorated animal print tissue paper and glossy Modge Podge.
Bling and bows were added, as desired.
It was so much fun seeing everyone's creativity!
We should have had a bow-making session.  This bow on this cute shoe was adorable!
I really like this two-toned animal print shoe!
And this one..... :)
And these..... The Modge Podge is still wet on these, but dries clear and glossy..if you get the Gloss type.  Some of the ladies put a magnet on the back to put on their refrigerator.

The great thing about this inexpensive craft is that it can be adapted to ANY mold and ANY occasion!  


Pin It Now!

Thursday, October 4, 2012

Chocolate Chip, Oreo, Brownie, Fudge Bars

There are lots and lots and lots of recipes like this on the internet and Pinterest.  From what I could see, one of my favorite blogs (that's not on my blog list.....but will be after I write this post), www.kevinandamanda.com, is the original creator of this absolutely, wonderfully, delicious dessert.  Here is the link to their original recipe so you can see pictures. I iced mine with the hot fudge, but forgot to take a picture of the final product.  Just use your imagination.....like Barney the dinosaur would say! :)

I tweaked this recipe a little bit - just to make it quicker and easier.  I think homemade anything is always better, but confess that sometimes I just go with the box/package mixes/tubes.  And actually, some people prefer the already-made taste to homemade.  Example:  My husband and kids prefer boxed brownies to homemade.  Yes, they're odd that way!! (ha ha!)

So, here is the recipe.  Not a low calorie dessert.  Skip counting the points.  You'll break the calculator :).  Just eat it and enjoy.  Do an extra lap or a few more (okay a LOT more) steps on the treadmill.  You'll be okay.

Oh, and I took it to a potluck meal yesterday.  My husband said it was great, but really rich.  I got an "amazing" from a teen and it was gone before I could get a little taste.  Gone doesn't always mean "good", but I'm taking another one to the "after the football game" student meal and I'm thinking it will be gone, too :).

Chocolate Chip, Oreo, Brownie, Fudge Bars

1 package chocolate chip cookie dough (regular size - not large size) (homemade cookie dough can be used, if desired)
1 package Double-Stuf Oreo Cookies (you'll have some to eat/spare)
1 family-sized package brownie mix (oil, eggs, and water as per directions)
1 jar hot fudge sauce (The homemade hot fudge sauce recipe on our blog is great!  Search for it on the home page.)

Preheat oven to 350 degrees.  Line 9 x 13 inch pan with waxed paper (I didn't do this step, but it would have made it easier to cut and remove.) Allow cookie dough to get a little softened then press it into a 9 x 13 inch pan.  Layer Oreos across bottom - not touching.  Mix brownies up according to package directions.  Pour over Oreos.  Bake for 45-55 minutes (mine took 45 minutes and usually my oven is slow).  Pour hot fudge sauce over brownie layer.  Serve with ice cream, if desired.
Pin It Now!

Tuesday, October 2, 2012

Costumes for Kids

There's nothing more fun to a child than dressing up in a costume.  My favorite thing when my kids were little was having them coordinate in a certain theme.  Because of the "digital" age of photographs now, I'm trying to slowly get my print photos into digital form.  I started with these pictures because they bring back great memories from the kids' younger days and because I thought some of you might like some costume ideas.
This first costume set is Toy Story.  This was the year before our youngest was born.  The Woody and Buzz costumes were bought, but Jesse's was made using a white shirt that I painted to match her shirt, then jeans with Holstein cow print chaps...most likely made by my mother in law, since I don't sew anything more than a button on :).  The belt was mine from childhood and the hat purchased.
This "Wizard of Oz" costume set is my absolute favorite of my kids dress-up years!  The little one was the lion, in a purchased costume.  Dorothy's dress was borrowed from a friend and I made the tin man and scarecrow costumes.  I remember that the tin man took a lot of time.  Dryer vent tubing made the arms and a funnel is the head.  The box body is painted silver and decorated with aluminum foil and maybe silver cupcake liners.  Google search for more directions.  The scarecrow was made using a sweatshirt and sweatpants, with scrap fabric cuffs that had raffia hot-glued to the edges.  The color was made from scrap fabric, as was the hat.  Hot glue was the tool of choice for this costume!  It only needed to hold up for a few hours.

It's fun going through old pictures and thinking about special memories with the kids.  And just maybe it helps you come up with some creative idea for your family!

Pin It Now!
 
Pin It button on image hover