Wednesday, February 29, 2012

Quick Black Forest Cake

Posted by Lori: 

A friend sent this recipe to me this morning.  It sounds delicious, don't you agree??!!  Looking foward to trying it soon.  Thanks, Lisa!

Quick Black Forest Cake

1 (18.25 ounce) package devil's food cake mix with pudding 
3 eggs 
1 tablespoon almond extract 
1 (21 ounce) can cherry pie filling 
1 1/2 cups semisweet chocolate chips 
1 tablespoon butter 
2 tablespoons milk 
1/2 cup confectioners' sugar

Preheat oven to 350 degrees F (175 degrees C). 
Mix together: cake mix, beaten eggs, almond extract, cherry pie filling and 1 cup semisweet chocolate chips. Stir until just combined. Pour batter into a greased 9x13 inch pan. 
Bake in a 350 degree F (175 degree C) oven for 45 to 50 minutes or until a toothpick inserted in the center comes out clean. Remove cake from oven and let cool. 
To Make Glaze: Heat 1/2 cup semisweet chocolate chips, butter or margarine, and milk in a saucepan over medium high heat. Once semisweet chocolate chips are melted and mixture is combined stir in confectioners' sugar. 
Spread glaze over cooled cake. Serve cake as is or with whipped cream and a cherry.


  Pin It Now!

Pantry Re-Do

What a transformation this pantry has had in the past two and a half years!  It started out as a "mud room" shower.  Then, in early fall 2009, after finding that the shower had leaked and was causing mold around the outside of it, my husband tore it all out and made this pantry (shown below).  At the time, I was proud to have it and the storage space it had for the kitchen.
Early September 2009....
During our recent remodel/addition, the pantry got another redo - a much-needed redo!  From September 2009 until this time, the pantry never had a door and the frame around the door opening was never finished.  I didn't really mind, since I knew that 'someday' we would be adding on anyway.
The process was long, but the end results were worth it.  New shelving was brought in and installed.  Some came from Lowe's and some came from The Container Store (it was 30% off at the time!).  I organized and sorted.  Surprisingly, I found that I had 15 cake mixes.  Wow!  15??!!  Why??  I want to always be prepared :).  Really, I do like to keep several in stock for spur of the moment times, but also, when I see a "new" kind at the store, I buy it.  The Funfetti kinds, the de leuce kind, etc.  They're fun to try! I think I have a problem :).
This was taken today....when the end racks of the pantry are less full.  Now instead of just buying because I'm not sure what I have on hand, I can see what I have on hand and not hoard.  Being organized - at least in this area- is a great feeling!

Pin It Now!

Monday, February 27, 2012

Two-Ingredient Cake

Posted by Donna:

For quite a while, I've been noticing a cake recipe using only two ingredients. Larry and I were having a really big sweet craving last Friday. I decided to make the strawberry cake using this recipe.

1 box strawberry cake mix
12 oz. 7-up

Mix the two together and bake in a 350 degree oven for about 25 minutes.

I was pleasantly surprised. It was so moist. Grant you, it's not like the homemade version of strawberry cake, but it works great for an instant "sweet" craving.

The sad part of this story is that I made--I should say experimented---with a new recipe for the icing--it turned out way too, too sweet--so; I ruined a perfectly good cake. We ended up throwing it out just because of the icing. Pin It Now!

Chocolate Curls


Posted by Lori: 

Chocolate Curls add a special touch to fancy desserts and ordinary desserts.  I had never made them until recently, but they were easy and fun to make, so I'll be doing them again, I'm sure.

For small curls, you can simply use a vegetable peeler and run it along the side or back of a chocolate candy bar (such as Hersheys).  For larger curls, do the following:

Melt 1 1/2 ounces of dark, semi-sweet or milk chocolate in a saucepan, with an added teaspoon of shortening.  You can melt it over very low heat, stirring constantly, or over a pan of water.  Stir constantly either way, as chocolate easily burns.

After it is melted, spread a thin layer across the back of a baking dish.  Allow to cool.
Hold a straightedged metal spatula against the baking dish just inside the edge of the chocolate at a 45-degree angle. Apply gentle, steady pressure, and push the spatula straight forward.

For looser curls, push the spatula forward in an arc. 

Use the curls to decorate your desserts and give them a

Pin It Now!

Friday, February 24, 2012

Howdy!

Posted by Lori:

Sorry, but I don't have time to post a recipe today and didn't yesterday. Didn't want you to think something was wrong. We've just been extremely busy and you probably have been, too! Sooooo, just dropped by to say that I/we hope you have a very nice weekend and we'll post more next week!

Have you ever made chocolate curls??  I'll show you how next week.  They're fun to make!  Lori Pin It Now!

Wednesday, February 22, 2012

Larry's Projects


Posted by Donna:


Since I haven't been baking or cooking anything new recently, I decided to share a few things that my husband has made. About two years ago, Larry was informed one day that he no longer had a job. He had worked at his position for 21 years; so, this was very unexpected. Needless to say, we were so upset--especially since we had no idea this was coming. Since then he has interviewed for several jobs, but his "age" was always brought up. He was 62 at the time; so, the one question that was always asked was, "How long are you planning on working?"

Trying to "re-invent" yourself is very hard--especially for a man. Thankfully, though, he has finally found something that he enjoys doing. A friend had made me a "casserole" carrier--so; Larry decided last fall that he would make Kimberly and Lori one for Christmas. He also started making tree swings--which I posted earlier--- and actually sold one. I asked him to make me the small black bench for my bathroom--for decoration!!!! Then, he just recently completed the quilt rack. It's rather large--as he admits---but I finally found a place for it in our bedroom.

Larry's favorite store is Harbor Freight. He usually comes out of the store with some cheap tool. At least, he now understands my "shopping buys" at The Market in Edmond. When you have a hobby, you have to support it, right? Pin It Now!

Tuesday, February 21, 2012

Geometry....Tiger Time....Valentine's Day

Posted by Lori:
This isn't a typical day in Mr. M's after-geometry-class, but it happened to be a special day.  It was Valentine's Day.  Mrs. M, as I've mentioned before, has asked me to help her treat Mr. M's geometry class (which my daughter is in) each holiday during a 20 minute time period called Tiger Time.  It's typically spent catching up on extra geometry studies.  
The students had a choice of having white cake with strawberries and whipped cream or chocolate heart-shaped cupcakes with icing.....or a mixture of all.  (*Note:  These heart shaped cupcakes are made by putting a marble in-between the cupcake liner and the pan.)
Everyone had fun making their own creations.  They topped them with squirt whipped topping or regular Cool Whip, sprinkles and chocolate hearts (Melt chocolate chips and piping them in heart shaped onto waxed paper. Allow to sit until hardened.)
The red punch was one bottle of Hawaiian Punch, one bottle of ginger ale, and a container (1/2 gallon) of pineapple sherbet.
After all of the students had finished their desserts and punch, they made lots of extras.
They delivered the treats around the school for the junior high and high school teachers.  I told them they had to get rid of it, so they even shared with the next hour class.  How nice!  The Juniors treated the Seniors!
Mr. M enjoying the break.
Yum!  What a fun Valentine's Day treat!


  Pin It Now!

Monday, February 20, 2012

Strawberry Chocolate Valentine Cookies

Posted by Lori:

These cookies are so pretty!  They aren't just for Valentine's Day, but are especially pretty for the sweetheart holiday.  I just read the reviews on the cookie last night, which explains why I didn't care for the taste when I made them.  The Taste of Home recipe says to use strawberry drink mix, so I thought Kool Aid, as did many other bakers, BUT, it should be Nestle Strawberry Drink Mix.  So, it will be a great cookie with the right ingredient!!


2/3 cup butter, softened
2/3 cup sugar
1 egg
1 tablespoon lemon juice
2 cups all-purpose flour
1/3 cup strawberry drink mix (NESQUIK, NOT KOOL AID!!)
2 teaspoons baking powder
1/2 teaspoon salt

GLAZE: 1 cup (6 ounces) semisweet chocolate chips
1 teaspoon shortening

FROSTING: 1/3 cup butter, softened
2 tablespoons strawberry drink mix (NESQUIK, NOT KOOL AID!!)
1/8 teaspoon salt
3 cups confectioners' sugar
3 to 5 tablespoons
2% milk

In a small bowl, cream butter and sugar until light and fluffy. Beat in egg and lemon juice. Combine the flour, drink mix, baking powder and salt; gradually add to creamed mixture and mix well. On a lightly floured surface, roll out dough to 1/4-in. thickness. Cut with a floured 2-1/2- to 3-in. heart-shaped cookie cutter. Place 2 in. apart on ungreased baking sheets. Bake at 350° for 8-10 minutes or until set and edges begin to brown. Cool for 2 minutes before removing to wire racks to cool completely. In a microwave, melt chocolate chips and shortening; stir until smooth. Spread over cookies; let stand until set. In a small bowl, beat the butter, drink mix and salt until blended. Gradually beat in confectioners' sugar. Add enough milk to achieve desired consistency. Decorate cookies. Yield: about 2 dozen. Pin It Now!

Friday, February 17, 2012

English Royalty Chocolate Chip Scones

Posted by Lori:

A few days ago, I found this recipe on Allrecipes.com (by Marbalet).  Since we were feeding the high school boys' and girls' basketball teams Thursday morning, I decided to make these scones for them, along with breakfast burritos, sausage biscuits and gravy, hash browns, and fruit. (By the way, it was all GONE!  They did share with some of the teachers. :)  Anyway, though most of them had never eaten a scone, many of them liked the rich, chocolatey goodies.  The original recipe didn't have an icing, but I used a powdered sugar/milk/vanilla glaze and put some on top.

The ball players were amused that they were eating as the "Royals" do!  I'll be treating them again next week.  Might make some more scones, as well!

ENGLISH ROYALTY CHOCOLATE CHIP SCONES

Ingredients

  • 1 3/4 cups all-purpose flour
  • 1/3 cup white sugar
  • 2 teaspoons baking powder
  • 1/2 teaspoon salt
  • 5 tablespoons unsalted butter, chilled and cubed
  • 1/2 cup miniature semisweet chocolate chips
  • 3 tablespoons orange juice

Directions

  1. Preheat oven to 400 degrees F (200 degrees C). Spray a baking sheet with nonstick cooking spray.
  2. In a large bowl, whisk together the flour, sugar, baking powder and salt. With a pastry blender or a large fork, cut in the butter until the mixture resembles coarse crumbs. Stir in the chocolate chips. Mix in the orange juice to form a dough.
  3. Turn out the dough on a floured surface. Pat or roll into a 9 inch circle about 1/2 inch thick. With a 2 1/2 inch fluted biscuit cutter, cut out 12 scones, pushing the dough scraps together for the last few, if necessary. Transfer the scones to the baking sheet.
  4. Bake in preheated oven until golden brown, about 12 minutes. Move to wire racks to cool.

Pin It Now!

Wednesday, February 15, 2012

Valentine's Banquet - Vintage Valentine/Music Theme

Posted by Lori:

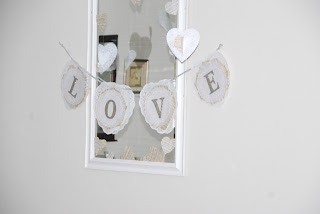
Sunday after worship the "young adults" treated the "Senior Saints" to a Valentine's Banquet.  I wanted to share some of the decorations with you.  It was a vintage Valentine/music theme. The colors were white/ivory/black/silver.
This pennant was made with a large heart paper doily, then a smaller heart doily.  Tucked into the edge of the smaller and between both hearts was torn pieces of an old song book.      
I used more of the music pages for the centerpieces.  I asked our preacher (and my brother-in-law) if he had seen any old song books around the building.  Since he had just moved into the office, he knew right where some were.  The former, now retired preacher had given him a stack of really old ones.  Perfect!  I used one whole book for the pennants, these paper hearts and wrappers for the inside candles.
The tables were set for five or six people each.  
The whole theme/inspiration for this decor was based on these placemats I found at a little store in Altus, OK (Gems, etc.).  You can find them at www.cakevintage.com.   I found Valentine stamps at Walmart and stamped LOVE, Be Mine, and You're Sweet in the center of each plate.  The centerpiece black/ivory papers are from the same line as the placemats.
Music hearts and silver heart confetti.
I made a lot of paper doily/music hearts to hang from the ceiling.  Thanks to my husband for hanging all of them for me!  He typically isn't a "decorator"!!  These were double sided hearts (doilies glued together) then the music hearts were folded and glued on just right at the fold only, so that they would stick out some on each side of the fold.
Paper doilies with silver glitter also hung from above.
A few of these 3-D hearts were hung.  Not many, but they were pretty!
 Something about candles.....So pretty!
Close-up of the centerpieces.
 Room from a distance...
Close-up of one pennant.
Close-up of hearts.
Little lace valance for a typically bare window.
Another view....
Dessert table!

The Senior Saints were served ham, green beans, potato casserole, bread, and homemade desserts.  They played a "2 truths and 1 untruth" game.  We guessed who was who.  They also played a matching game using songs from the song book about "love".  They matched the song title with a phrase from the song.  So much fun!  What a blessing those Seniors are to all of us!

Pin It Now!

Tuesday, February 14, 2012

Topiary


Posted by Donna:

A few years, I "really" got into topiaries. Since most were so expensive, I decided to make my own.


Supplies needed:

container
styrofoam form
reindeer moss
hot glue gun
florist pins


Through the years, some of the reindeer moss has disappeared due to "little" fingers that are attracted to it. It's funny what grandchildren are attracted to. Everytime I find a new "empty" spot, I can't keep from laughing.

This is such an easy project. It doesn't take long to do. Pin It Now!

Sunday, February 12, 2012

Nutter Butter Fudge Parfaits

Posted by Lori:


Tonight we hosted our youth group's annual Teen Valentine Banquet and Scavenger Hunt.  For the very first time EVER, it snowed during the whole event!  The snow didn't damper the fun at all and after eating chicken and beef lasagna, garlic breadsticks,  and green beans, desserts the teens were ready for the fun-filled evening.  Recipes are posted on this blog.  Use the search feature.


Along with the traditional Chocolate Delight (I made them into parfaits), I made something new:  Nutter Butter Fudge Parfaits.  They were a big hit!  So much so that one of the Senior boys is planning to check out this post for the recipe.  (Enjoy, Kerry!)


Nutter Butter Fudge Parfaits (Makes 12 in 8 ounce cups)
For the peanut butter mousse, you will need:
8 ounces cream cheese, softened
1 cup creamy peanut butter
1 cup plus two tablespoons powdered sugar
1 teaspoon pure vanilla extract
4 tablespoons heavy cream


In the bowl of a stand mixer fitted with the whisk attachment or in a large bowl using an electric mixer, beat cream cheese, peanut butter, confectioners’ sugar, vanilla, and heavy cream until thoroughly combined and fluffy; about 3 minutes.
For the fudge sauce you will need:
2 cups powdered sugar
1 can evaporated milk
2/3 cup semi-sweet chocolate chips
1/2 cup butter, melted
1 teaspoon vanilla

Bring sugar, milk, chocolate chips, and butter to a boil. Simmer uncovered for 8 minutes, stirring constantly. Remove from heat and stir in vanilla. Cool sauce completely.
For the whipping cream you will need:
2 cups heavy whipping cream 
4 tablespoons powdered sugar
Mix with an electric mixer together until soft peaks form.
For the parfait layers you will need:
1 package Nutter Butter cookies, coarsely chopped
Peanut butter mousse
Fudge Sauce
Whipping cream
Directions:  Place a layer of cookie crumbs in bottom of parfait cup.  Pipe or spoon a layer of peanut butter mousse (piping makes it more defined and less messy).  
Add a layer of fudge sauce, then whipped cream.  Repeat layers and top with more cookies.  If you begin to run low on something, just pipe around the edge.  It won't bother the taste at all, but will make it look "pretty" from the outside!  Enjoy!

Pin It Now!
 
Pin It button on image hover