Friday, July 31, 2009

Pineapple Ham Loaf

Posted by Donna:
My mother used to make ham loaf pretty often when I was growing up, and I really liked it. I can't remember fixing it when my girls were small, except maybe two or three times. Last year, for some reason, I decided a ham loaf sounded really good. I still had the recipe Mother used, but I decided to search the internet and see what was out there. They're all pretty much the same recipes, but I finally settled on one in particular. I was extremely pleased with the way it turned out. I had forgotten how much I liked it. A lot of people don't like to eat ham this way; but, I do think most women do enjoy it for a change.

Pineapple Ham Loaf

2 eggs
1/2 cup milk
1 cup finely crushed saltines
1/4 tsp. pepper
1 1/2 pounds cooked ham, ground
1 pound ground pork

Sauce (optional)
1 cup brown sugar
1 tsp. prepared mustard
1/3 cup vinegar
1/4 cup water
1 (8 oz.) can crushed pineapple, undrained

In a large bowl, beat the eggs; add the milk, crackers and pepper. Add the ham and pork; mix well. shape into a 9 in. x 4 in. loaf and place in shallow baking dish. Bake the loaf at 350 degrees about 1 1/2 hours. If you are going to use the sauce, combine the sauce ingredients and pour over the loaf before you bake it. You'll also need to baste the loaf frequently with the sauce.

When I make the loaf, I do use the sauce. I prefer not to use all of it because it is very sweet. It's just a matter of preference. The loaf is very good without it.

When I went to the meat market and got my meat, the butcher said, "I know what you're making, ham loaf!!!" Of course, then he preceded to tell me how much he likes it. I've always thought of it as something ladies serve at luncheons or club meetings. I know Mother did a lot. It's just fun to serve things a little different sometimes.

Pin It Now!

Thursday, July 30, 2009

Corn Dog Muffins

Posted by Lori:
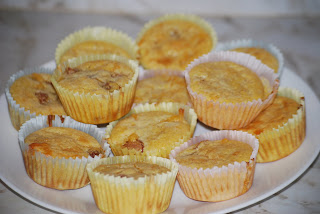
Most kids enjoy eating corn dogs. Three out of the four of mine do. I don't usually serve corn dogs at home, but tried a new recipe recently that was a big hit with the three kids that do like them. (The other one tolerated them, but still isn't a corn dog fan!)It's a recipe for corn dog muffins that is super-simple to make for the kid's lunch. I had seen a recipe similar to these before, but couldn't remember where (do you ever do that???). So, I searched online and found a few recipes that sounded good and just adapted them a little according to my kid's taste preferences.

CORN DOG MUFFINS


2 (8.5 ounce) packages corn Jiffy mix
2 eggs
1 cup milk
1 cup cheddar cheese, shredded
6 hot dogs, chopped

In a large bowl, combine corn bread mix, eggs and milk; stir ingredients until moistened. Add hot dogs and cheddar cheese (batter will be thin).

Fill greased or paper-lined muffin cups three-fourths full. Bake at 400 degrees for 14-18 minutes or until golden brown. Serve immediately or refrigerate/freeze.

We froze the leftover muffins and then, a few weeks later, just placed them back into a muffin pan...heating them from the frozen state. The muffins were just as good the second time around!
Pin It Now!

Wednesday, July 29, 2009

Tex-Mex Pot Roast

Posted by Kimberly:

I have been waiting to post this recipe until this week. Why? Because my sister and her kids are here for a visit, and I wanted to make this for them. I was afraid that if I posted it before they came, she might decide to try this for herself, and then I wouldn't have a new recipe to "impress" her with. I served this Monday night to she and her family for supper and it was a hit.

Tex-Mex Pot Roast

2 lbs. lean roast, trimmed (I trim off all the fat.)
2 cups dried pinto beans, rinsed
1 can (8 oz.) diced tomatoes
1 can (10 oz.) Rotel
1 can (8 oz.) tomato sauce
1 tsp. pepper
1 tsp. salt
1/2 tsp. garlic powder
Water

Place all ingredients into crock pot. Add enough water to cover and to allow beans to cook well. Cook on low for 8-12 hours or until beans are tender and roast breaks apart into small pieces. Serve rolled up inside flour or corn tortillas with all the fixings or over tortilla chips.

When I have cooked mine for only 8 hours, I usually turn my crock pot to high for the last couple of hours so that the juices will cook down. Just use your judgement based on how your crock pot cooks.

This makes a lot, so it is great to serve when you have guests. When I make it for just my family, we eat it for two meals and then freeze the leftovers which is usually enough for two more meals.

Pin It Now!

Tuesday, July 28, 2009

Cherry Dump Cake

Posted by Donna:
I absolutely love the cake I'm posting today. Sometimes the simplest recipes are the best. It is true in this case. I'm pretty sold on cherries----cherry pie, cherry cream cheese pie, cherry cobbler, and today's cherry cake. I'm sure some of you fix this quite often. For those of you that haven't tried this before, you really must bake it. It is yummy!!

Cherry Dump Cake

1 large can crushed pineapple, undrained
1 can cherry pie filling
1 box yellow cake mix
1 cup chopped pecans
2 sticks margarine, melted

Layer the first four ingredients in the order listed in a 9 x 13 cake pan. Drizzle the melted margarine over the layered ingredients. Do not mix. Bake at 350 degrees for 1 hour.

This is wonderful by itself, but it's even more wonderful with ice cream on top!!!! My mouth is watering right now.

Pin It Now!

Monday, July 27, 2009

Yummy Cinnamon Rolls

Posted by Lori:
Our traditional Sunday morning breakfast (for the kids, anyway) is cinnamon rolls. However, up until this point they've been the canned variety. It's just a quick breakfast before we head out the door for Bible class and worship. This recipe for "Yummy Cinnamon Rolls" was sent to me by Mom several months ago. She got it in an email from a friend. I forgot about the recipe until a few days ago when I was cleaning out my email inbox and found it. I decided to try them and they were great! In fact, we may say "good-bye" to canned cinnamon rolls forever!

YUMMY CINNAMON ROLLS

1 package Rhodes Cinnamon Rolls (discard icing or find another use for it...maybe just eat it - ha ha!)
1 stick of real butter
1 cup vanilla ice cream
1/2 cup brown sugar
1/2 cup sugar
Nuts, if desired

Combine butter, ice cream, sugar and brown sugar in pan and bring to a boil. Let cool. Put cinnamon rolls in 9 X 13 baking pan and pour mixture over the rolls. Put in cold oven overnight and let rise. In the morning preheat oven to 325 degrees (remove rolls before preheating!) Bake for 30 minutes. Serve from pan or invert on serving tray.

I've made homemade cinnamon rolls, but only do it a few times a year. My father-in-law is the cinnamon roll expert in my family! I'm grateful for this new Sunday morning YUMMY CINNAMON ROLL recipe. It's easy and delicious!

Visit Heavenly Homemakers for more Gratituesday!
Pin It Now!

Sunday, July 26, 2009

Ice Cream Pie

Posted by Kimberly:

A couple of weeks ago, we went home for a "Coke" family reunion. While we were there, my mom wanted to celebrate my son's 9th birthday since he was having a slumber party this year and not a traditional birthday party. So, she asked him what his favorite cake was. Blake is quite the picky eater, (I cannot say a whole lot because so was I when I was his age.) so he doesn't really like many cakes. What he does like is ice cream pie, and that was what he wanted. I emailed mom the recipe so she could grant his request. He was so excited to eat it, and so was I because I hadn't made it in a while.

Ice Cream Pie

Crust

1 lb. bag oreo cookies
1/2 cup melted butter

Place oreos in a platic bag and crush with rolling pin. Mix crumbled cookies and melted butter. Press into bottom of a 9x13 freezer-safe pan.

I have used two store-bought oreo cookie pie crusts also. This is a great way to make one for your family and share one with someone else. You will have leftover topping/sauce because the pie crusts are not as deep. Just refrigerate what is left over and spoon it over the top of each piece of pie as it is served.

Filling

1/2 gallon vanilla ice cream

Take carton off of ice cream and cut ice cream into even slices beginning at one end. Lay the slices on top of crust. I cut little pieces and feel in the holes or gaps. I also take a spoon and smooth the ice cream out a little. Put this in the freezer while you make the topping, so the ice cream can harden.

Topping

2 cups powdered sugar
1 can evaporated milk
2/3 cup semi-sweet chocolate chips
1/2 cup butter, melted
1 teaspoon vanilla
peanuts (optional)

Bring sugar, milk, chocolate chips, and butter to a boil. Simmer uncovered for 8 minutes, stirring constantly. Remove from heat and stir in vanilla. Cool sauce completely. Pour sauce over ice cream. Freeze for at least one hour before serving. If desired, the peanuts can be sprinkled on top of the ice cream before the sauce is poured over the top.

This sauce is delicious and really is what makes this pie so yummy! In fact, it is good just eaten with a spoon by itself!!

Pin It Now!

Saturday, July 25, 2009

Upside-Down Pizza

Pizza seems to be a favorite of everyone. I know when I was still teaching, the students always looked forward to the day pizza was being served. This is a twist on the standard pizza because it's upside down. So far, it has passed with flying colors among all ages.

Upside-Down Pizza
Posted by Donna:

2 lb. ground beef
1/4 cup chopped yellow or white onion
1 pkg. spaghetti sauce mix
1 (6 oz.) can tomato sauce
1 cup of Prego spaghetti sauce
1 large carton sour cream
1 (8 oz.) can crescent rolls
2 T. margarine, melted
1/2 cup shredded Parmesan cheese
1 1/2 cups grated Mozzarella cheese

Brown the meat and onion; then drain. Add spaghetti sauce mix, tomato sauce, and Prego sauce to the meat/onion mixture. Simmer gently to let all the flavors combine. Spread the meat mixture in a 9 x 13 pan or casserole dish. Spread the mozzarella cheese, followed by the sour cream on top of the meat. I always buy the large carton of sour cream just to make sure I have enough. It won't take the whole carton. Top with the crescent rolls. Brush the rolls with the melted margarine and sprinkle with the Parmesan cheese. Bake in a preheated oven at 375 degrees for 25 to 30 minutes. Let the pizza cool a little before serving.

I certainly hope you'll try this new way to serve pizza.

Pin It Now!

Friday, July 24, 2009

Creamy Baked Potato Salad

Posted by Lori:
Yesterday was our second oldest child's 13th birthday. Zachary wanted a hamburger/hot dog cookout for his special day, which also included baked beans and potato salad on the menu. I've had people ask about my potato salad before and what I used in it and how much, but I didn't really know how much of anything I used. So, this time as I was making it, I took the time to write down what I was doing and made sure to measure how much I was adding. And then, since Mom asked for the recipe, I decided that should be my next blog post!

CREAMY BAKED POTATO SALAD
5 lbs. potatoes (I used golden, but have used red)
1/2 stick butter
1 teaspoon salt
1 cup chopped dill pickle slices or stackers (I like Kosher)
4 Tablespoons pickle juice (which is a 1/4 cup)
1 teaspoon mustard
2 cups real mayonnaise
1/2 cup sour cream
1/2 cup purple onion, finely chopped
3 hard boiled eggs, finely chopped
few dashes of pepper

Wash potatoes and place in 9 x 13 cake pan or casserole dish. Slice butter and scatter in pan. Cover with foil and bake at 350 degrees for 3 hours or until soft. Allow to cool for 30 minutes to one hour covered. Peel off skin (leave on if desired) and cut potatoes into bite sized chunks. Add remaining ingredients and stir until well blended. Refrigerate for several hours until ready to serve.

Most people either prefer a mayo-based salad OR a mustard-based salad. This is more mayo-based, but has lots of flavor with the small amount of mustard, pickles, and pickle juice. But, I suppose the one thing that makes my potato salad different is that I use baked potatoes. I especially like the flavor of baked potatoes more than boiled potatoes. It just seems to give a unique flavor to potato salad, soups, and casseroles. However, if you prefer yours boiled, it would work just fine.

Pin It Now!

Thursday, July 23, 2009

Strawberry Jello Cake

Today's recipe has been in our family--it seems like forever. I suppose everyone has a "signature" recipe that they're known for. My mother was a wonderful cook, as all the women in her family were. Strawberry Cake was my mother's "signature" dessert and she always prepared it as one of her desserts for any of our family get-togethers. She was expected to bring this to all family reunions. She passed away eighteen years ago, and I continue to bring it to our family reunions to continue the tradition. This cake was always my older daughter's favorite cake. However, since she's a "little" older, she's become like most of us ladies---chocolate begins to be a "top" runner for our cravings--but still loves this cake. One of my sons-in-law celebrated a birthday in April and this is the cake he requested that I make for him. This cake has also transferred over to a favorite with some of our grandchildren.

Strawberry Jello Cake
Posted by Donna:

1 pkg. white cake mix
1 pkg. strawberry jello (small pkg.)
1/2 cup mazola oil (I've been substituting Cottonseed Oil for this and it works great.)
1/2 cup frozen (sweetened) strawberries (thawed)
1/2 cup water
4 eggs

Put all the ingredients into a large mixing bowl and mix with a mixer for three minutes. Pour into a greased and floured 9 x 13 cake pan and bake in a preheated 350 degrees oven. I bake mine about 25 to 30 minutes. I don't like a dry cake; so when it has baked 25 minutes, I begin to touch it to see if it's ready. Sometimes I have to go the whole 30 minutes.

Icing

1/2 stick margarine (melted)
1 box powdered sugar (as you know from baking, sometimes it takes a little more)
1/2 cup strawberries
Beat the ingredients together until creamy. Spread on cake.

It's fun to have recipes that are passed down from one generation to another. Those are usually the best ones. I've decided the one ingredient that makes this cake so good is that it's made with lots of love inside!!!!!

Pin It Now!

Wednesday, July 22, 2009

Italian Bow Ties

Posted by Lori:
One of my favorite hobbies is creating new dishes. To me it's fun to look in the pantry, see what's in there, and create something new! Of course, not everything is successful. In fact, there have been some total disasters!

When my husband and I married, 21 years ago, I decided that I wanted to write a cookbook for newlyweds. I had been cooking since I was in grade school and in fact, wanted to be a home economics teacher all through high school (I still might someday, except for now it's called "Family Science" in most schools!). I knew how to make some things without a recipe and without measuring, but wanted to write things down step by step for others for the newlywed cookbook. The first time I tried measuring was on something simple...pinto beans. I added MANY TABLESPOONS of chili powder! They were horrible, of course, and there was no way we could eat them; the dog didn't either! We still laugh about that day.

My latest creation - "Italian Bow Ties" turned out great! It passed the taste test of the five judges (plus me) here in my house. Of course, some liked it more than others, but everyone agreed that it's a keeper. I think it might be good with Parmesan cheese sprinkled on top, too. The kids also got to name the new recipe, so they thought that was fun!

ITALIAN BOW TIES

1 box bow ties (Farfalle noodles)- I used Barilla brand, with whole grain/extra fiber
2 cans petite diced tomatoes (I had to use one can that was not petite, but would prefer both to be petite)
2 Tablespoons butter (if desired)
2 teaspoons olive oil
2 teaspoons Italian seasoning
1 teaspoon garlic powder
1 teaspoon salt

Cook noodles per package directions. Drain and return to pot. Add tomatoes, butter, olive oil, Italian seasoning, and salt. Cook on medium heat until heated thoroughly.

I grew up in a small town called Eldorado, Oklahoma. The school cafeteria was great! One thing they would serve was tomatoes and noodles. Mom mentioned this dish recently and said she's been making that lately herself for she and Dad. As a teacher she remembered eating it at school, too. This recipe is based on that simple dish the cafeteria served us many years ago. I served it with "Creamy Italian Chicken", another creation I'll share with you soon!

Pin It Now!

Tuesday, July 21, 2009

Chunky Potato Soup

I know most of us usually look forward to the fall/winter seasons because we eat more soups and stews. However, I love potato soup anytime of the year. This particular recipe came from a book published by women from my home town, Hollis, OK. The recipe is my aunt's; so, that makes it special. The book is also very special to me because my daddy bought it for me about eight months before he passed away. I think we all agree that cooks from our home town, especially our relatives, are some of the best. This is the only potato soup recipe I make now.

Chunky Potato Soup
Posted by Donna:

4 medium potatoes, cubed
2 cups water
1/4 cup chopped onion
6 T. butter/margarine
3 T. all-purpose flour
3 cups milk (I always use 2% for this.)
1 1/2 cups sharp cheddar cheese
Salt and pepper, to taste

Bring the 2 cups of water to a boil in a large saucepan. Add potatoes and cook until tender. (Do not drain the water off the potatoes.) Melt the butter in a skillet over medium heat. Add onion; cook, stirring frequently, until the onion is clear and tender, but not browned. Add flour, salt, and pepper to this mixture. Stir until well mixed. Add this mixture to the potatoes. Whisk until it is well mixed. Add the milk and cheese. Simmer, stirring frequently, until the cheese has melted.

I always add crumbled bacon, extra cheese, and chopped green onions on top of each bowl of soup. To me, soup is such a comfort food. I've taken it to those who have been "under the weather," as I know many people do. It's always so appreciated.
Pin It Now!

Monday, July 20, 2009

White Texas Sheet Cake

Posted by Lori:
Most everyone has eaten the very popular chocolate sheet cake made with buttermilk. About 20 years ago, I tasted a white sheet cake at a church dinner. It was so good!I asked if the lady would share the recipe, which she did.

I forgot about that recipe for many years, but re-discovered it several years ago. I make it quite often now and although all ages/people like it, it seems to be most popular amoung women. (Note: I don't know why it's called "Texas", but I like Texas, so I'll keep that name for it!) Each spring I host the church ladies at my home for a ladies salad supper. This cake is always the dessert I choose to serve.

TEXAS WHITE SHEET CAKE
1 cup butter (margarine can be used, but it's not as rich)
1 cup water
2 cups flour
2 cups sugar
2 eggs
1/2 cup sour cream
1 t. almond extract
1 t. baking soda

Icing:
1/2 cup butter
1/4 cup milk
4 1/2 cups powdered sugar
1/2 teaspoon almond extract
1 cup chopped pecans, if desired

In large saucepan, bring 1 cup butter and water to a boil. Remove from heat and stir in flour, sugar, eggs, sour cream, 1 teaspoon almond extract and baking soda until smooth. Pour batter into a greased jelly roll pan (10x15x1). Bake at 375 degrees for 20 to 22 minutes, or until cake tests done with toothpick. (I like for the toothpick to still have a few crumbs on it - not be totally clean - so that it's really moist.) Cool for at 20 minutes.

Combine 1/2 cup butter and milk in saucepan; bring to a boil and remove from heat. Mix in sugar and 1/2 teaspoon almond extract. Stir in pecans. Spread over warm cake.

I don't care for nuts in my icing, so I don't ever use them - but maybe you do. I've seen the cake made with almonds and walnuts, as well as the pecans I've listed.

One interesting thing I've noticed about this cake. If it's at a potluck, it most likely won't get chosen because it's not eye-catching. The last few times I've made it, I've tinted the icing a really light pink and it's a lot more popular! I think it's just more eye appealing being a color instead of just a creamy white. So, it could be tinted other colors, too, according to your preferences.


Pin It Now!

Saturday, July 18, 2009

Cheese' N' Chicken Enchiladas

Most of our posts this week have been in the "Mexican Food" category; so, I'm going to continue that and post another one. This particular recipe came from a teacher that I taught with the year I retired---which was seven years ago. During my twenty- seven years of teaching, I gained some really good recipes. This one, I think, is one of my favorites.

Cheese' N' Chicken Enchiladas
Posted by Donna:

1/4 cup chopped yellow or white onion
2 T. margarine
1 1/2 cup shredded cooked chicken
1 (12 oz.) jar of mild picante sauce, divided
1 pkg. cream cheese, cubed
1 tsp. ground cumin
2 cups (8 oz.) shredded extra sharp cheddar cheese
8 (6 inch) corn tortillas ( flour tortillas can also be used)

Pre heat the oven to 350 degrees. Cook and stir the onion and margarine in a large skillet until the onion is tender. Stir in the chicken, one fourth cup picante sauce, cream cheese and cumin; cook until thoroughly heated. Stir in 1 cup of the sharp cheddar cheese. Spoon about one third cup of the chicken mixture in the center of each tortilla and roll up. Place each tortilla seamside down in a 9 x 13 baking dish. Top with extra picante sauce and cheese. Bake 15 minutes.

These are very filling by themselves; but, I usually serve Spanish rice, salad, and guacamole with them.

Have a great weekend!!!

Pin It Now!

Wednesday, July 15, 2009

Southwestern Cornbread Muffins

Posted by Kimberly:

As I told you in my previous post, I like to fix soups because they are easy and make enough for at least two meals. One of my favorite sides to serve when I make them is southwestern cornbread muffins. I have made several changes to the original recipe in order to make it healthier and more figure-friendly. Don't equate "healthier" with "less tasty" because this recipe is just as good as any that includes oil, sugar, and regular flour. These muffins are moist and they have passed the test of family and friends.

Southwestern Cornbread Muffins

1 can cream style corn
1 cup whole wheat flour
1 cup cornmeal
1/2 tsp. baking soda
1/2 tsp. salt
1 egg
2 egg whites
3/4 cup fat-free milk
1/4 cup applesauce
3 tbsp. honey
1 cup cheddar cheese
1 (4 oz.) can green chilies

Combine flour, cornmeal, baking soda, and salt. In a separate bowl, combine eggs, milk, honey, and applesauce. Stir into dry ingredients just until moistened. Add the cheese, chilies, and corn. Pour into prepared muffin pan. Bake at 350 degrees for 15 minutes.


Pin It Now!

Tuesday, July 14, 2009

Buttermilk Biscuits

Posted by Donna:

A very scary thing happened at my house this morning. I had to make homemade biscuits!!!!! Three of our grandsons were here, and when the first one got up this morning, I asked him what he wanted for breakfast. He quickly said, "Biscuits." I went to the refrigerator and, of course, there were no "canned" biscuits there!!!! I make homemade rolls, but homemade biscuits are something you don't find on my table but once every ten years, maybe. I began to panic a little.

Then I remembered a recipe that I had on my "to do" list and knew this was the morning to try it. I did have to substitute the buttermilk with a tablespoon of lemon juice and regular milk, but it worked great. I usually substitute with vinegar, but, of course, I was out of that, too. This particular recipe is in a book that one of my daughter's best friends gave me a few years ago. It's a wonderful book, and there are so many recipes that I've yet to try.

Buttermilk Biscuits

2 cups sifted flour
1 T. baking powder
1/2 tsp. sugar
1/2 tsp. cream of tartar
1/4 tsp. salt
1/4 tsp. baking soda
1/2 cup butter flavored Crisco
2/3 cup buttermilk

Preheat the oven to 450 degrees.

In a medium bowl, stir together the flour, baking powder, sugar, cream of tartar, salt, and baking soda. Add the butter flavored Crisco and blend the ingredients with a fork until you have a crumb-like mixture. Next, add the buttermilk and stir until the ingredients are moist.

Put the dough onto lightly floured wax paper and knead very, very gently. The dough will be quite airy; so, I just spread the dough with my hands until it was about a 1/2 inch thick. Cut with a biscuit cutter which has been dipped in flour. Place the biscuits on a well-greased cookie sheet or parchment paper. I used parchment paper. Bake 10-12 minutes or until browned.

I can't describe to you how good these are. All three of the boys loved them. Larry came and ate one and he loved them as well. He did ask why I fixed them for the grandsons and not him. He hasn't figured out yet that grandchildren get special treatment from grandmas. These didn't take any time to make. I've decided no more canned biscuits at the Coke house!!!!


Pin It Now!

Breakfast Pizza


Posted by Lori:
Breakfast pizza is one of my kid's favorite breakfast dishes. It's quick and easy, but very filling. I was excited to find wheat (not 100%, but still with extra fiber) biscuits at the store the other day, but my kids still prefer the white biscuits with less fiber! I think they're getting tired of my "trying to be healthier" kick this summer!

BREAKFAST PIZZA

1 can Grands biscuits
1 t. butter or margarine
8 eggs
1/4 cup milk
Salt, if desired
10 slices bacon, cooked and crumbled (I like to use the already cooked bacon slices for this recipe because it's so convenient)
1 cup grated cheddar cheese

Grease 15 inch pizza pan. Flatten each biscuit and place on pizza pan, sealing the seams to create the pizza crust. Melt butter in skillet with medium-high heat. Scramble eggs with milk and salt (I do one "shake" per 2 eggs) until done. Spread eggs evenly on top of biscuit crust. Top with crumbled bacon and cheddar cheese. Cook at 375 degrees for 20 minutes or until edge of crust is slightly browned.

This recipe can easily be adapted according to what your family likes. You and your family might like adding green chilies or onions to the eggs while cooking. Maybe you would like mushrooms or bell peppers as a topping. My kiddos like it fairly plain.

I usually use bacon as the meat topping, but you can use ham or sausage. I take this pizza to the teachers and school staff during Teacher Appreciation Week and on the first day of school breakfast our PTO serves each year. It's interesting that the bacon pizza is consistantly the most popular each time.
Pin It Now!

Sunday, July 12, 2009

Chicken Enchilada Soup

Posted by Kimberly:

Being a stay-at-home mom, I like to make things that I can stretch out for two or three meals to help save on our grocery bill. An added bonus of this is that I don't have to cook every night of the week. One of my favorite ways to accomplish this is by fixing soups. This chicken enchilada soup is really quick and easy to make, is a crowd pleaser, and freezes well.

Chicken Enchilada Soup

4 skinless, boneless chicken breasts, boiled and shredded
3 cans chicken broth
One 23 oz. can Ranch Style Beans
One 10 oz. can Rotel
1 1/2 cups frozen corn
1 lb. Velveeta cheese

Add all ingredients into a pot and cook on medium-high heat until the cheese melts which takes approximately 30 minutes. Serve over crushed tortilla chips. I also like to serve this with Mexcian cornbread. (My next post will be a healthier version of Mexican cornbread.)
Pin It Now!

Saturday, July 11, 2009

Southwest Cornbread Salad

This weekend, we are having a "Coke" family reunion. Out of seven children, there is only one remaining child who celebrated her 86th birthday in January---Elsie Coke Byrd---my husband's aunt. She lives in California and is the hostess of this reunion. She is so excited about this and has worked very hard for a year getting this planned---all from her home in California. She's a retired school teacher, who was still helping out at the schools until the last couple of years. She recently went on a cruise with all of her family. That says a lot about her "spunk" and zest for life.
I decided to share one of the recipes that I will be taking to the reunion.

Southwest Cornbread Salad
Posted by Donna:

1 pkg. Jiffy cornbread mix
1 envelope ranch salad dressing mix
1 (8 oz.) sour cream
1 cup mayo
2 large tomatoes
2 cans pinto beans
2 cans whole kernel corn, drained
10 strips of bacon, cooked and crumbled (save two strips for topping)
1 cup chopped green onions
1 cup chopped green pepper
3 cups shredded sharp cheddar cheese(save one cup for topping)

Prepare the cornbread mix as directed. Let the cornbread cool completely, then crumble.
Stir together the salad dressing mix, sour cream, and mayo until blended. Set aside. Crumble half the cornbread into a 9 x 13 dish. Top with half each of the beans, tomatoes, cheese, bacon, corn, green onions, and green pepper. Spoon half of the dressing evenly over the top. Repeat layers with remaining ingredients, ending with the dressing. Top with extra cheese and crumbled bacon. Cover and chill for at least 3 hours.

Since I've been involved in our recipe blog, I keep wondering, "Why don't I fix this recipe more often?" This blog has also made me realize how I get into such a rut with my cooking. My husband's reply to that statement would probably be, "What cookin'?" I cetainly hope I'm not the only cook out there that feels this way.

I do hope you enjoy this recipe.


Pin It Now!

Friday, July 10, 2009

Orange Barbecued Chicken

Grilled chicken is great plain, but yesterday I decided to try something different. It turned out to be really good!. In fact, all of us liked it - even our nephew who happened to be visiting. Our nephew, Bryce, usually uses ketchup with all kinds of meats, but he said he liked the sauce on the chicken so much, he decided he didn't need ketchup!

ORANGE BARBECUED CHICKEN

2 1/2 cup barbecue sauce (Head Country is our favorite!!)
1/2 cup orange juice
1/2 cup Italian dressing
3 lbs. chicken (I used boneless, skinless breasts)

Mix barbecue sauce, orange juice, and dressing together until blended. (Note: You could half the marinade and still have plenty for the chicken. I prefer more for extra basting.) Place chicken in large container or gallon Ziplock bag. Pour sauce over chicken and seal container or bag. Refrigerate for several hours. Grill chicken, basting with sauce several times while cooking.

Of course, this recipe could be baked, too.
Pin It Now!

Thursday, July 9, 2009

Pineapple Cake

Posted by Donna:

I first ate this cake about three or four years ago, and it's on my "favorite desserts" list now. One observation I've noticed about pineapple: men love it---or at least the men I know do. In my immediate family, desserts become somewhat of a concern for me at meals. It goes from liking everything, or only certain things. When you're cooking for family, you want everyone to have something they enjoy. Believe it or not, I consider my sons-in-law first. (That statement will make my daughters really happy!!!! tee hee) I was so thrilled the first time I fixed this cake because they both liked it. It also passed with flying colors when my husband and older brother ate it. That's when I realized I could never go wrong with this Pineapple Cake on the dessert menu.

Pineapple Cake

Preheat oven to 350 degrees

2 cups flour
2 cups sugar
2 eggs
2 tsp. soda
1 large can crushed pineapple (undrained)
1/2 cup pecans
1 tsp. vanilla

Mix all the ingredients together and beat for 3 minutes.

Pour into a greased/floured sheet cake pan. ( mine is 10 x 15 )
Bake for about 25 minutes. I don't know about you; but, I've learned to touch the top of my cakes and know when they're ready. I like my cakes done, but moist. Let the cake cool down before adding frosting.

Frosting:

1 pkg. cream cheese, softened to room temperature (8 oz.)
1 3/4 cups powdered sugar
1/2 cups pecans
1/2 cup margarine
1 tsp. vanilla

Melt the margarine. Pour into a mixing bowl. Add the cream cheese, powdered sugar, and vanilla and beat until smooth. After the frosting is smooth, stir in the pecans.

Enjoy!!!!!!!!!

Pin It Now!

Wednesday, July 8, 2009

Oatmeal Caramelitas

Posted by Kimberly:

A few years ago, my family was visiting our best friends who lived in McKinney, TX at the time. She had made oatmeal caramelitas for dessert, and I couldn't quit eating them. They quickly became one of my favorite desserts, and anytime that I make them, women always want the recipe. What woman doesn't love chocolate and caramel, right?! Case in point: My kids' school has a cookie cook-off every year during its Fall Festival. This year my daughter entered them for her grade level and won first place. The moms and teachers who were around during the judging kept stopping me to tell me how wonderful they were and requested the recipe.

Oatmeal Caramelitas

1 (14 oz.) package caramels, unwrapped
1/2 cup evaporated milk
2 cups flour
2 cups quick-cooking oats
1 1/2 cups brown sugar
1 teaspoon baking soda
1 cup butter, melted
1 cup semi-sweet chocolate chips

Preheat oven to 350 degrees. In a saucepan over medium heat, melt the caramels with the evaporated milk stirring frequently until smooth. Set aside. In a medium bowl, stir together flour, oats, brown sugar, and baking soda. Stir in the melted butter. Press half of the mixture into the bottom of a greased 9x13 pan. Bake for 10 minutes. (Do not overbake.) Remove from the oven, and pour caramel mixture over top. Sprinkle the chocolate chips over the caramel. Crumble the remaining oat mixture evenly over the top, and pat down lightly. (I actually get a handful of the remaining mixture and squeeze it together and then break it apart so that it is in various-sized chunks.) Bake for an additional 15-20 minutes or until the top is golden. Cool before cutting into bars. *I prefer to eat these warm, so I will nuke them in the microwave before eating.


Now just a little funny on my sister: She quickly became a big fan of these, too, so when she and her kids came to my house for a visit, I made them. I always bake mine in a glass 9x13 casserole dish. Well, on Sunday morning, we were in a dash to get out the door for church, so I hollered at her and asked her to put the chicken in the oven. When we walked in the door after church, I didn't smell barbecued chicken cooking in the oven, so I opened the oven door and found the caramelitas in there instead! I'm sure you can only imagine our disappointment when we realized that there was nothing to eat for lunch, and, more importantly, that our dessert was ruined!!!

Pin It Now!

Tuesday, July 7, 2009

Calzone

Although nothing beats homemade bread like Mom posted yesterday (here), these frozen bread rolls are easy to use and very versatile. One way I use them is for calzone. At Thanksgiving I make mini calzones as appetizers for our annual night-before-Thanksgiving event on my husband's side of the family.

Calzone - serves 6 - 10
1 pkg. 24 count frozen rolls, wheat or regular (dough balls - I get Rhodes brand, but any brand will work)
1 1/2 lbs. hamburger
1 T. garlic powder
1 T. onion powder
Salt
Pepper
3 cups mozzarella cheese

Allow frozen dough balls to thaw on cookie sheet or microwave them to thaw per package directions. Brown hamburger with garlic powder, onion powder, salt, and pepper. Drain to remove grease.

Using desired number of rolls per calzone (I use one roll for appetizers - used four for these calzones), roll out dough into rectangle shape (just do a circle with one).
Sprinkle mozzarella cheese down the middle of dough, topped with hamburger meat. Of course, you might rather use pepperoni, sausage, Canadian bacon, and some pizza-style veggies, too. We just prefer them plain.
Seal edges and place seam side down on a greased baking sheet.

Brush lightly with olive oil and bake at 350 degrees until browned. The small ones will take 12 - 15 minutes; larger ones about 25 minutes. I brush the appetizers with garlic butter before baking them instead of the olive oil.
Serve with spaghetti sauce and/or garlic butter (my favorite) or do half and half . These calzones were made with the whole wheat dough. We probably prefer the regular dough more, but did this in the quest to eat healthier! Also, these made with four rolls each were really big and no one ate a whole one...three rolls would be better. Our calzones were served with a salad. And, the leftovers were heated up and enjoyed a few days later!
Pin It Now!

Monday, July 6, 2009

Refrigerator Rolls

Posted by Donna:

I love homemade bread. It took me two or three years to learn how to make homemade rolls. I always watched Mother make them and it looked simple to me---that is until I started making them myself. Some things, like bread, take lots of practice---learning what consistency the dough should feel like, how long to knead it, and the right amount of time for it to rise. It takes more than just following the recipe at times. This is my mother's recipe, and they're definitely a real "comfort" food. Hope you enjoy them as well.

1 cup sugar
1 cup butter flavored crisco
2 cups milk
1 cup water

Bring these four ingredients to a boil and boil for 2 minutes. Cool to lukewarm. After the mixture has cooled down, dissolve 2 pkg. of yeast in 1/2 cup cool water. Make sure the yeast is completely dissolved. Do this in a large bowl. Then, pour the lukewarm mixture ino the bowl with the yeast. Mix very well. Add 3 cups sifted self-rising flour and mix well. Cover with a paper towel and let rise until it has doubled in size. I have a particular bowl I use for this. I have put marks on the bowl with a magic marker, just so I'll know when it has doubled. This usually takes about 1 1/2 hours or a little longer at my house. It may vary at your home. Just make sure it has doubled in size. After it has doubled in size, stir down the dough with a spoon. Sift together 5 1/2 cups of all purpose flour, 1/8 tsp. baking soda, and 1 tsp. baking powder. Add this dry mixture to the dough and mix well. Again, cover with a paper towel. This time, you just have to let it rise 45 minutes. Then, put the dough on a floured board or wax paper sprinkled with flour. Knead for 2 minutes; then roll out for rolls. I probably roll mine to about a 1/2 inch thick. One word of caution---- you know how bread shrinks back up when you roll it out. You can divide your dough into two balls and that helps that problem some. With practice, you learn how thick you want your dough to be. Cut your rolls out with a biscuit cutter. Place in greased pans. Let rise until they have doubled in size. Bake at 375 degrees until brown---around 10 minutes.

I always make my rolls several days before I need them. After I put them in greased pans, I don't let them rise, but cover them with foil--several layers----and freeze them. On the day I want to bake them, I take them out and let them rise for 5 or 6 hours. This recipe makes anywhere from 32 - 40 rolls. It all depends on how thick you make your dough when rolling it out.

I realize rolls take a lot of work; but, they are definitely worth it. There are just those things that are worth doing for your family. Remember, you're making memories with these rolls!!!!! Sweet, sweet, memories!!!!

By the way, don't ask me why Mother named these refrigerator rolls because I don't know. They're just homemade rolls; but, when she passed this recipe on to me, she called them refrigerator rolls. I've just stuck with that name. It's just another one of those special things you do just because your mother did.

Pin It Now!

Friday, July 3, 2009

Brownie Pizza


***NOTE ABOUT the COUNTRY BREAKFAST CASSEROLE recipe: The number of eggs was left off the ingredient list and is now corrected!! (It's 6 eggs)

Posted by Lori:
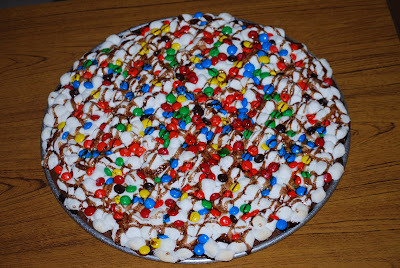
We just picked up our two oldest children from camp at QMCC (Quartz Mountain Christian Camp). Another son also attended the week before. Each year, on the Wednesday night of camp, we go visit them and worship with the group. Also on that night, I take whatever homemade treat they have requested. This year Jacob requested "Cake Mix Cookies" (I'll post them sometime). Zachary requested "Chocolate Globs". You'll find that recipe here (click link). Lauren wanted "Brownie Pizza" for her treat, and actually, so did the counselors because that was what she had last year and they remembered it!

BROWNIE PIZZA

1 boxed brownie mix, prepared as directed
1 medium sized bag M & M's
1 pkg. small marshmallows
Chocolate syrup
Caramel sauce (if desired)

Bake brownie mix in greased 15-inch pizza pan or you could use a small sheet cake or jelly roll sized pan. Bake for 25 minutes. Drizzle chocolate syrup over brownie OR spread caramel sauce all over the top. Sprinkle package of marshmallows over the top and place back in the oven for 5 more minutes. Take out and scatter M & M's over top. Drizzle with chocolate syrup and caramel syrup.

It's fun to put the brownie pizza in a pizza box. This is a big hit with kids and teens....and their counselors :).
Pin It Now!

Thursday, July 2, 2009

Country Breakfast Casserole

Posted by Donna:

This recipe was given to me by my younger daughter; but, because I've fixed this several times lately the past few months, I decided to beat her in sharing it. Not really. It is true that I have been fixing it quite a bit here lately, but I didn't try to beat her. I called her and got permission to go ahead and share it. There are lots of breakfast casseroles out there; but, what makes this different is the gravy mix that is added. It is really good and it is my favorite now.

Country Breakfast Casserole

1 lb. sausage
6 eggs
1 chopped green onion
frozen hash browns
2 cups shredded sharp cheddar cheese
1 cup water
1/2 cup milk
1 (2.64 oz.) pkg. McCormick country gravy mix

Preheat oven to 325 degrees.

Brown the sausage. Drain on a paper towel. Mix the sausage and green onion together and spread across a greased 9 x 13 casserole dish. Add the thawed hash browns on top of the sausage/onion mixture. I don't measure the amount of hash browns I use---I just make sure the top is covered---probably 2-3 cups. Salt and pepper the hash browns. Next, add the cheese on top of the hash browns. Whisk together the eggs, water, milk, and gravy mix. Pour this on top of the other layered ingredients. Bake 40 minutes-or until a knife comes out clean. In my oven, 40 minutes is all it takes. Let the casserole set for ten minutes before serving. The leftovers heat up very well.

I've been taking this to families who have lost a loved one. They've really enjoyed it. I think everyone enjoys breakfast goodies anytime of the day.

Pin It Now!

Wednesday, July 1, 2009

Squash Soup

Posted by Lori:
Sunday night after worship a little boy came up and asked if I would like some squash. His family has a big garden this summer and they were sharing the bounty. The back of their van was filled with HUGE squash like these. I took one of each, since my family only likes fried squash and I'm trying to keep us eating healthier. I know that the yellow squash is regular summer squash and the green one is zucchini, but WHAT IS THE WHITE SQUASH? The little boy told me it was "hand" squash, but the site I read says that's not in America. I looked at squash pictures, but found nothing that looked like this.
I decided to make a squash soup. It was really good! I tallied up the whole pot and it's only 5 Weight Watcher points, so one serving isn't even one point.

SQUASH SOUP
10 cups squash, cut in chunks
2 cans (14 1/2 oz.) diced tomatoes
1 carton (32 oz.) chicken broth
1 T. Italian seasoning (you may prefer less)
1 T. onion powder
1 T. garlic powder
1 t. salt
pepper, to taste

Place ingredients in large pot. Simmer until vegetables are tender - about 45 minutes.

I don't make soup too often in the summer time, but it's a proven fact that soups are more filling, so that's always a good thing. My youngest son probably would have tried it, but he had already eaten when it was ready. My oldest would have tried it, but she's at camp this week. The two middle boys and my husband - not a chance!

I didn't use the white squash, just the yellow summer squash and zucchini. Do you know what it is? I think it's so pretty! It looks like a flower :). I'll think I'll just save it until fall and put it out with our pumpkins.

Pin It Now!
 
Pin It button on image hover