Friday, November 30, 2012

Mommy's Helpers Reindeer Apron

First I want to apologize for the quality picture.  It's hard to see what I'm trying to show you, but just imagine it, if you will.  

I got this idea from my sister-in-law.  She has an apron with her children's handprints/footprints making reindeer just like I do, except that it is on a white/red/green striped apron (I think!).  I chose to do a red apron several years ago, when my children were younger. It's a little dark for the project, so a lighter color of apron would be better.  I remember being in a rush and not taking time to make sure the paint was on their hands and feet really good.  I also didn't heat-set the pain after it dried, so it's faded some. 

Under each reindeer I have the child's name and age painted. My daughter's reindeer has a holly and berry on top of the reindeer head to make it more girly.

No, the quality isn't quite as good as it should be.  I should have planned ahead instead of rushing the craft.  But it's my children's handprints and footprints.  It's a special treasure and keepsake, in my opinion! It hangs in my kitchen every Christmas.
Pin It Now!

Thursday, November 29, 2012

Joseph's Coat of Many Colors

Last night I taught the 4 and 5 year old Bible class about Joseph and his coat of many colors.  I've taught this lesson to children many times in the past and usually have used brown paper sacks to let them make their own "coats of many colors", but this time I did something different.  I raided one of my middle son's drawer to gather up plain white t-shirts for the kids.
After the lesson, I cut the t-shirts right up the middle in the front, making them easy to put on and so they would resemble a coat. Then the students made them "colorful" with washable markers.  Their shirts aren't really colorful like they could have been, but they got the idea and had fun making them.  You could start out with a colored t-shirt if you planned ahead a little better than I did!  I've also done this with tie-dyed shirts, just to let them wear, but not decorate.

Simple illustrations help the children retain the story they learn.  Having fun while learning makes it even better!

Pin It Now!

Tuesday, November 27, 2012

Cinnamon Pretzels


I had been seeing this recipe on Pinterest for a while and finally had an opportunity to make them yesterday.  The first batch I used the big pretzel twists, but then did the small ones.  The smaller ones are better.  More of the cinnamon/sugar mixture sticks to them.  These are simple to make and would be great for homemade Christmas gifts!


Cinnamon Sugar Pretzels 

1 (16 oz) bag pretzel twists 
⅔ cup vegetable oil 
½ cup sugar (I used homemade vanilla sugar.)
2 tsp cinnamon 

Preheat oven to 300 degrees. Pour pretzels into a roasting pan. In a medium sized bowl mix together vegetable oil, cinnamon and sugar. Pour over pretzels and stir to coat. Place in oven on top rack and bake for 30 minutes, removing twice to stir.

Pin It Now!

Monday, November 26, 2012

Thanksgiving Creativeness

This year our Thanksgiving had several things to do that showed creativeness of family members.  My mother-in-law painted a canvas with a blue sky, green grass and a tree.  Family members did a thumbprint leaf on the tree in various colors of ink, then put their initial on their own leaf.  This was fun for all ages and will be a great keepsake for years to come!
One of my sisters-in-law found these interesting tablecloths at Walmart last year on clearance.  Both kids and adults enjoyed coloring and doing activities during our Thanksgiving dinner.
One of my daughter's creations was a Texas Rangers' Turkey!  He turned out pretty cute, didn't he?!
Another creative outlet was on my son's new cast.  He broke his arm at a basketball game last Monday night and  got this lovely hot pink cast on the Wednesday before Thanksgiving Day so family members began signing that evening.  I'm pretty sure the cast will be full of signatures by the time he gets home from school today.


I hope you had a wonderful Thanksgiving, with lots of thankful thoughts, family, food, and fun!
Pin It Now!

Monday, November 19, 2012

Skillet Apple Pie

Mom posted this recipe last fall, but this past Saturday, we celebrated an early, early Christmas together and she made it for the family.  She wasn't pleased with the fact that it boiled over.  It never had before.  But the boiling over didn't change the fact about how good it was. I had never eaten it before, but it was delicious!  I took a picture of it to share with you, as well.  Of course, the fact that she served Blue Bell Homemade Vanilla Ice Cream with it made it extra special!

Originally Posted by Donna in Sept. 2011:

If you want to feel like the Pioneer Woman, you must make this pie. This recipe is in the recent issue of Southern Living. It's such a pretty pie, and you really do feel a sense of pride when it comes out of the oven. The fact that it's baked in a cast iron skillet makes it so much fun.

Skillet Apple Pie

2 pounds Granny Smith apples---I used four of these
2 pounds Brae burn apples---four of these also
1 tsp. ground cinnamon
3/4 cup granulated sugar
1/2 cup butter
1 cup firmly packed light brown sugar
2 pie crusts, unbaked (I used my recipe that is posted on this site) You can use store bought if you choose.
1 egg white
2 T. sugar

Preheat oven to 350 degrees. Peel apples, and cut into 1/2 inch thick wedges. (I just cut mine up to what I thought would work.)
Toss apples with cinnamon and 3/4 cup granulated sugar.

Melt butter in a 10 inch cast-iron skillet over medium heat; add brown sugar, and cook, stirring constantly, 1 to 2 minutes or until sugar is dissolved. (It took the 2 minutes on my stove.) Remove from heat, and place 1 piecrust in skillet over the brown sugar mixture. Spoon apple mixture over the piecrust, and top with the remaining piecrust. Whisk egg white until foamy. Brush the top of the piecrust with egg white; sprinkle with 2 T. granulated sugar. Cut 4 or 5 slits in the top for steam to escape.

Bake at 350 degrees for 1 hour to 1 hour and 10 minutes or until golden brown and bubbly. If the pie crust starts to brown too much, place aluminum foil on top of the crust. (As well as I remember, I did use the full hour and 10 minutes in my oven and I did have to put foil on top of my crust. Cool on a wire rack for 30 minutes before serving.

Serve with ice cream.

This fall issue of Southern Living is worth the purchase. The cake on the cover is just as good. I made it, also, a few weeks ago. There are a lot of apple recipes in this issue. Of course, you can go to their website and get some of these as well. 

I wish I had a picture to share. (*NOTE from Lori:  Now she has a picture! :) I can't wait to make it again.
Pin It Now!

Thursday, November 15, 2012

How to Cook a Turkey (According to a 1st Grader)


I love this "recipe". It was written by my youngest son when he was in 1st grade.  If you're new to turkey cooking, maybe this will help :).


HOW TO COOK A TURKEY
by Biscuit

10 pounds of dressing
9 cups of juice
One 20 pound turkey
9 eggs
20 cups of milk

Directions:
Go shoot a turkey.  Then take the skin off.  Then you can use the feathers to decorate something.  Wash the turkey off in the sink with some water.  Put the clean turkey in a big, big pan.  Put all of the dressing on top of the turkey.  Bake the 9 eggs and then put them in the turkey.  Then pour water on the eggs and that will make mush to go in the turkey.  Take a little spoon and get some dressing out, then pour the milk where the dressing was.  Then put the dressing back where it goes.  If you want to put the feathers on when you're not eating it you can, then when you are gonna eat it take them off.  Put the pan in the oven.  Don't cover it cause the feathers might get hot.  Cook the turkey and feathers for about 30 minutes.  Then taste it and look at it to see if it's done.  When your mom yells "It's ready!!!" then it is prolly done.  Then take the turkey out of the oven and put it in the middle of the table.  Take the bones out.  Throw the bones to the dog.  Have your dad cut it up and put it on your plate.  Eat the turkey after you say a prayer.  After you eat, take all your Thanksgiving stuff down and get ready for Christmas.
***

This 1st grade Thanksgiving cookbook has become one of the special memories from my children's younger years.  I'm thankful that their teacher was willing to take the time to listen to each student and write down their "recipes".  What a special cookbook!

Pin It Now!

Wednesday, November 14, 2012

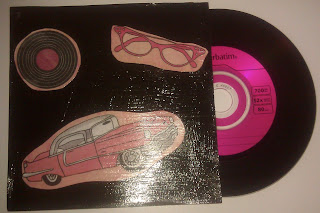
"Record" Craft for '50's Theme

To go along with the '50's theme retreat over the weekend, the teens made "record albums".  I found some really neat vinyl CD's that actually looked like old records.  They are real, working CD's, but look and feel like vinyl records on the top side.  
I found the CD's at Amazon.com, and they come in these three colors, plus orange and purple.
The covers/sleeves were light brown, thick paper, but the teens redid them to look like album covers.  They had a good time designing the covers! The sleeves were also found on Amazon.
For my own cover/sleeve, I left the back undone, but some of the teens decorated both sides.  You can see the CD looking 'normal' on the back side.  

These vinyl CD's can be melted in the oven to make bowls.  Just do a search for CD or record bowls and you'll find directions for the craft.  I may make one, just to try it!
Pin It Now!

Tuesday, November 13, 2012

"Coke' Float Centerpieces


At a recent youth retreat, the crafts were based on the '50's theme.  These "Coke" floats are easy to put together and the teens really enjoyed making them.  

You will need the following supplies:

White silk carnations
Light brown shredded paper
Red glittery pom pom ball
2 straws
Glass Coke cup (or parfait-looking glass).  This one came from Dollar Tree.

Place a small amount of shredded paper in bottom of cup, followed by a carnation (take it off the stem). Continue layers, ending with several carnations.  Insert two straws and top with the "cherry"!  If desired, use hot glue guns to secure the carnations to the paper.

After the centerpieces is used, the cup can still be used as a drinking glass!
Pin It Now!

Monday, November 12, 2012

Camo Baby Shower

At first, when I heard I needed to decorated for a baby shower in a "camo" theme, I wasn't that excited.  Camo isn't really my thing, and I had nothing to start with.  But as I bought items for the theme, I became more and more excited.
I didn't plan for the orange to go with the theme, but I saw some orange table toppers in a closet in our church's fellowship building and got them out.  Than a friend happened to drop by with some orange table skirts.  The orange seemed perfect!
Just for fun I added some pumpkins.
And burlap.....lots and lots of burlap.  I even found camo printed burlap!  And another friend had more of that printed camo burlap!
So it worked out.  No really "baby-ish", but still cute.  
I found camo printed gable boxes at Canton First Monday.  They looked cute as table centerpieces.
The baby's name was put on a banner and hung from the burlap backdrop.
It's always fun to do something new and different.....especially in decorating.  We look forward to meeting you, baby Alan Wayne!

Pin It Now!

Friday, November 9, 2012

Super Cute Cupcakes

At our school carnival last night, a PTO mom made these really cute cupcakes!  I'm sure you can "Google" them or look on Pinterest and find the recipes.  The left ones are Oreo, the middle - obviously an ice cream sundae, and the right ones are German chocolate - with German chocolate icing on the middle of the top.
These cupcakes were presented so cute!  I didn't take a good picture because the ribbon is in the back, but each little bag had a cupcake and was tied with pretty ribbon.  Simple, but very cute!  These were made by a big sister of a girl in elementary school.

Thank you to both of you for making "fun" items for our carnival concession stand!

Pin It Now!

Wednesday, November 7, 2012

Pumpkin Pancakes with Caramel-Pecan Sauce

(*Note - This is a post from a few years ago.  I'm posting it again because they sound really, really good!  Too bad I already ate Cherrios :(.  Ha ha!)

This weekend I attended the 30th Annual Ladies' Fall Retreat at Quartz Mountain Christian Camp near Lone Wolf, Oklahoma. Now, when you think of camp food, many of you might not think of "good" food; however, at QMCC, the food for the ladies' retreat isn't just good - it's great!

For breakfast this morning there were four choices of pancakes: plain, chocolate chip (or maybe M & M), blueberry, and pumpkin. There was regular syrup available, plus blueberry syrup, and then a special caramel pecan sauce. That caramel pecan sauce was sooooo good on top of the pumpkin pancakes.

PUMPKIN PANCAKES
2 cups Krusteaz Buttermilk Pancake Mix (my favorite brand!)
2 tablespoons brown sugar
1 1/2 teaspoons pumpkin pie spice
1 1/4 cups cold water
1/2 cup canned pumpkin

In medium bowl, stir together pancake mix, brown sugar and pumpkin pie spice. Add water and canned pumpkin. Stir with a whisk until blended. Pour slightly less than ¼ cup batter per pancake onto lightly greased and preheated 375°F griddle (medium heat). Cook 1-1 ¼ minutes per side, turning only once.

CARAMEL-PECAN SAUCE
1 cup caramel topping
1 cup shredded coconut (optional)
1 cup pecans (roasted, if desired)
a splash of milk

In a small saucepan on medium heat, toast nuts and coconut until lightly browned. Stir in caramel. Bring back to a simmer, remove from heat and add milk while stirring. Let sit while you make the pancakes and the sauce will thicken a bit.

I asked the "chefs" about the pancakes and they told me the ingredients. I found this recipe on the Krusteaz website to share with you. I didn't even notice the coconut in the sauce and others didn't either. In fact, many of us were surprised that it was even there! It would be fine to leave it out if you didn't want to use it. Enjoy!


Pin It Now!

Monday, November 5, 2012

Canton First Monday

This past weekend several family members of my husband's side of the family met up for a girls' weekend.  We met in Frisco, TX, at one relative's house, then headed out early Friday morning to drive to Canton First Monday at Canton, TX.

The only thing I knew I was going to buy was seven bottles of Mexican vanilla.  I had just run out of the two bottles I bought last year, so getting new bottles was perfect timing.  I was excited about my purchases, until I got my 'proud bubble' burst!  Apparently I can get this vanilla any time at a restaurant about an hour away from home - at any time.  It's $12 instead of $10, but not bad for the huge bottle.  And then my bubble got burst even more.  Apparently I can get this same vanilla at WALMART!  Hmmmmph!  Can you believe it?  Me, either!

I did buy a few other things at Canton.....mostly decorating mesh and a big OU item for my son's class auction basket...and a candle.

In reality the trip isn't about the shopping.  It's about getting together as a family.  (And, it's about making it through Dallas area traffic in a small way!) We don't have the opportunity to do that very often with busy schedules and our own family activities/obligations.  It was fun talking, laughing, playing cards, and eating together.

Thanks for the fun time together, ladies!

Pin It Now!

Thursday, November 1, 2012

30-Day Giving Challenge

My cousin-in-law Alyssa, at Keeping the Kingdom First, is hosting The 30-Day Giving Challenge again this year.  I have accepted the challenge and encourage you to do the same.

With November here, we automatically begin thinking about Thanksgiving.  Why not make the whole month of November a month of thanks and giving?  While going through this 30-day challenge of giving something each day, you will be blessed in return.  With each gift or act of kindness, you will feel good to have helped someone else.  You will also begin to think more about the needs of others around you.

There are all sorts of way to give during this challenge.  You can give money, of course, but you can also give supplies, food, and clothing.  Those are things we naturally think about as ways to help others.  But I want to suggest another way that you can give of yourself during this challenge:  Give of your time.

Time is a precious thing to all of us, but sometimes we become stingy and selfish with our time.  Think about the hours you spend watching TV or hours on the computer or maybe enjoying a hobby.  Could you give up some of that time to help someone else - to give of yourself to help others?

It's great to give money, food, supplies, and clothes - and in fact, it's needed.  But, we must also make sure we are giving of ourselves from the heart and not just giving to fulfill and obligation - as a sense of duty.

Because I live in a very, very small town (less than 900 people) my ways to volunteer will be different than yours, but here are some ways to give in the next 30 days:

  1.  Volunteer to read a book at school.
  2.  Volunteer to take an elderly person shopping or to the grocery store.
  3.  Volunteer to babysit (free of charge) for a family with young children.
  4.  Take a meal to a neighbor.
  5.  Take a care package to a hospital waiting room.
  6.  Go visit patients in the hospital.
  7.  Take a group of adults, teens, or children to the nursing home to visit and sing.
  8.  Send someone a card. (homemade or purchased)
  9.  Bake cookies or muffins and take them to work to share with your co-workers.
10.  Volunteer to rake leaves in an elderly person's yard (or other yard work).
11.  Volunteer to take elderly people to their doctor's appointment.
12.  In line at a fast food drive-thru, pay for the person's meal/order behind you.
13.  Take flowers to an office (ex. your bank, doctor's office, post office, etc.)
14.  Send a hand-written note to a teenager (they'll be shocked that it's not a text message)
15.  If your child is in school, volunteer to help with school events, parties and carnivals.  Even if you work, those in charge can use your help in some way.
16.  Make fall door decorations and take them to nursing home residents.
17.  Take a meal to a family with a newborn baby.
18.  Help organize food boxes to give away to families in need.
19.  Send a note of encouragement to men and women in the military.
20.  Volunteer your time at a women's shelter, a soup kitchen, or other service provider.
21.  Take the time to call or go visit widows and widowers.  This time of year can be especially lonely for those who have lost their spouses and whose children may not live close by.
22.  Invite someone to your home.  This could be for a meal, for coffee/tea, desserts, or maybe a game.
23.  Host a neighborhood ladies' brunch.  Hand-deliver invitations.  Play ice-breaker-type games that allow each person time to talk.
24.  Host a ladies salad supper with friends or Christian sisters from your congregation.  Have them bring an item from their past to tell about, as well as their favorite salad.
25.  Most people do not like to ask for help, even if they need it.  Offer to help others in a specific way, such as, "I have Monday morning free.  Why don't I come help you with whatever you need done?" 

I look forward to this challenge and know that it really will be a challenge.  It is something I will need to plan for daily.  It won't just happen.  I have to "plan" for it to happen.  On the other hand, I can expect to be blessed by God because of this challenge.

Look what Jesus told the disciples: 

Give, and it will be given to you. A good measure, pressed down, shaken together and running over, will be poured into your lap. For with the measure you use, it will be measured to you."
Luke 6:38

So, are you up for the challenge?  What other ways can you think of that you can give during this month?
Pin It Now!
 
Pin It button on image hover