Showing posts with label crafts. Show all posts

Wednesday, July 8, 2015

Crafts at QMCC 2015


Coming up with crafts for a week at QMCC isn't hard, but finding some new unique ones is sometimes a challenge.  And then sometimes I provide the supplies and the campers come up with something totally unplanned! That's GREAT!
My husband's workplace had chopped down some trees.  No one realized that the insides of the trees were rotting until they came down, so a really strong wind could have toppled the trees at any moment, but much of the tree was cut into logs and for firewood and other projects. I decided to have some small logs cut into chunks to be used at craft time.  One of the campers took the inside of the log out, leaving these bark "frames".  Soon that idea caught on and others did the same! So unique!!
I also went to Lowe's and had planks of wood cut so that campers could do string art. C.J. spent several days working on his craft and will enter it in the fair!
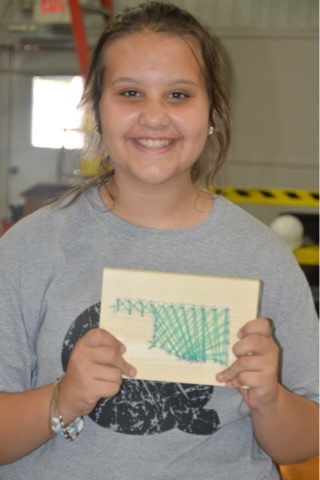
I loved the Oklahoma that Emma and another young girls did! We made a template of the state, she nailed around the outline, and used string to fill it in. It was so cute!
Others did initials, words, shapes...anything they could think of.
Another craft project with string was using buttons and making bracelets. This one turned out really cute! The hemp string is just woven through buttons.  The anchor button is actually on top of another button.  Such a simple, but very cute and easy, project!  
Pin It Now!

Tuesday, December 30, 2014

Tree Stump Chalkboard Ornaments


This summer when we went to Ruidoso, NM for vacation, I brought home some tree limbs to be cut for use at our nephews' wedding rehearsal dinner decorations. Shortly after that, I decided to use those cuts for my homemade gifts for my husband's side of the family.
Those cuts ended up being too tiny to do much with, so I had him cut some more that were larger. These may have been a litt too large, but I wasn't going to ask him to do any more. We were leaving for vacation a few hours after I finished them anyway, so it was a chore just getting them done at all!

I painted the cuts with an acrylic chalkboard paint, then used small chalk to decorate and write on them. An eye screw and baker's twine finished out the top. Lastly, I sprayed a fine mist of hairspray to set the chalk. Family members should be able to wipe off my writing and put their own, if desired.

If I had planned this idea originally, little jingle bells tied on top would have been a cute addition. My original idea was a decoupaged chalkboard tag, but it wouldn't have looked good. In my head, it did! :) Too bad my chalkboard writing skills are lacking - especially on small chalkboards.
Pin It Now!

Tuesday, February 18, 2014

Upcycled Coffee Containers

(Photo from Hometalk)

Possibly one of the cutest upcycle projects EVER!!!  The instructions can be found HERE.  One of the problems some have mentioned about this project is that the can't get the coffee smell out of the containers.  On her Facebook page, the author had several comments from a readers that said how to do rid them of the smell.  I would do the vinegar suggestions.  I use vinegar for lots of things - especially for cleaning.

1.  Soak over night in apple cider vinegar, then put newspapers inside overnight and in two nights the coffee smell should be gone.

2. Empty them out. Fill with vinegar and water. Let set for 20-30 minutes.  Rinse and dry. Any smell should be gone.

3.  Someone else suggested putting baking soda in them to absorb the smell.

The only problem I see with this craft, is that we don't drink coffee, BUT there are millions and millions of people who do, so you and I should be able to get these containers without problem.  In fact, my husband was gone for a few days, so I was in charge of feeding the goats and pigs.  It just so happens that he uses these containers for some of their feed supplements!  So he has a source somewhere!  I'll just have to find out from him where....or sneak a few feed containers from him! Ha ha!  Not really. They don't have lids....otherwise, I just might! :)
Pin It Now!

Friday, August 23, 2013

Cabinet Makeover

This cabinet brings back a lot of good memories.  For most of my life it was in my grandparents house, housing a few photo albums.  When I would visit, there was one small album that had several pictures of me from when I was a little girl, so I would go get it and flip through it.
When my grandparents both passed away, I got the little cabinet. I wanted to paint it, but sentimentally, just couldn't...until a few weeks ago.  I didn't treat it (like maybe it should have been), but just painted it with a black acrylic paint.  When I opened the cabinet, it was the sweetest smell - the smell of my grandparents house! So, I quickly decided to leave the inside gold :).
It turned out very nice!  And now I'll be using the cabinet in a more visible place in our living room.  I think I might even put that photo album back in there.....just for sentimental reasons.  But one thing is for sure. The inside smell will always bring back great memories!

Pin It Now!

Wednesday, June 5, 2013

Jesus on the Cross Craft

Last week was our Vacation Bible School.  The theme was "It's a Blue Ribbon Life".  I have several posts about it on my "Shine Like Stars" blog, but wanted to share a few crafts with you that my 1st and 2nd graders did in class.  I'm not a fan of using general crafts, but strictly want it to be crafts that are directed towards the Bible lesson that we are learning each day.
The lesson on the last day was about Jesus dying on the cross.  I had bought these large people shaped cutouts at Mardel and decided to let them be Jesus.  I didn't want the kids to color too much or make them look pretty or cute or anything, so did the craft along with them, telling them each step to do.  

First they glued their "Jesus" to the construction paper cross.  Next they drew simple eyes, a nose, and a mouth. We talked about how Jesus wouldn't have been smiling, so they decided a straight across mouth was best.

Next they drew the crown of thorns on his head. As they drew we talked about how that would have felt.

We talked about how the nails were in His hands and feet, but I didn't want to cross the legs how they probably were, but just let the kids draw nails on each hand and foot.  I could tell they were really thinking about the nails as they drew.

And, of course, we talked about the fruit of the Spirit, LOVE.....and how Jesus' death on the cross was because of His love for each and every one of us.  They placed a red heart with the words, "Jesus Loves Me This I Know" on the center of Jesus. 

Lastly, we talked about how Jesus' side was pierced. Some drew a line for that....some didn't.

I pray that this craft touched the hearts of each of the students that day.  I pray it touches your heart, as well.  Jesus DOES love us! So much that He gave His life for us!  Thank you, God, for your plan.
Pin It Now!

Thursday, May 23, 2013

A Special Graduation Quilt

Our daughter has received many, many wonderful gifts for her high school graduation recently, but I thought it would be neat to highlight a few that might give others some ideas about neat gifts.

This quilt was made by my sister-in-law.  She wrote a few months ago, asking what colors Lauren's college dorm room was going to be.  I told her black and white, with coral and light aqua.  She made this beautiful quilt for her bed!  It's so, so soft and Lauren loves it!
But on the back, my sister-in-law did something very special for Lauren.  She put squares at the corners that meant something special to Lauren:  Mickey Mouse and Minnie Mouse because of our family trips to Disney World, Texas Rangers because Lauren is a HUGE fan, Tiger print for our school mascot, and a college logo from where Lauren will be attending in the fall!  

Isn't that unique?!  So personal and special!  So warm and cozy!  No, Lauren won't share, and I don't blame her one bit!

Pin It Now!

Wednesday, January 23, 2013

Felt Christmas Tree Wall Decoration

My mother-in-law had a cute felt Christmas tree on her wall this year.  It was perfect for the little great-grandchildren our family has been blessed with in the past few years.  I was thinking how cute it would be to have some kind of felt decoration on the wall for each holiday or season.  A snowman for winter, a heart for Valentine's Day, a bunny for Easter, maybe a flower for the spring.  The possibilities are endless!

The tree is probably stapled onto the wall, but you could even glue it to cardboard and just stand it against the wall if you didn't want to staple it.  The "ornaments" have a piece of velcro (the rough part of velcro) attached to the back.  Children can decorate and redecorate the tree over and over again.

Lots of fun for little ones!
Pin It Now!

Monday, November 26, 2012

Thanksgiving Creativeness

This year our Thanksgiving had several things to do that showed creativeness of family members.  My mother-in-law painted a canvas with a blue sky, green grass and a tree.  Family members did a thumbprint leaf on the tree in various colors of ink, then put their initial on their own leaf.  This was fun for all ages and will be a great keepsake for years to come!
One of my sisters-in-law found these interesting tablecloths at Walmart last year on clearance.  Both kids and adults enjoyed coloring and doing activities during our Thanksgiving dinner.
One of my daughter's creations was a Texas Rangers' Turkey!  He turned out pretty cute, didn't he?!
Another creative outlet was on my son's new cast.  He broke his arm at a basketball game last Monday night and  got this lovely hot pink cast on the Wednesday before Thanksgiving Day so family members began signing that evening.  I'm pretty sure the cast will be full of signatures by the time he gets home from school today.


I hope you had a wonderful Thanksgiving, with lots of thankful thoughts, family, food, and fun!
Pin It Now!

Friday, September 7, 2012

Nature Craft in a Jar

Our county fair is going on this week.  Since I'm the 4-H leader for our small town, I try to help the members with crafts that they can enter in the fair.  I told you about the unsuccessful I Spy Ornaments....if you remember.

This project was a success!  I found the flyer/directions at Hobby Lobby after going up and down the aisles searching for the perfect craft.....for 30 members - boys and girls.  This was perfect!

'
NOTE: *This is NOT a good picture of the craft, but this is the kind of picture you get when you forget to take the picture yourself and you ask your husband and son to stop by the fairground to snap a picture! 
(ha ha!!) Notice that the KERR part is in the front.  I doubt he noticed!


So, here's what you will need:
1 quart sized Mason jar, wide mouthed opening is best
Ring and lid for jar
Burlap square for top
Dried moss/grass
Small rocks
Twigs
Small silk flower stems
One silk bug (bee, butterfly, ladybug, etc.)

Open jar and place moss/grass in the bottom of the jar.  Add some rocks and twigs.  Keep one long twig out and twist on bug.  Let it "fly" away from the twig or be crawling up the twig.  Add silk flower stems and any other twigs/stems you desire.  Be careful not to cover bug.  Place lid on jar, topped by burlap square, then finish craft by tightening the ring.  Some of our burlap squares were thicker so the 4-H members had to take the lid part off. I told them that was best, anyway...that was their bug could breathe :).

Pin It Now!

Tuesday, August 28, 2012

"I Spy" Christmas Ornament.....Sort Of

Posted by Lori:

I thought I had a great idea for a craft last week.  Not trying it out beforehand, I took all of the supplies to the first 4-H meeting of the year and had the members make crafts for the local fair that was held last weekend.

I purchased clear glass ornaments, miniature Christmas charms, trinkets, and novelties....and the mini-mini styrofoam balls to make snow.  The plan was to put about 8 or 10 little things into the glass ornament and fill it with the "snow".  I thought it would be so much fun "spying" the snow - trying to find the mini goodies.  But my idea failed - BIG TIME!
As you can see, the "I Spy" ornaments don't have much to spy at all.  I see a glimpse of red and green, but nothing that looks like a jingle bell, a cookie cutter, a light bulb, a gingerbread man, a snow man, a snow flake, etc.  Nothing!  I really thought all of those mini items would be heavier than the styrofoam mini balls, so they would sink to the bottom, but no.
You may be asking, "Why did you post this?"  Well, I still think the idea sounds fun and thought maybe YOU could help me by giving ideas of what to do!  I can "Google" it or "Pinterest" it (that's a new phrase, I'm sure!), but want to get your ideas first.

Let me know what you think!

By the way......I still entered the ornaments in the fair.  The 4-H members would have been disappointed if I hadn't!
Pin It Now!

Sunday, July 8, 2012

Olympic Themed Crafts

Posted by Lori:

My family and I spent last week at Quartz Mountain Christian Camp.  (Read about the week at my devotional blog site HERE.)  The theme for the week was based on the Olympics - "Go for the Gold". I thought I would share some of the Olympic-themed crafts we used for decorating one of the nights.
Torches made from paper towel tubes covered in aluminum foil with red, orange, and yellow tissue paper flames.
My brother-in-law told me about his Olympic ring craft.  Purchase the foam swimming noodles.  Secure them into a circle shape with 1 inch dowel sticks cut into 4 inch pieces.  Where ends come together, cover with colored to match duct tape.  Spray paint noodles in desired colors.  FYI:  The more expensive spray paint IS worth it!  I bought both and learned a lesson!  The cheap worked, but took several coats.  These rings were tied together with clear fishing wire.  This particular ring set was only attached to the iron pole with one string of fishing wire on the black ring.  You can tell the red needed to be secured as well, but it worked for the short amount of time we needed it.
These little disks were from Hobby Lobby.  I think they were called "Flying Disks".  I spray painted the purple ones to make them black, but all other colors were fine.  Just cut the yellow and green disks and fit the rings together.  I secured them with duct tape on the back side.  Some kind of glue might work well, too.  Hot glue did not work.

One more idea we did not do, but sounded GREAT! Take five hula hoops. Purchase balloons in the Olympic ring colors.  Blow up the balloons and secure each Olympic color to each hula hoop.  Secure hoops together.  

It's almost time for the Olympics!!  How about an Olympic themed party to celebrate!

Pin It Now!

Friday, June 8, 2012

Making a Plaster Mold from a Chocolate Mold

Posted by Lori:

When I was asked to make the centerpieces for our school's Junior-Senior banquet, I was excited!  I wanted to make the centerpieces look nicer than some of the plastic ones I had seen on Prom/Banquet websites, so went to work trying to come up with something.  Our centerpieces were going to be shared with another school and since their event was being held a month earlier than ours, they had a lot of input into what they wanted in the decor.
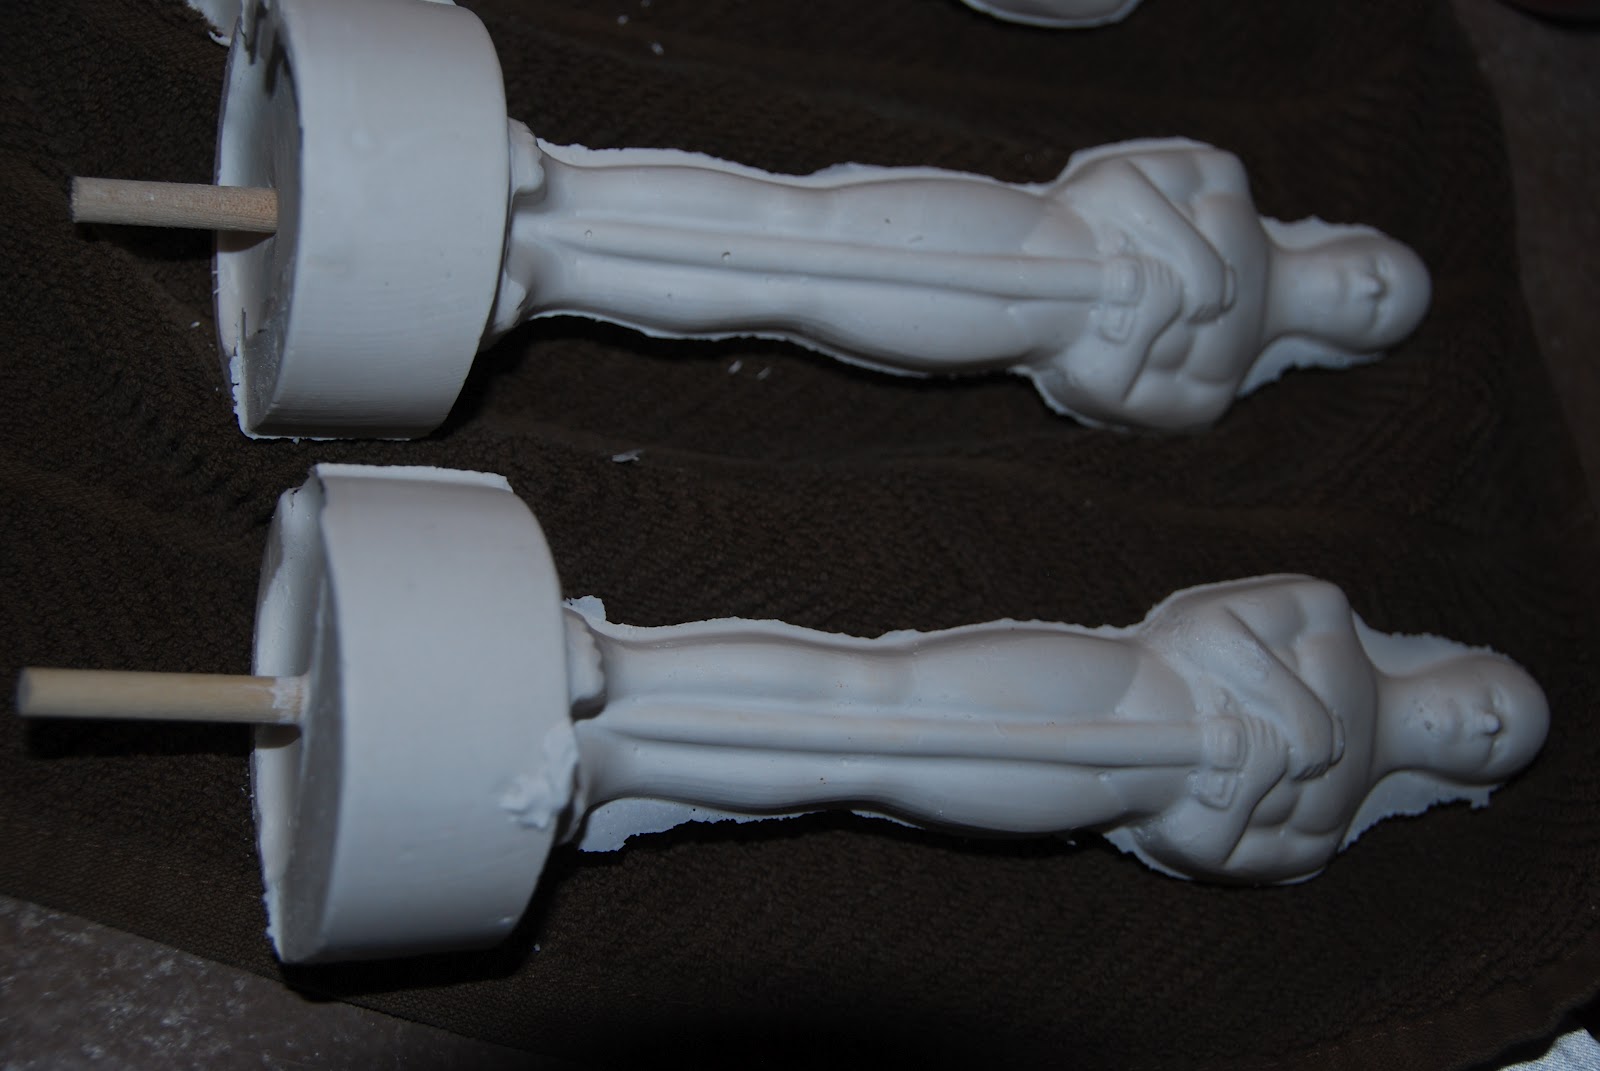
The other school wanted a film reel and an Oscar.  They showed us an example from one of the online sites I had seen.  All I could see was that the centerpieces were all plastic.  I didn't want that!  I searched online for an "Oscar" mold so that I could make my own replica of the gold statue.  I finally found a chocolate mold for an Oscar-looking guy and bought it through eBay from overseas.  It came really quickly and I was excited about trying the project!
Unsure of how to go about making the chocolate mold work with Plaster, I searched online.  I found a site that had GREAT instructions (click HERE) and followed them exactly. 
I made 19 Oscars plus a few more that broke.  I was soooooo tired of that man by the time I was done!!! :)   I used Pottery Plaster from Hobby Lobby.
The site I linked will tell you how to smooth out the edges of the middle where the molds come together.  I used the sand paper and also a knife in some places.
I needed the mold to stand upside down, so tried a few different ways to accomplish this.  The first way was to set it inside a large vase.  That worked for a while, but then seemed to slip.

The final way I used seemed to work the best.  It was just a clear plastic, disposable cup.  The sides could be squeezed to fit the upside down mold perfectly.  The plaster only had to dry an hour or so before being set.  (It was actually ready sooner, but I found waiting an hour worked best and caused less frequent breaking).  After drying for at least 24 hours, the Oscars were painted metallic gold.  Then the centerpieces were ready to be assembled!
The plaster Oscar had a dowel stick in the bottom, which stuck out about an inch and a half.  I placed it in the plaster while it was still wet, leaving the 1 1/2 inch end exposed. The dowel was stuck into REAL movie reels (also bought on eBay and came in a cool Hollywood Film Studio official box!) that I painted black, and also stuck into a wooden square that was actually a base of a gold foil Christmas tree I got at Hobby Lobby on clearance. (I thought I might use the metal pole that stuck out and formed the tree, but it didn't work.  Thankfully the bases worked perfectly!)  

Woven through the reel was real film strip.  I bought wide film from www.hollywoodmegastore.com and thin film strip wrapped with gold star wire garland.  The thin film was sent by the guy who sold me the film reels (He generously gave me the film strip because I was using it for the school event.  He even forgot to send it the first time and sent it later!  Isn't that neat??!)

The centerpieces were finished out by using red and gold pics - some with stars.  The pics were trimmed and stuck into holes in the film reel.  We were pleased with the way the centerpieces turned out and so was the other school.

I really enjoyed learning how to make a chocolate mold into a plaster mold.  That opens up many possibilities of creating new things at a lower cost.  I hope that you enjoy knowing this "tip", as well!  And if you need an Oscar mold.....let me know.  I assure you, I won't be making any more plaster Oscars - at least for a very, very long time!
Pin It Now!

Tuesday, April 24, 2012

My Green Door

Posted by Lori:
I'm not one for change, and especially when it has a connection to my childhood, but on a whim, I decided to go for it!  I'm talking about my front door, which was previously brown and kind of faded and "dry" looking.  It's just like the front door on the house that I lived in for most of my childhood, in a house that was built during my kindergarten year and we lived in until spring break of my sophomore year in high school.  Kind of silly to be "attached", but that's how I am.
For some reason Saturday, I got the urge to pain the front door.  Maybe it's because I know that we're getting new siding and rock trim and I wanted the door to look "newer", too?  Maybe because it was hard to tell from the road if our door was open or not because it was so dark?  Either, way, I used a green paint I had on hand (with the help of my mom via phone!).  I almost went turquoise because I had a gallon of it, too, but just couldn't do it!

I used a simple black sponge brush.  First I dabbed Vaseline on a few areas where I wanted to "distress" the paint, then painted over the door.  I liked how the paint didn't go into the designed parts and decided to leave them that way.  After the first coat dried, I went over the smooth areas again, let them dry, then wiped with a cloth and steel brush along where the Vaseline was.  The paint won't stick to the Vaseline.  And, there it is!  My new GREEN door!!!  I painted the wreath hanger the same color, then put the burlap wreath back up. (search: Burlap Wreath on our blog home page for directions).  The wreath needs a bow or something to decorate it up, but I'm not sure yet what I want.

So, maybe the door will stay green a while.  Maybe I'll try another color some day.  Who knows?!
Pin It Now!

Monday, April 16, 2012

Spring


Posted by Donna:


Two things I'm lovin' about spring are: my yellow roses and decorating. I finally decided I needed to prune my rose bush last fall since it was looking sick. That made a huge difference. It immediately started looking better. This isn't a very good picture of the umbrella because of the reflection in the glass door. I've seen this idea several places and loved the look. People amaze me with their creative ideas.

Everything is so beautiful this year---I think people everywhere are enjoying this early spring with the green, green grass, early blooming flowers, and the much needed rain. We have so much to be thankful for. Pin It Now!

Friday, April 13, 2012

Dish Towel Dress

Posted by Lori:
A friend posted this picture of these "Dish Towel Dresses"!  Aren't they cute????!! I asked to use the photo and she also supplied me with the little poem that can be made to go with it.  Here is a link to the instructions for the "dresses".  Thanks, Carla!

Link: http://calamitykim.typepad.com/photos/whip_up_a_darlin_dress_to/index.html

POEM
Though I am a little dress
I was not made to wear,
But I'll help with my apron...
Come cleanup time I'm there!
(from craftsayings.com)


Pin It Now!

 
Pin It button on image hover