Wednesday, March 31, 2010

Pineapple Pudding Cake

Posted by Lori:
This is a great and easy cake.  In fact, it akes me want a piece right now!

Pineapple Pudding Cake
1 yellow cake mix
1 large. can pineapple, crushed
1 large package vanilla pudding, instant
1 (8 oounce) Cool Whip

Mix and bake cake mix as directed in 9 x 13 cake pan. Allow to slightly cooled.  Pour pineapple (juice also) over cake. Prepare vanilla pudding according to directions. Pour over the layer of pineapple. Spread Cool Whip over top and garnish as desired.  Allow cake to cool before spreading the Cool Whip.
Pin It Now!

Tuesday, March 30, 2010

Parmesan Chicken (Low Carb)

Posted by Lori - recipe via Kimberly or mom many years ago:
I know that to those who try to eat a low-fat lifestyle, low carb may seem kind of strange (unless you try to do both together)- especially the thought of eating real butter versus a low-fat margarine. But, whenever I decide to lay off of sugar and junk food - and lose some weight, too - I opt for a low carb or no flour/no sugar plan. It seems to work best for me, I like it, and it actually lowers my cholestrol.  Because butter is 100% natural and a "real" food, it's naturally carbohydrate free.

Parmesan Chicken (Low Carb)
4 boneless, skinless chicken breasts
1 1/2 cups or 6 ounce package grated Parmesan cheese
1 stick butter, melted

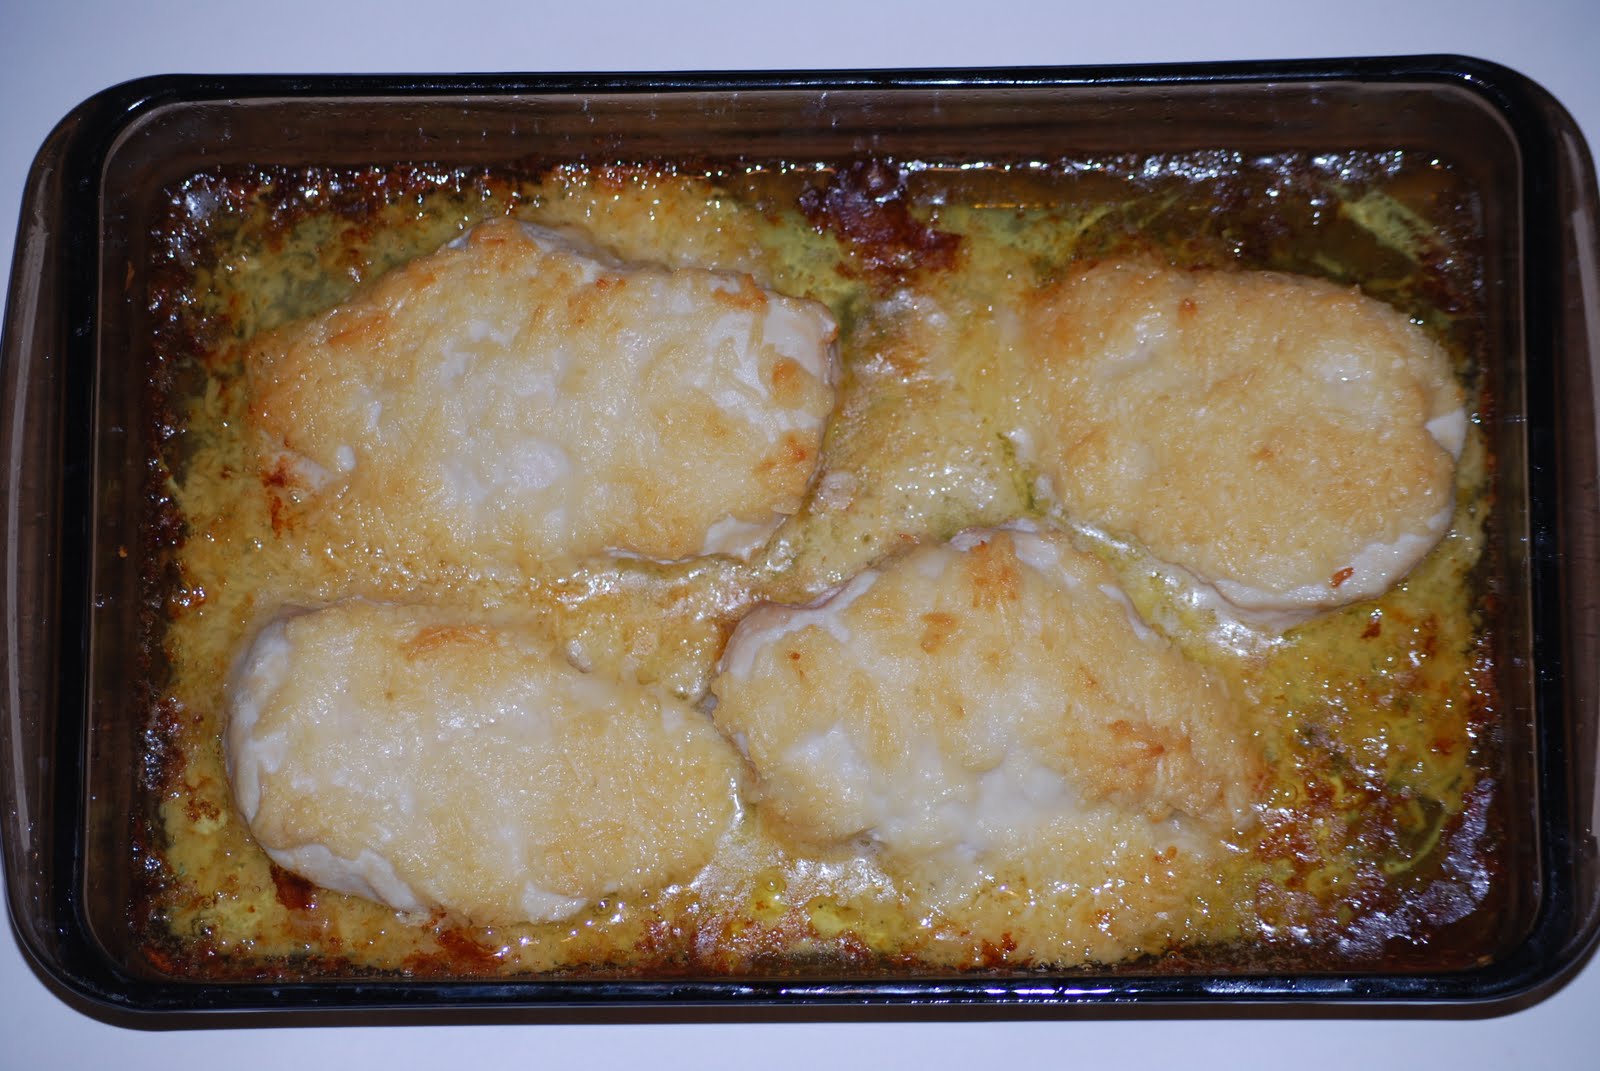
Preheat oven to 350 degrees. In small bowl mix together melted butter and Parmesan cheese. Place chicken breasts in baking dish. Using a little less than half of butter/cheese mixture, spread over chicken breasts.

 Bake for approximately 30 minutes or until cheese just begins to brown. Remove baking dish from oven, flip chicken breasts over, and top with remaining butter/cheese mixture. Bake 30 more minutes or until cheese is lightly browned.  (A little browner than this picture is better, actually.)
If you're concerned with the butter, you can see in the top picture that most of it is on the outside of the chicken. You won't be getting too much of it anyway, unless you choose to spoon it over your chicken, and it's really just needed to hold the cheese together and keep it on the chicken while baking.
Pin It Now!

Monday, March 29, 2010

Chicken Soup

Posted by Kimberly:

We have some dear friends here in Lubbock who have been like adopted grandparents to our kids. Last week, he had to have quadruple bypass surgery. The kids and I went to see him at the heart hospital on our way back in to town from spending spring break at mom and dad's. While we were at the hospital, our friends and their daughter were raving about a chicken soup that a lady from our church had made for them. So, when I asked her if she would share her recipe, she kindly agreed. She emailed it to me, and when I saw her at church Sunday morning, she asked me if I had received it and told me to not let its length scare me. My reply to her was "Well, it does!" Not only was the recipe two pages long and required two days to make it, but it also involved cooking a whole chicken which I had never done before. (I am a skinless, boneless chicken breast girl!) So, on Sunday afternoon while I was making my menu and grocery list out for the week, I decided I would give it a try under the condition that my husband would pull out the insides of the chicken for me! :)

Below is the recipe she emailed to me just as she wrote it. I even included her hints that she color-coded in blue and the ones she included at the bottom. She is my kind of lady..... she tells EXACTLY what to do and doesn't assume that I know what she is talking about. :)

Chicken Soup

It is best to do this in two stages. Cook and debone the chicken and chop the vegetables and bag them one day. The next day, put it all together. (While chicken is cooking, I usually chop the vegetables...see types and amounts on Day Two.)

Day One:

Cook together and simmer for about 1 1/2 hours or until the chicken is tender:

1 whole chicken (around 4 pounds with packaged insides removed.)

3 quarts water

1 whole, peeled, medium onion

2-3 ribs of celery, twisted

3 bay leaves

While chicken is still warm, take meat off the bone, cut in bite-sized pieces and place in plastic bag. Place in refrigerator as soon as possible, with bag open. When meat has cooled, close bag, expelling as much air as possible.

Cool broth as soon as possible to lessen chance of toxic conditions. Try to refrigerate within 35-40 minutes.

Day Two:

Melt: 4 tablespoons margarine/butter

Saute in the margarine for 6-10 minutes on medium heat, stirring frequently:

1 clove garlic, peeled and finely chopped

2/3 cup uncooked rice

1 cup finely chopped onions

1 cup scraped and finely chopped carrots

1 cup finely chopped celery

Skim any fat off the top of the broth that was refrigerated the day before and add enough water to have 10 cups liquid. Be sure and remove the whole onion, celery ribs and bay leaf, throwing them away. DO NOT THROW AWAY THE BROTH!!!!

Combine:

the sauteed vegetables

10 cups broth

6-8 chicken bouillon cubes

1 rounded teaspoon curry powder

1/2 teaspoon white pepper

1/4 teaspoon black pepper

1 tablespoon parsley flakes

Simmer for 15-20 minutes, or until rice is tender.


Blend together and add to the soup, stirring constantly as you add it to avoid lumps:

1/4 cup cornstarch

1/2 cup water

To all of the above, add and stir in: (about 30-45 minutes before serving....if chicken is cooked too long, it becomes mushy)

1 cup half & half cream

the chicken meat cut in bite-sized pieces

This should yield about 4 quarts (1 gallon)

Some other hints:

  • While chicken is cooking, I cut the onions, carrots, and celery. (They can all be stored in the same plastic bag.)
  • Leave the skin on the chicken while cooking. Then throw it away with the bones.
  • The next morning, the fat from the skin is easily skimmed off the broth.
  • You can add more chicken bouillon cubes to taste.
  • If you like thicker soup, add more cornstarch than suggested.
  • This freezes well.
  • I usually double this recipe as I have a three gallon pot, then freeze in smaller containers to take to those who are under the weather.
As I said above, this recipe scared me at first. I have to say, though, it really wasn't that hard. I just had to plan where I had a chunk of time to cook the chicken and cut it up. By day two, it is really nice because all of the chopping is done....it is just a matter of putting it all together. One change that I am planning on making the next time I make this is adding more rice to make it a little heartier and because my husband and I really liked the rice. I am going to increase the rice to 1 cup instead of 2/3. After I see how that works, I may try to increase it to 1 1/3 cups.

This soup was really delicious and I will definitely be making it again for friends and family. I am now even considering cooking a whole chicken and using real broth every time a make soup that calls for canned broth and chicken. It makes such a difference in the flavor. So for those of you, who, like me, entertained the thought of substituting this with canned broth....DON'T DO IT! It won't be near as good! Plus, you will really feel like a Food Network chef by the time you are done! I know I did!! :) Pin It Now!

Sunday, March 28, 2010

Sibyl's Mexican Dish

Posted by Donna:
I grew up eating this mexican casserole. I still like it---it's quick and easy to assemble; but very good as well. Mexican food is probably my husband's favorite food. When we go out to eat, we take turns choosing where to go. I always choose Olive Garden or Cracker Barrel, and he always chooses Mexican food. Right now, I owe him two visits to a Mexican Restaurant---unless I connive and fix this at home a couple of times---then I could "have my way" when we go out to eat again. That sounds like a great idea to me!!!!!

Mexican Dish

2 lbs. hamburger meat

1 can cream of chicken soup

1 can mushroom soup

1 can mild enchilada soup

1 can chopped green chilies (mild)

1 small onion (chopped)

1-1/2 cups grated sharp cheddar cheese

Brown hamburger and onions. Add all other ingredients. Simmer until well heated and pour over crushed or broken pieces of average size pkg. of doritos. Put grated cheese on top and bake at 350 degrees until cheese is melted.

I really do like Mexican Food, but I'm very picky about it. I don't like it greasy or too spicy. I've gotten to where I prefer to make it and eat it at home. Two of my favorites were Casa Bonita in Oklahoma City and Zapata's in Lawton. Of course, they've gone by the wayside and no longer exist. I'm still searching for a "favorite."
Pin It Now!

Thursday, March 25, 2010

7 Layer Magic Cookie Bars

Posted by Lori:

This is an Eagle Brand recipe that most likely you've seen or maybe even made yourself. I've eaten them, but don't recall ever making them.

I need something quick and easy for an event this weekend. I think this recipe will be perfect! Instead of 1 cup chocolate chips/1 cup butterscotch chips, I'll use 2 cups of the chocolate. I think I would prefer it that way myself, but also that's what I have in my pantry.

1 1/2 cups graham cracker crumbs
1/2 cup butter, melted
1 - 14 ounce can Eagle Brand® Sweetened Condensed Milk
1 cup (6 ounce pkg.) butterscotch-flavored chips
1 cup (6 oz. pkg.) semi-sweet chocolate chips
1 1/3 cups flaked coconut
1 cup chopped nuts

Preheat oven to 350 degrees. Spray 13 x 9-inch baking pan with no-stick cooking spray. Combine graham cracker crumbs and butter; mix well. Press crumb mixture firmly into bottom of prepared pan. Pour sweetened condensed milk evenly over crumb mixture. Layer evenly with remaining ingredients; press down firmly with fork.

Bake 25-30 minutes or until lightly browned. Loosen from sides of pan while still warm; cool on wire rack. Cut into bars or diamonds.

For perfectly cut cookie bars, line entire pan with foil, extending foil over edge of pan. Coat lightly with no-stick cooking spray. After bars have baked and cooled, lift up by edges of foil to remove from pan. Cut into individual bars. Pin It Now!

Wednesday, March 24, 2010

From Us to You

"3 Cherry Cokes":  Kimberly, Donna, and Lori
Posted by Lori:
I'm not posting a recipe today.  Instead, I decided to post this picture of mom, Kimberly and I (they may get me!!).  A few weeks ago we took a trip to Fredericksburg, TX, and enjoyed our time together - just us "3 Cherry Cokes".  We had never done anything like this before - where we've left our husbands/families for a long weekend, but look forward to doing it again before too long.

Today, we want to say "Thank You" to all of you who visit "Life's a Bowl of Cherries" or receive the posts via email, feed, or Facebook.  We hope you enjoy our recipes and stop by to visit often.  Let us know which recipes you've tried and what you think about them.  We appreciate your comments!

Oh, and we've recently added music to our blog so turn up your speakers when you stop by.  The music has a food theme.  The French song is from the Disney movie Ratatouille.  We have no idea what it's saying, though!

Blessings to each of you :)
Pin It Now!

Tuesday, March 23, 2010

Homemade Strawberry Shortcake

Posted by Lori:
If you like strawberry shortcake and you haven't made your own cake before, now's the time to learn!  Strawberry season is just around the corner and with frozen strawberries, you can make this delicious dessert any time of the year.  Homemade shortcakes are so much better than bought cake-y things!  I chose to make it for our family this past Saturday, which also happened to be the first day of spring (never mind the fact that it was snowing outside!)

Years ago I made this and made just one large cake.  The presentation of the dessert is so pretty, yet so easy.  This time I made eight individual cakes instead.

Homemade Strawberry Shortcake
2 1/4 cups flour
1/4 cup sugar
2 1/2 teaspoons baking powder
1/4 teaspoon salt
1/2 cup butter (at room temperature or melt just slightly in the microwave to soften)
2/3 cup milk
1 egg

Preheat oven to 425 degrees.  Grease baking sheet or 8-inch round cake pan.  In medium bowl, combine flour, sugar, baking powder and salt.  Add butter and cut in with pastry blender or just use fork.  Mixture will form into crumb-like consistancy.  Add milk and egg and stir just until well blended.  Now you can either pour batter into greased round pan or make into individual cakes.  I used a 1/3 cup measuring cup and scooped it out onto a sheet cake pan.  It made 8 cakes.  You could make 10 easily by using a smaller cup.
Bake 10 - 15 minutes for the small cakes and 15 - 20 minutes for the larger one.

Remove from the oven and allow to cool.  Remove shortcakes from pan.  Slice in half hortizontally and place bottom half on serving dish.  Top with strawberries (which have been sweetened with sugar or sugar substitute - or frozen strawberries with syrup).  Spread whipped topping over strawberries.  Add the top part of the shortcake, add a dollop of whipped topping, and finish with a few more strawberries.

I used the container-type whipped topping for the middle and the canned-type on the top because the kid's like the squirt kind.  But, in my opinion, the container-type tastes better. Pin It Now!
 
Pin It button on image hover