Thursday, June 14, 2012

Breakfast Pizza

Posted by Lori:
Breakfast pizza is one of my kid's favorite breakfast dishes. It's quick and easy, but very filling.

BREAKFAST PIZZA

1 can Grands biscuits
1 t. butter or margarine
8 eggs 
1/4 cup milk
Salt, if desired
10 slices bacon, cooked and crumbled (I like to use the already cooked bacon slices for this recipe because it's so convenient)
1 cup grated cheddar cheese

Grease 15 inch pizza pan. Flatten each biscuit and place on pizza pan, sealing the seams to create the pizza crust. Melt butter in skillet with medium-high heat. Scramble eggs with milk and salt (I do one "shake" per 2 eggs) until done. Spread eggs evenly on top of biscuit crust. Top with crumbled bacon and cheddar cheese. Cook at 375 degrees for 20 minutes or until edge of crust is slightly browned.

This recipe can easily be adapted according to what your family likes. You and your family might like adding green chilies or onions to the eggs while cooking. Maybe you would like mushrooms or bell peppers as a topping. My kiddos like it fairly plain.

I usually use bacon as the meat topping, but you can use ham or sausage. I take this pizza to the teachers and school staff during Teacher Appreciation Week and on the first day of school breakfast our PTO serves each year. It's interesting that the bacon pizza is consistantly the most popular each time. 
Pin It Now!

Tuesday, June 12, 2012

Flavored Sugar

Posted by Lori:

I found this great recipe for flavored sugar that can be added to tea.  It's a full sugar recipe, but the recipe could be adapted to sugar free by using a sugar substitute and sugar free flavored drink mixes.  I have to add some sweet flavoring to my tea.  I don't like it at all just plain!  Apparently that's the way it is in the south.  My husband was in Georgia in April and he said that unsweetened tea wasn't even an option on the menu!  Unfortunately, unsweet is the only way he likes it, so his beverage selection was always water.

I hope you enjoy making your tea even tastier with this recipe!

Flavored Sugar

1 cup sugar
1 package (0.23 ounces) unsweetened lemon, cherry, or strawberry (or your preferred flavor) flavored soft drink mix

In a small bowl, combine sugar and soft drink mix.  To serve, stir 2 teaspoons flavored sugar into 6 ounces of hot or cold tea.
Pin It Now!

Friday, June 8, 2012

Making a Plaster Mold from a Chocolate Mold

Posted by Lori:

When I was asked to make the centerpieces for our school's Junior-Senior banquet, I was excited!  I wanted to make the centerpieces look nicer than some of the plastic ones I had seen on Prom/Banquet websites, so went to work trying to come up with something.  Our centerpieces were going to be shared with another school and since their event was being held a month earlier than ours, they had a lot of input into what they wanted in the decor.
The other school wanted a film reel and an Oscar.  They showed us an example from one of the online sites I had seen.  All I could see was that the centerpieces were all plastic.  I didn't want that!  I searched online for an "Oscar" mold so that I could make my own replica of the gold statue.  I finally found a chocolate mold for an Oscar-looking guy and bought it through eBay from overseas.  It came really quickly and I was excited about trying the project!
Unsure of how to go about making the chocolate mold work with Plaster, I searched online.  I found a site that had GREAT instructions (click HERE) and followed them exactly. 
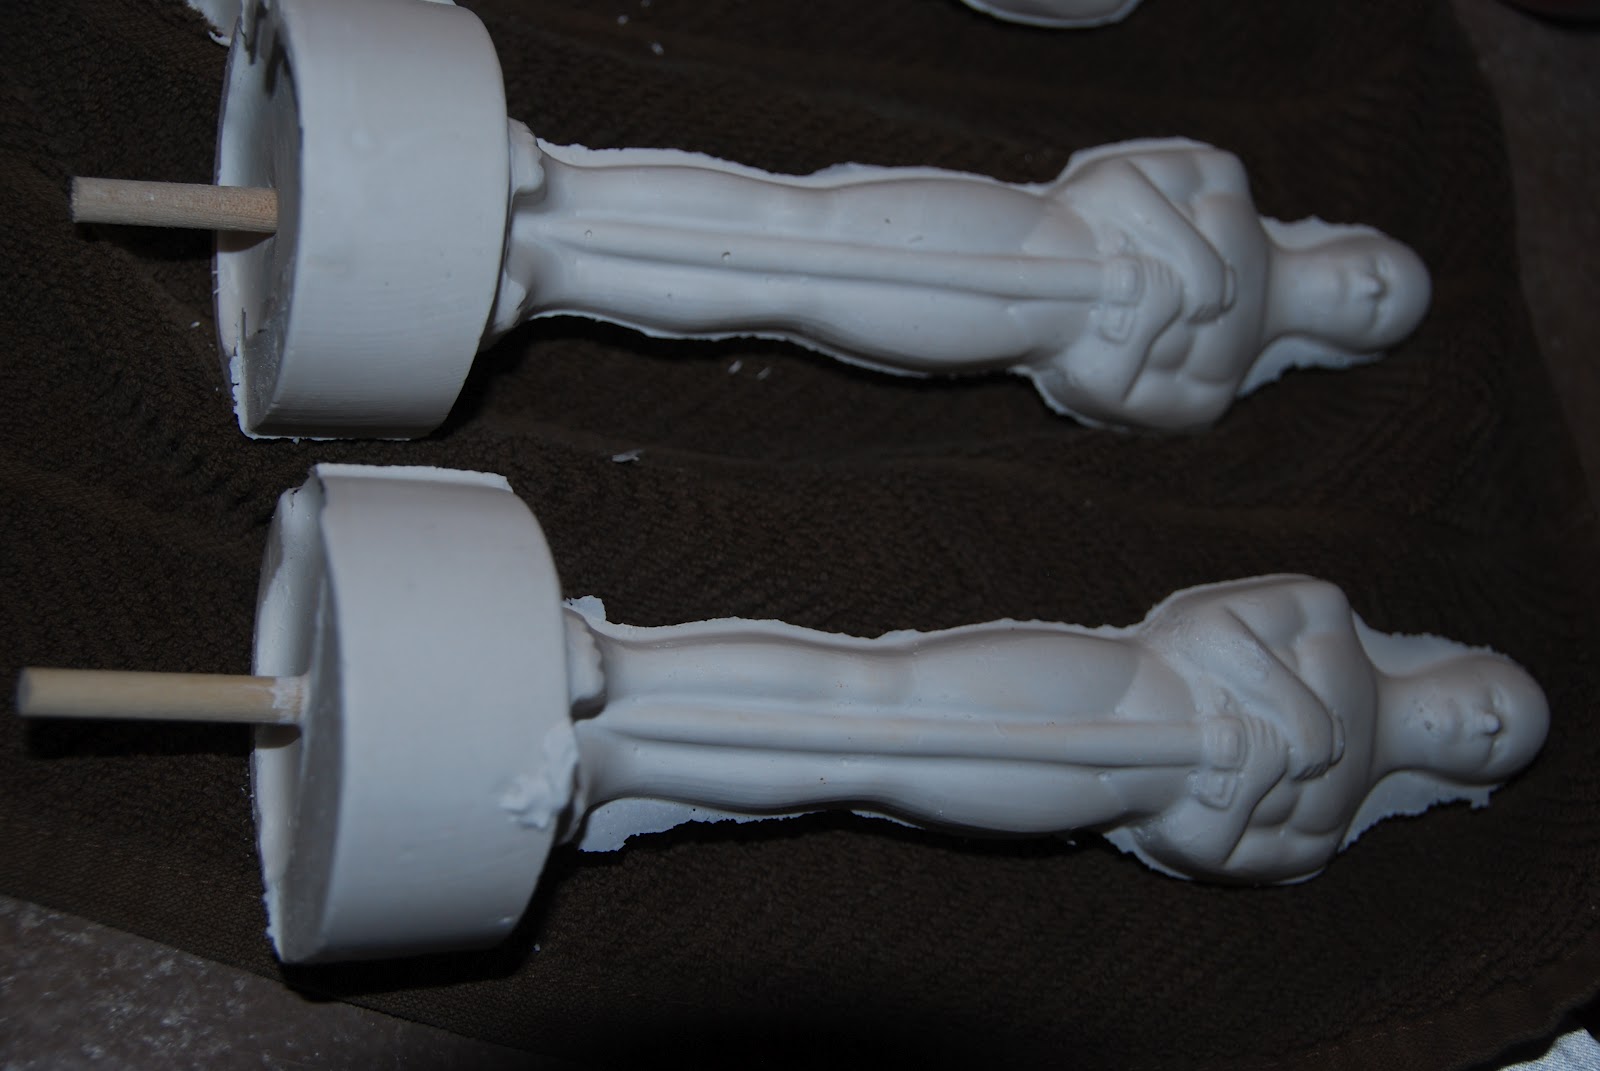
I made 19 Oscars plus a few more that broke.  I was soooooo tired of that man by the time I was done!!! :)   I used Pottery Plaster from Hobby Lobby.
The site I linked will tell you how to smooth out the edges of the middle where the molds come together.  I used the sand paper and also a knife in some places.
I needed the mold to stand upside down, so tried a few different ways to accomplish this.  The first way was to set it inside a large vase.  That worked for a while, but then seemed to slip.

The final way I used seemed to work the best.  It was just a clear plastic, disposable cup.  The sides could be squeezed to fit the upside down mold perfectly.  The plaster only had to dry an hour or so before being set.  (It was actually ready sooner, but I found waiting an hour worked best and caused less frequent breaking).  After drying for at least 24 hours, the Oscars were painted metallic gold.  Then the centerpieces were ready to be assembled!
The plaster Oscar had a dowel stick in the bottom, which stuck out about an inch and a half.  I placed it in the plaster while it was still wet, leaving the 1 1/2 inch end exposed. The dowel was stuck into REAL movie reels (also bought on eBay and came in a cool Hollywood Film Studio official box!) that I painted black, and also stuck into a wooden square that was actually a base of a gold foil Christmas tree I got at Hobby Lobby on clearance. (I thought I might use the metal pole that stuck out and formed the tree, but it didn't work.  Thankfully the bases worked perfectly!)  

Woven through the reel was real film strip.  I bought wide film from www.hollywoodmegastore.com and thin film strip wrapped with gold star wire garland.  The thin film was sent by the guy who sold me the film reels (He generously gave me the film strip because I was using it for the school event.  He even forgot to send it the first time and sent it later!  Isn't that neat??!)

The centerpieces were finished out by using red and gold pics - some with stars.  The pics were trimmed and stuck into holes in the film reel.  We were pleased with the way the centerpieces turned out and so was the other school.

I really enjoyed learning how to make a chocolate mold into a plaster mold.  That opens up many possibilities of creating new things at a lower cost.  I hope that you enjoy knowing this "tip", as well!  And if you need an Oscar mold.....let me know.  I assure you, I won't be making any more plaster Oscars - at least for a very, very long time!
Pin It Now!

Tuesday, June 5, 2012

Fiery Furnace S'More Snack Craft

Posted by Lori:

If you're looking for a VBS or Bible class snack craft for the "Fiery Furnace" Bible story (Daniel 3), this one is GREAT!  I found it online, but can't remember where right now (maybe Danielle's Place??).   For VBS, I bought a small toaster oven so that I could make the snacks in the classroom.  The students thought it was great making them and eating them, of course!

Here's what is needed for each snack:

1 graham cracker square
Approximately 10 chocolate chips
8 small marshmallows
4 Teddy Grahams (leave one off when cooking)

On top of graham cracker square, put the chocolate chips, marshmallows, and 3 Teddy Grahams.  Toast in 350 degree oven for 5 minutes, or until marshmallows are browned.  The Teddy Grahams should not burn......making them just like Shadrach, Meshach, and Abed-Nego in the Fiery Furnace story.

One more person was in the fiery furnace and it looked like an "angel" or a "son of God".  When the s'more is done, remove the snack to a plate and place the 4th Teddy Graham on top.  This is the 4th person from the story (sent by God) and the one who saved the men from being burned. 

Pin It Now!

Sunday, June 3, 2012

Daniel in the Lions' Den Snack

Posted by Lori:
When one of the Vacation Bible School lessons is Daniel in the Lions' Den, you must have a lion snack, right?  Of course!  

Food crafts help create lasting memories of the story in the minds of children, so that is the main reason I like to do them.  The children are always ready for a little snack after the lesson and activities, anyway.

For this lion use the following ingredients:

1 round cracker
Peanut butter ( if allergic, just leave off)
Chow mein noodles (they had a choice of these or pretzel sticks)
Reeses Pieces (or if allergic used chocolate chips)
Chocolate licorice for whiskers and ears

Enjoy!
Pin It Now!

Friday, June 1, 2012

Crustless Quiche

Posted by Donna:

I went for a haircut the other day, and my hairstylist and I started talking about "food." She and her family eat very healthy, but very well. They don't eat bread, potatoes, except sweet occassionally, or sugar (she said they might fudge once in a while and have a little sugar). It's strictly vegetables, lean meat, fish, chicken, and fruit. She also said this quiche is one of their favorites, and that they eat it a couple of times a week.

 I fixed it for Larry and me the next day, and he loved it and kept commenting on it. It's so simple. This is the amount I did for Larry and me.

Crustless Quiche 

1/2 lb. hamburger meat, browned and rinsed to get the grease off
chopped onion
chopped green bell pepper
five eggs
salt and pepper

Brown the meat and rinse under hot water to get the excess grease off. Spread the meat in a greased casserole dish. Layer about a half cup chopped onion on top of the meat--followed by about a half cup of chopped bell pepper. Whisk the eggs and add salt and pepper to the them. Pour on top of the layers.

I added some shredded cheese on top. Bake at 350 degrees for about 25 - 30 minutes.

My hairstylist does hers this way:

1 lb. meat
Enough vegetables to make 2 cups ( onions, green or red bell peppers, chopped spinach, squash, jarred red peppers)
She said she changed it up from time to time with the veggies
7 eggs
Shredded cheese

Larry ate almost the whole dish in one setting. He said he wanted the leftovers for breakfast the next morning. I knew he would like it because of the peppers and onions. Pin It Now!

Chicken Crescent Casserole

Posted by Lori:

I received this recipe from my friend, Renee, yesterday and wanted to share it with you.  Since school is out and VBS is over, I should be baking and cooking new recipes soon - or at least that is my plan!  I've missed it!  My family probably has, too!  

Have a good weekend!

Chicken Crescent Casserole


1 can crescent rolls
2 cups cooked shredded chicken (I used grilled & ready Tyson canned chicken)
10 3/4 oz. cream of chicken soup 
4 oz. cream cheese, softened
4 T. Butter, softened
1 c. whipping cream or half and half
2 pkg cheddar cheese
onion flakes
Salt and Pepper

Combine softened cream cheese, butter, chicken, a dash of onion flakes, and a couple of tablespoons of whipping cream, salt and pepper and half a package of cheese. This is the filling.

Next, on stovetop, combine soup, the other half of of package of cheese and remaining whipping cream. Leave on stovetop until cheese has melted and is warm.

Place a heaping spoonful of chicken mixture in crescent roll and roll up the best you can and place in a greased 9x13. Continue until all crescents are used. If you have extra filling, place it around crescents in the pan. 

Pour the soup mixture over the top covering all the crescents. Top with however much cheese you would like. Bake at 350 for 30 min. Enjoy!

Note from Renee:  "I have also done this with ground beef, and cream of mushroom soup. It was good too!" Pin It Now!
 
Pin It button on image hover