Blog reader, Marsha, sent this wonderful tip for shucking corn:
1. Cut the stem end off about 1 ½ inches and leave husk ON.
2. Put one ear of corn in the microwave and cook for 4 minutes.
3. Take corn out and hold by the top (I call it the furry end) and shake and the corn will fall out almost 100% free of the silk.
4. Adjust if cooking more than one ear at a time.
5. Enjoy!
Thanks, Marsha!
Friday, August 29, 2014
Wednesday, August 27, 2014
Baked Corn
I really don't like to cook food in the microwave. I don't mind heating something quickly, but don't want to nuke my food too long, you know? So, when I bought this corn, I planned to just put it in a pan on the stove. This "experiment" started out to be roasted corn, but maybe it just didn't cook long enough or at a hot enough temperature, but we ended up really, really liking the way it turned out, anyway! So, I thought I would share it with you.
BAKED CORN
2 packages frozen corn (I used Valley Fresh Steamers Extra Sweet Niblets Corn from Green Giant)
6 tablespoons salted butter
1 teaspoon sea salt (can use regular salt)
1/8 teaspoon pepper
Place corn in baking dish. Slice butter into 1/4 inch pieces and place over corn. Sprinkle with salt and pepper. Bake uncovered at 350 degrees for 45-60 minutes (my oven cooks slow, so it took 60). Stir once or twice while baking.
Monday, August 25, 2014
My Ford Pickup
For years and years I had wanted an old Ford pickup. I didn't care about how it looked, whether rusty or painted, but I had a certain style I wanted. THIS STYLE!
(Decorated: "Fair Theme" at night)
Finally I found one, but I thought it cost too much. But then my husband said if he could sell a little tractor he had setting out in the field, I could get the pickup. It sold the next day! In fact, we could have sold 10 of those little tractors! Ha!
(Decorated: "Fair Theme" with flash)
And when my husband went to get the pickup, he was going to offer less on it. The guy told him it was much less than he had told me (man vs. woman thing, I think) and less than what my husband was even going to offer!! YAY!!My whole reason for wanting the pickup was for pictures. Here are most of the girls from my son's Senior class. The girls were so excited to get to take a pic out there with the Seniors 2015 banner! One of them commented that they could take a picture there each month and see how much they grow! Ha ha! I reminded her that they really don't want to "grow" this year :). Maybe she meant "mature"!
Right before our daughter left for college, I realized we hadn't taken any family pictures during the summer. We quickly took a few pictures when we could. The sun was too bright to get closer to the pickup, but they still turned out well! Thank you to our niece-in-law, Marisa, for coming over to snap a few pics on short notice!
I'll be decorating this pickup for fall, and Christmas, and all of the other holidays. I can't wait until it's time for hay bales and pumpkins and corn stalks! I envision lots of family pictures taken here. And others are welcome, too! In fact, it's already been used by the cheerleaders and some of the Seniors for senior pictures! That's exactly what I got it for!
Monday, August 18, 2014
Stir Fry Bowl
One of the boys and my favorite restaurants is Genghis Grill. I have only been there twice, and them only once, but it's so good and fresh, that we really liked it! Plus you can make it just as you like it. The only draw-back is that it's a little expensive....about $10 a person for a bowl. And the portion size it's really big enough to divide and keep half for another meal. But, it's delicious!
I found this sauce packet at Target and decided to do our own "bowls" at home.
Here's how to do it:
Grill onions and peppers in a small amount of oil - sweating them to make them tender and caramelizing the onions (putting a lid on and letting it cook until golden, only stirring occassionally).
Slice partially frozen chicken tenderloins really thin, stir-frying them in with the onions and peppers until done.
Add the sauce, salt, and pepper....serve over rice. Now you have your own "bowl" for a fraction of the chain's cost per bowl!
Friday, August 15, 2014
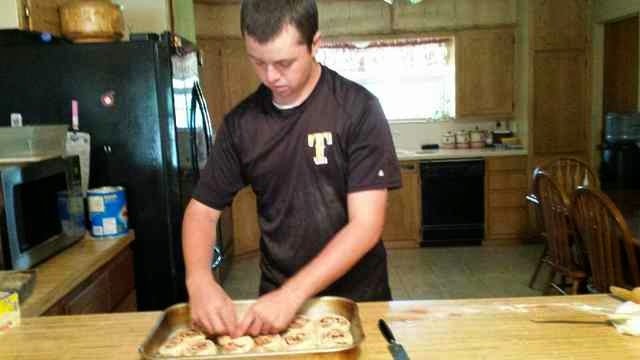
There's a New Cinnamon Roll Maker in the Family
Cinnamon rolls are a big deal on my husband's side of the family. My hisband's grandmother started the tradition many, many years ago - coming up with a bread and roll recipe that's been passed down for decades.
My father-in-law became the hot roll and cinnamon roll maker in the family, continuing to do so for many years before his health declined at the very end of his life. A few have strived to follow in his steps, and come pretty close, but I'm not sure it will ever be a perfect match. I'm certain that his elongated hot roll shape will never be completely replicated. They were special.Our oldest son, Zachary is probably the youngest and only grandchild (that I know of, anyway) who has even attempted the cinnamon roll feat. His grandmother helped instruct him on the bread, then his Uncle Ken helped him learn to roll them up nice and tight.
His first batch was wonderful!!! His second ones were good, too, but we had a pan/fire/smoke/oven/liquid/smoke detector malfunction (you had to be there, but most likely you were in bed when the catastrophe happened. Zachary was in bed, too. I was in charge of baking the cinnamon rolls, but the catastrophe wasn't totally my fault. I blame Zachary for part of it. Moms can do that, right??! :) )so they weren't quite as good! He fed them to his Senior classmates this morning, and they didn't seem to think there was anything "smoky" about them, so that's good!
Thursday, August 14, 2014
Salted Caramel Browned Butter Bars
I made these bars Sunday afternoon for a youth rally. They were sooooo good! Unfortunately, I went to get them after the youth rally was over and they were all gone. Well....maybe that's a good thing! I didn't need them, anyway!
The original recipe is for muffins, stuffing each muffin with two caramels, but I didn't have time to do that and needed a bigger amount of servings. The addition of the whipping cream, plus making them into bars turned out great! If you want to see the original recipe, HERE is the link.
SALTED CARAMEL BROWNED BUTTER BARSThe original recipe is for muffins, stuffing each muffin with two caramels, but I didn't have time to do that and needed a bigger amount of servings. The addition of the whipping cream, plus making them into bars turned out great! If you want to see the original recipe, HERE is the link.
3/4 cup butter
1 cup brown sugar
1 egg
2 teaspoons vanilla extract
2 cups flour
2 teaspoons corn starch
1 teaspoon baking soda
1/2 teaspoon salt
1/2 cup mini chocolate chips
20 caramels candies, unwrapped
3 tablespoons heavy whipping cream
kosher salt, for sprinkling
Melt the butter in a small saucepan over medium heat. Whisk constantly until butter turns a deep golden brown, about 5 minutes. Pour the butter into a mixing bowl. Stir in the brown sugar until well combined. Stir in the egg and vanilla and mix well. Mix in the flour, corn starch, baking soda, and salt until well combined. Pat down half of dough into a jelly roll pan (10.5 x15.5 x 1 or 1/2 sheet pan size)
Melt the caramels with the whipping cream in a saucepan over medium-low heat, stirring often. Pour the melted caramel over the bottom cookie dough.
Sprinkle mini chocolate chips over caramel layer, then sprinkle kosher salt. I used a teaspoon or less, but you may like more!
Pinch off small pieces (about a teaspoon size) and sprinkle over the caramel and chocolate. Pat down some. It may cover most of the chocolate and caramel, but don't worry if it doesn't.
Scoop 1 tablespoon of dough into 10 muffin wells each. Flatten with your fingers to cover the bottom of the muffin tin. Place two caramel candies on top of the cookie dough. Sprinkle with a a bit of kosher salt. Top each with another tablespoon of cookie dough.
Bake at 350 degrees for approximately 30 minutes, or until beginning to brown slightly.
Let cool then cut into bars. (Or eat while warm with a spoon!)
Wednesday, August 13, 2014
Pioneer Woman's Waffles
Guess what? I followed another recipe exactly! I know! I can't believe it, either! What's happening to me??? :)
And, another thing...It's a Pioneer Woman recipe. I may become a PW junkie. No...I don't think so, but I at least have found a few recipes of things that actually sound like I know all of the ingredients and can find in our rural area of Oklahoma.
On a side note, and a little bit of info about the house the Pioneer Woman lives in now. Would you believe that I've actually been there? I stayed in that house (it was a lodge at that time) and my aunt's family owned it and lived in the house on the ranch. She and my uncle were married at her home (not the lodge) and I was the flower girl. I vaguely remember the place, but only that it had pretty green hills (they may have been small bumps, but for this flat land, SW Oklahoma girl, they were hills. Maybe even mountains :). ) Aren't you glad you found out that tidbit of info?
So, the recipe I made was waffles. And I cooked them on a cute little heart-shaped waffle iron! And they really are delicious, even for me, a non-waffle fan. My husband and two of our children really, really like waffles, so they were excited!
PIONEER WOMAN'S WAFFLES
2 cups All-purpose Flour
1 Tablespoon Baking Powder
1/2 teaspoon Salt
1/4 cup Sugar
1-1/2 cup Milk
2 whole Egg Yolks
1 Tablespoon plus 1 teaspoonVanilla Extract
1 stick (1/2 Cup) Salted Butter, Melted
4 whole Egg Whites
Preheat the waffle iron to the regular setting.
Sift together the flour, baking powder, salt, and sugar in a bowl. In a separate bowl, whisk together milk, 2 egg yolks, and vanilla. Pour over the dry ingredients and very gently stir until halfway combined. Pour in the melted butter and continue mixing very gently until combined.
In a separate bowl using mixer, beat the egg whites with a whisk until stiff. Slowly fold them into the batter, stopping short of mixing them all the way through.
Scoop the batter into your waffle iron in batches and cook according to its directions (lean toward being a little deep golden and crisp!) Remove and serve immediately.
Tuesday, August 12, 2014
Onion Strips
This is probably a recipe I never should have tried.....but I did. And my family is glad that I did!
We had eaten Onion Strips at a restaurant in Memphis, TN, called Huey's, so we were all kind of craving them. We were also having cheeseburgers, so it just kind of made sense that we would want these to go along with them.
Some "Pioneer Woman" recipes haven't worked out like I wanted them to, but maybe that's because I don't like following directions. I would rather do my own thing, so rarely follow them. I also get tired of all of the pictures, but some people probably like those to see how to do things. Anyway, this one I did follow! And it was great!
ONION STRIPS (She calls them "straws)
1 whole Large Onion
2 cups Buttermilk
2 cups All-purpose Flour
1 Tablespoon (scant) Salt
1/4 teaspoon (to 1/2 Teaspoon) Cayenne Pepper (I used red pepper)
1 quart (to 2 Quarts) Canola Oil
Black Pepper To Taste
Slice onion very thin. Place in a baking dish and cover with buttermilk and soak for at least an hour.
Combine dry ingredients and set aside.
Heat oil to 375 degrees.
Grab a handful of onions, throw into the flour mixture, tap to shake off excess, and PLUNGE into hot oil. Fry for a few minutes and remove as soon as golden brown.
Repeat until onions are gone.
Sunday, August 10, 2014
Slow Cooker Teriyaki Chicken
This is the last recipe from my sister, but I KNOW that I'll be trying this one soon! It sounds so good and so easy! With school starting, it will be a perfect, quick, and easy meal for busy weeknights. My sister used this for the chicken in the fried rice recipe I posted last week.
This recipe came from therecipecritic.com
SLOW COOKER TERIYAKI CHICKEN
12 boneless skinless chicken thighs (about 3 pounds) (I used 4 boneless skinless chicken breasts)
3/4 cup sugar
3/4 cup soy sauce
6 tablespoons cider vinegar
3/4 teaspoon ground ginger
3/4 teaspoon minced garlic
1/4 teaspoon pepper
4 1/2 teaspoons cornstarch
4 1/2 teaspoons cold water
Hot cooked long grain rice
Place chicken in a 4 qt. slow cooker. In a large bowl, combine the sugar, soy sauce, cider vinegar, ginger, garlic and pepper. Pour over chicken. Cover and cook on low for 4 to 5 hours or until chicken is tender. Remove chicken to a serving platter; keep warm. Skim fat from cooking liquid. Place liquid in a saucepan and bring to a boil. Combine cornstarch and water until smooth. Gradually stir into liquid and stir until sauce is thickened. Serve with chicken and rice.
Thursday, August 7, 2014
Chicken Fried Rice
As I am posting the link for this "Chicken Fried Rice", I'm wishing that I had some of it to eat right now.....at 12:24 A.M.! The protein shake from earlier this afternoon is wearing off! Time to go to bed, I suppose!
My sister sent me this recipe to share with you. I'm only linking it because the actual recipe site has links for a sauce and I didn't want to hunt for it since it is so "early" in the morning. :)
Click HERE for the link.
I'm going to make this very soon....maybe tomorrow!
My sister sent me this recipe to share with you. I'm only linking it because the actual recipe site has links for a sauce and I didn't want to hunt for it since it is so "early" in the morning. :)
Click HERE for the link.
I'm going to make this very soon....maybe tomorrow!
Monday, August 4, 2014
Strawberry Avocado Spinach Salad with Creamy Poppy Seed Dressing
My sister sent me this recipe and said it's really good. I am just now beginning to like avocados, actually, so I'll have to try it! Thanks, Kim!
(Recipe from therecipecritic.com)
INGREDIENTS
6 oz baby spinach
1 cup fresh strawberries, sliced
2 Large avocados, chopped
¼ cup sliced almonds
¼ cup feta cheese
Creamy Poppy Seed dressing:
⅓ cup mayonnaise
¼ cup 2% milk
3 Tablespoons Sugar
4 teaspoons cider vinegar
2 teaspoons poppy seeds
(Recipe from therecipecritic.com)
INGREDIENTS
6 oz baby spinach
1 cup fresh strawberries, sliced
2 Large avocados, chopped
¼ cup sliced almonds
¼ cup feta cheese
Creamy Poppy Seed dressing:
⅓ cup mayonnaise
¼ cup 2% milk
3 Tablespoons Sugar
4 teaspoons cider vinegar
2 teaspoons poppy seeds